I love a cheese board because it lets everyone snack like they planned better than they did. There’s something very “effortless hostess” about it, even when I’m clearly arranging crackers with suspicious focus. A pretty board looks fancy. However, it doesn’t need a catering budget or secret food stylist.
I’ve found that the best boards hit that sweet spot between useful and gorgeous. Not museum gorgeous, though. Nobody wants to stand near appetizers wondering if they’re allowed to touch the salami. That’s a social trap with almonds.
Living in Orlando means I think about warm-weather party food. Crowded counters matter. Late guests matter, too. So, I like a setup that looks fresh but doesn’t require dramatic last-minute fuss. Give me cheese, fruit, crunch, and a little salty bite, and I’m already interested.
I also like food that lets people choose their own bites. That way, nobody needs to ask whether the green thing is spicy. Small mercies count.
This post is for anyone craving charcuterie board aesthetic without a craft project. We’re talking a real diy cheese board with U.S. measurements, easy steps, serving tips, and enough pretty detail to make Pinterest behave itself. And yes, we’re going to make it look intentional. We’re not making it look painfully overworked. The pretty part comes later, but the sneaky little trick starts right at the grocery cart. Really, the goal isn’t fussy food. It’s snack confidence with better lighting.
Some of the links on this page are affiliate links. That means if you click and make a purchase, I may earn a small commission at no extra cost to you. If you’re curious about the fine print, you can check out my full disclosure.
The Cheese Board Mood Starts Before The First Cracker
A good cheese board starts with one tiny mindset shift. It’s not about buying the most expensive cheese at the store. Instead, it’s about making everything look like it belongs together. That sounds obvious, but it saves money, counter space, and party stress.
I tend to notice boards go wrong when they try to include everything. Three cheeses can look better than seven when the board has balance. More isn’t always more. Sometimes more is just dairy traffic with crackers.
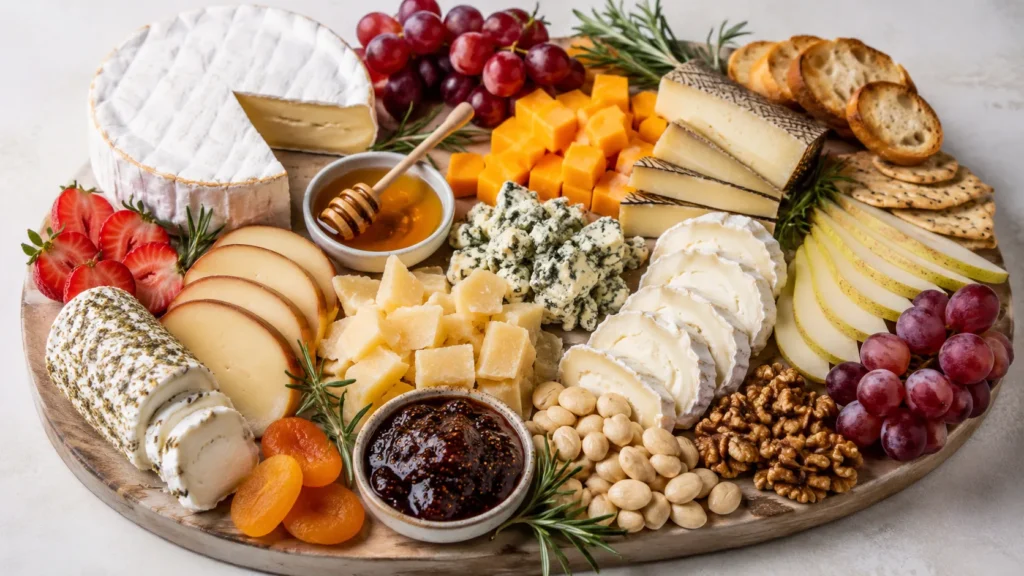
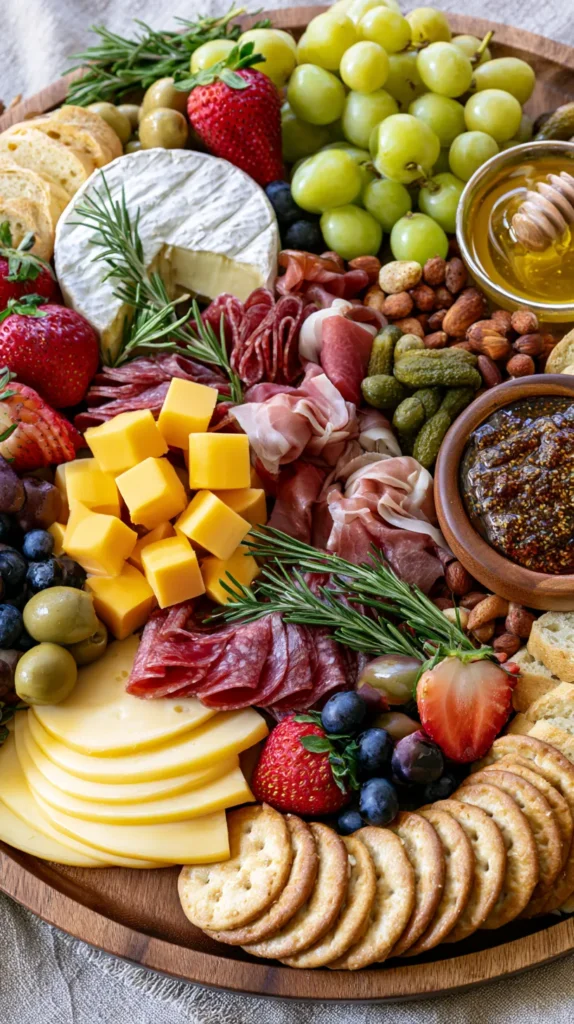
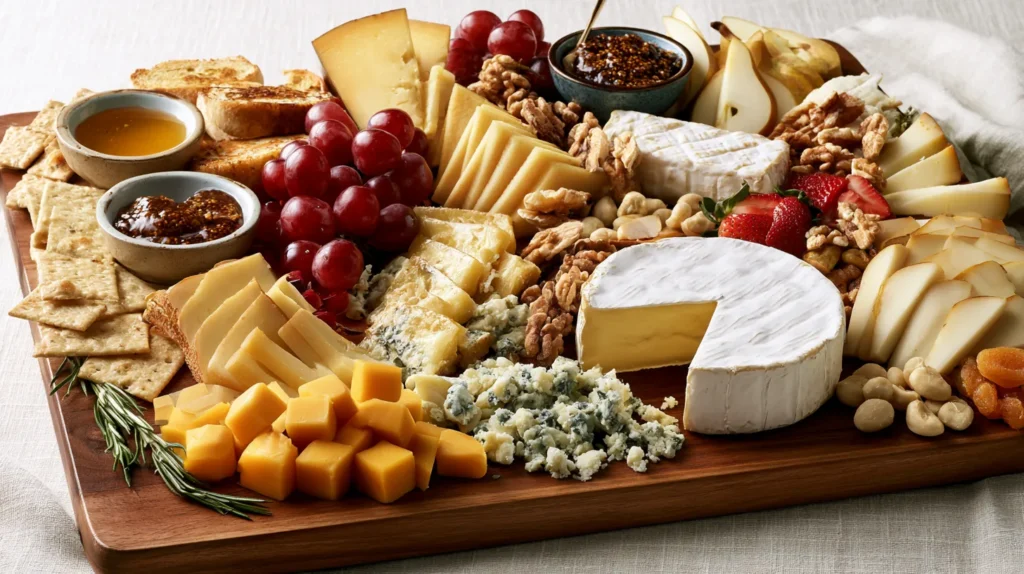
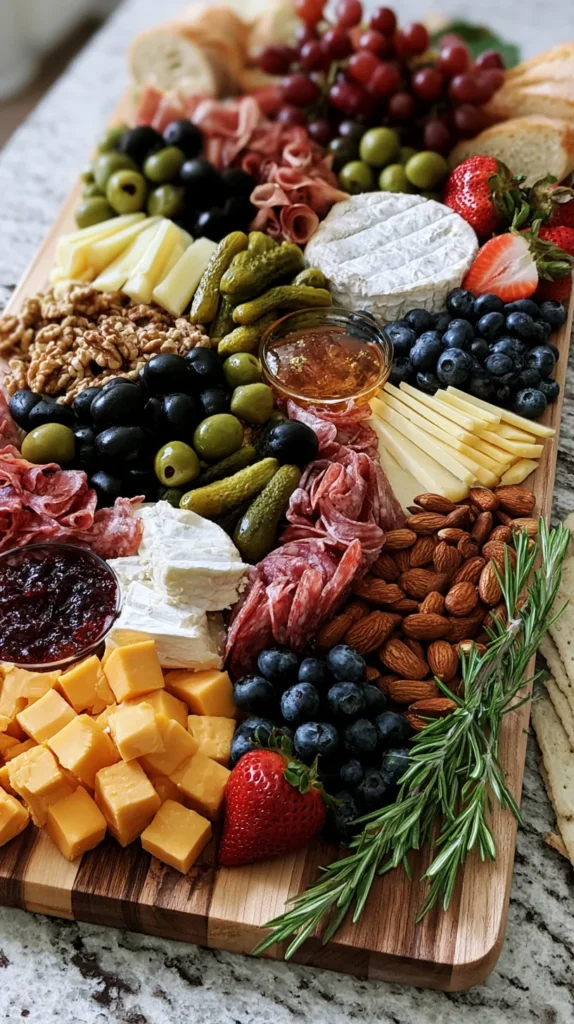
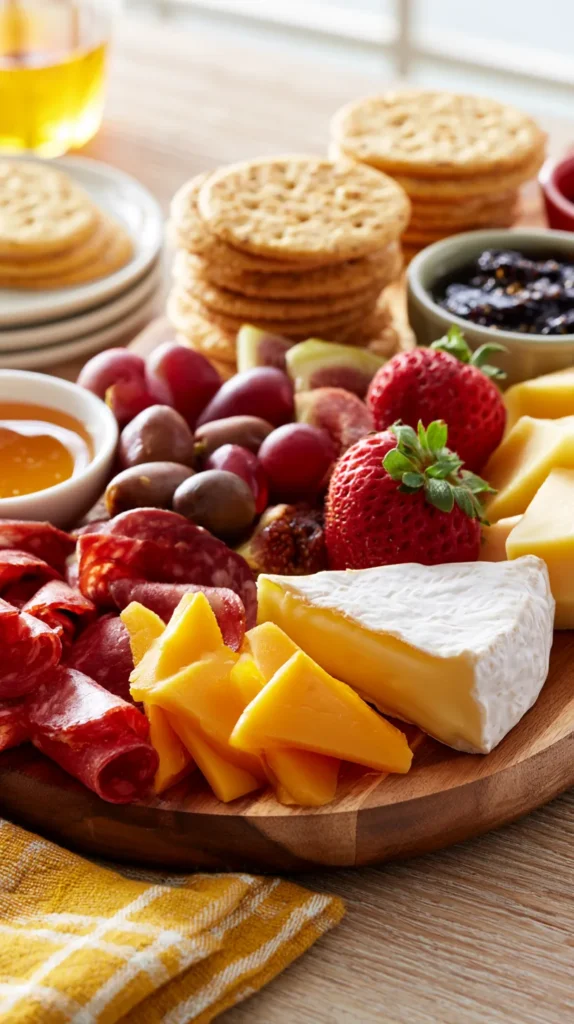
For a pretty cheese board aesthetic, I like to think in groups. You need something creamy, something firm, something salty, something sweet, and something crunchy. After that, the extras add personality. And yes, olives count as personality. Strong personality, but still.
The board itself matters less than people think. A wooden cutting board, white platter, tray, or rimmed baking sheet can work. The trick is filling the space well. You don’t need a board from a lifestyle store. If your tray has edges, even better. It keeps grapes from making a run for it.
Here’s the part people miss: empty space can make a board look unfinished. However, packed space can make it look generous. That doesn’t mean chaotic. It means snug, layered, and cozy without becoming a snack landslide.
So, before buying anything, pick the mood. Rustic picnic? Soft bridal shower? Casual Friday night? Once the mood clicks, every choice gets easier. That’s where charcuterie board inspo stops looking random and starts looking useful. Better yet, it keeps you from buying six spreads nobody opens. That alone can save a cart from becoming a dairy treasure hunt.
Cheese Board Ingredients For A Pretty, Simple Spread
This cheese board recipe serves 6 to 8 people as an appetizer. If you’re serving it as dinner grazing, plan closer to 4 to 5 people. I know, rude. People hover near cheese with commitment.
For a charcuterie board simple enough to pull together fast, I like this mix. It looks full without getting silly:
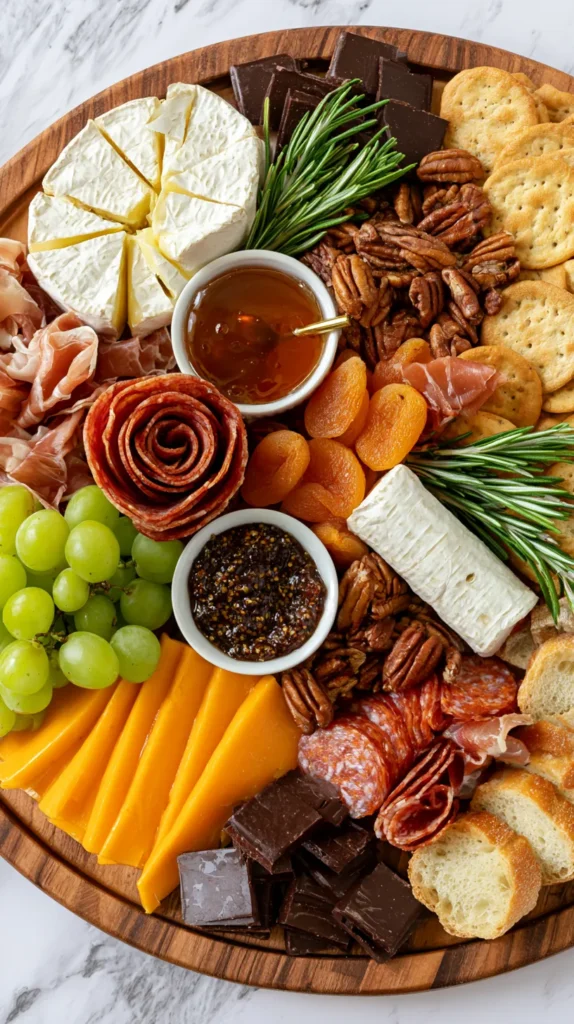
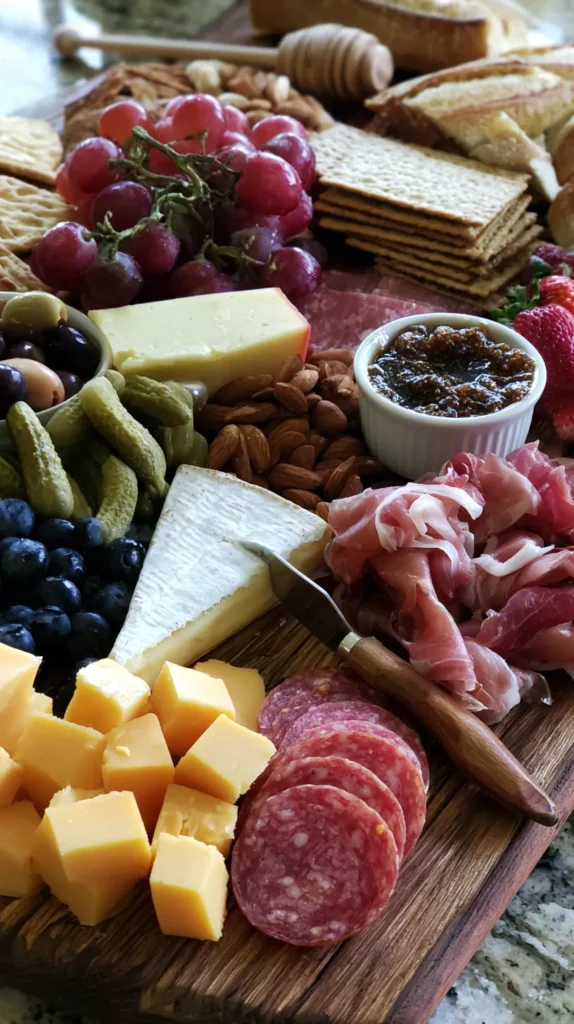
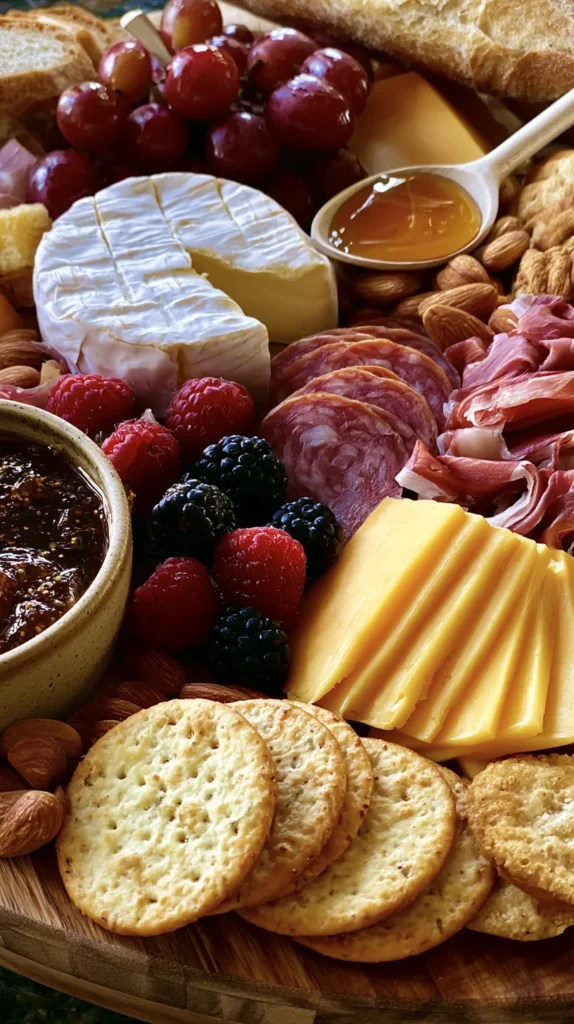
- 8 ounces brie, cut into a wedge
- 6 ounces sharp cheddar, sliced or cubed
- 6 ounces smoked gouda, sliced
- 4 ounces goat cheese or garlic herb spread
- 4 ounces salami, folded
- 4 ounces prosciutto, loosely gathered
- 1 cup red or green grapes
- 1 cup strawberries or blueberries
- 1/2 cup olives
- 1/2 cup cornichons or small pickles
- 1/3 cup almonds, walnuts, or pecans
- 1/4 cup honey, fig jam, or pepper jelly
- 2 cups assorted crackers
- 1 small sliced baguette
- Fresh rosemary, thyme, or basil for garnish
- Optional: dark chocolate squares or dried apricots
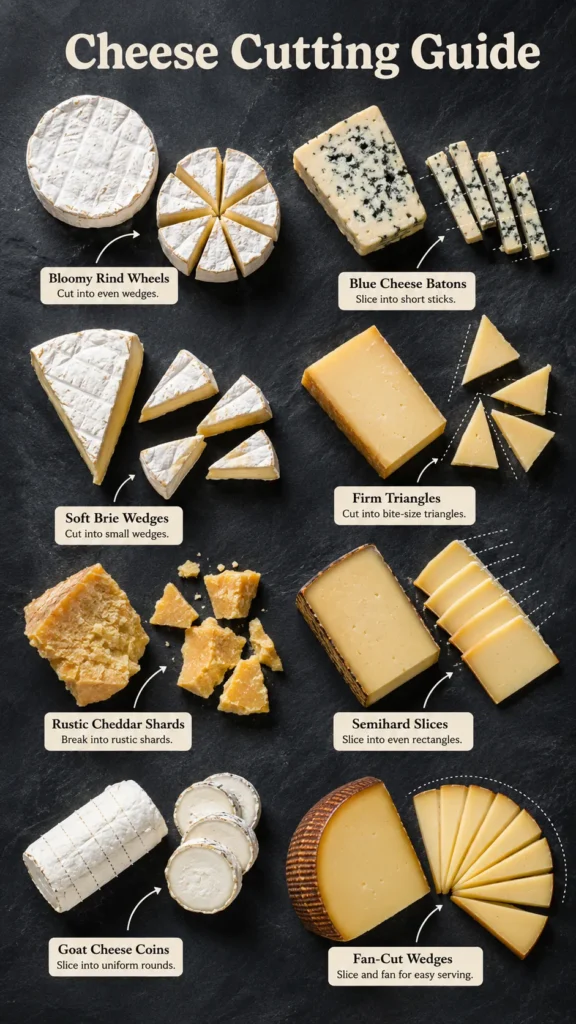
I’ve found that three cheeses give the best mix without making the board too crowded. Brie gives the soft creamy moment. Cheddar adds the classic bite. Gouda brings a smoky note that works with fruit, crackers, and meat.
However, don’t let fancy cheese names boss you around. Store-brand cheese works beautifully when you slice it well and group it with care. That’s the secret behind many small cheese board ideas. The styling does heavy lifting, and nobody needs to know the cheddar was on sale.
If you want a cheese platter board for a larger party, double the crackers and fruit first. Then add more cheese if the board still looks thin. For a smaller night, cut everything in half and use a dinner plate. Cute, calm, done.
The Shape Trick That Makes Everything Look Expensive
The fastest way to make a board look expensive is simple. Stop lining everything up. Straight rows can look neat, but they often look flat. A board needs movement. Not chaos. Just a little curve, a little stack, and a little “oh, this person knows things.”
Start with the biggest items first. Place the brie wedge, cheddar pile, gouda slices, and small bowl of jam in different areas. That creates anchor points. Then build around them in loose waves. The board suddenly looks styled, even before the crackers arrive.
I like odd numbers because they look more natural. Three cheese zones look better than two. Five fruit clusters look prettier than four. Again, this isn’t math class. It’s snack geometry, which feels more useful.
For a strong charcuterie board aesthetic, repeat colors in different spots. Put grapes on one side, then add a smaller grape cluster across the board. Place berries near the brie, then repeat them near crackers. The eye moves around instead of stopping at one loud corner.
Here’s the tiny twist: cut some cheese and leave some whole. Cubes look casual. Slices look polished. A whole wedge looks generous. Together, they create that layered cheeseboard platter ideas look people save without knowing why. The same trick works for fruit, too. Keep some loose and some clustered.
Also, don’t fear overlap. Crackers can tuck under cheese. Salami can lean into fruit. Nuts can fill gaps. Overlap makes the board look full. Separate piles can make it look like a grocery haul waiting for direction. See? Fancy was mostly placement wearing better shoes. Small shifts matter.

How To Build A Cheese Board Without Overthinking It
I use this process because it keeps the board pretty and sane. However, I’m not precious about it. If something shifts, just nudge it back and keep going. We’re not assembling office furniture.
Use a board around 12 by 16 inches for this recipe. A round board around 14 inches also works. Add parchment first if your board needs protection.
- Place small bowls first. Add honey, jam, olives, or pickles.
- Next, add the cheeses. Spread them around the board, not in one corner.
- Fold or gather the meats. Tuck them near firm cheeses and crackers.
- Add fruit in clusters. Keep grapes on the stem if they look pretty.
- Place crackers and baguette slices in curved lines.
- Fill small gaps with nuts, dried fruit, chocolate, or herbs.
- Add knives, spoons, and toothpicks before serving.
- Chill the board without crackers if you prep early.
- Add crackers 10 minutes before serving so they stay crisp.
I like this order because it creates structure fast. Once the big pieces land, the little pieces have a place. That sounds dramatic, but it helps.
For a diy cheese board, plan about 2 ounces of cheese per person as an appetizer. Plan 3 to 4 ounces per person if it’s the main snack. Add more crackers than you think, because crackers vanish first. Every time.
The best part? A slightly imperfect board often looks better. The goal is abundant, not airbrushed. A board that looks too perfect can make guests hesitate. Nobody needs shy crackers at a party. Put the board down, add the knife, and let people enjoy it. Simple wins here.
Small Boards That Still Look Like A Whole Moment
Small boards deserve more respect. I said it. A giant grazing table can look gorgeous. Still, most people need something for a kitchen island or coffee table. Smaller boards can look polished because every inch has a job.
For small cheese board ideas, use fewer ingredients with stronger contrast. Pick two cheeses instead of four. Choose one meat, one fruit, one crunchy item, and one spread. That small cast can still bring plenty of charm without turning the board into a puzzle.
I’ve found that mini boards work best when they have height. Stack crackers upright. Use a tiny bowl for jam. Leave grapes on a little stem. Fold salami into quarters and tuck it tightly near cheese. Height makes a small board look styled instead of sparse.
A small board also helps when you want budget control. You can buy one nice cheese and one basic cheese, then let fruit and crackers stretch the look. This matters because cheese boards ideas can get expensive fast. The “maybe one more thing” mood sneaks in.
Here’s a surprisingly good opinion: skip the huge variety on a small board. Variety can look messy when space runs out. Instead, repeat ingredients in two or three spots. That makes the board look full and calm.
If you’re serving two to four people, use a dinner plate, pie dish, or small cutting board. Add a cheese knife and one tiny spoon, and suddenly it looks intentional. The plate didn’t change. Styling changed the whole mood. That tiny shift is why small can still look like a full party plan. It photographs better, too.
Grazing Board Ideas That Make Serving Easier
Serving matters because nobody wants to wrestle with brie while holding a drink. A pretty board should invite people in without making them perform surgery. So, I like to do a few things before anyone arrives.
These grazing board ideas keep things easy and pretty. The tiny setup choices matter:
- Slice hard cheeses before serving, but leave a few pieces stacked nearby.
- Cut brie partly through, so guests can take some without panic.
- Put sticky spreads in bowls instead of directly on the board.
- Offer two knives if soft cheese and jam sit far apart.
- Keep wet items, like olives and pickles, away from crackers.
- Add small plates or napkins close to the board.
- Place extra crackers nearby in a bowl, not on the main board.
- Refresh fruit if the board sits out for a while.
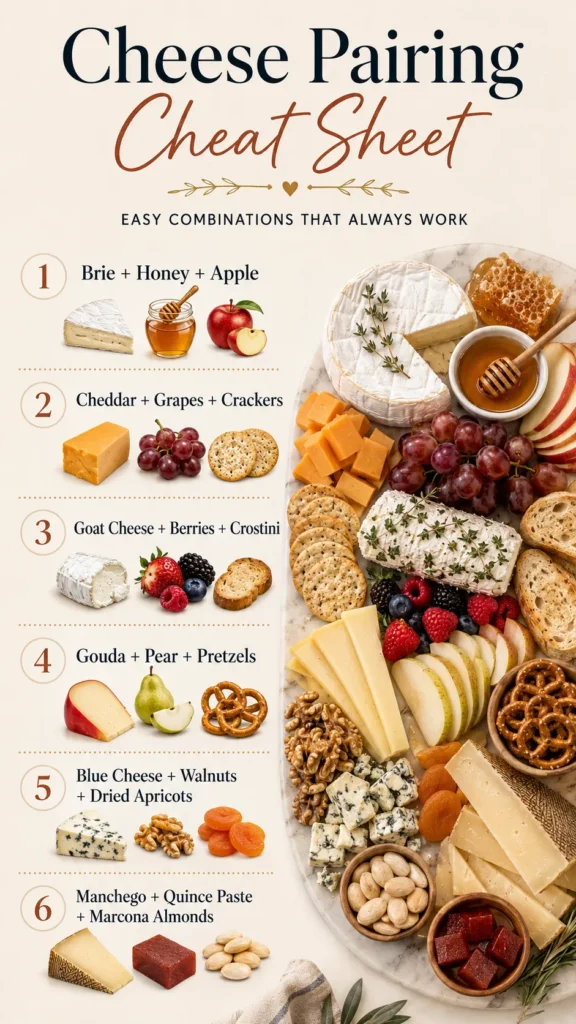
I also like serving mild items next to bold ones. Cheddar works near salami. Brie works near fruit. Gouda works near pickles or nuts. However, there’s no need to chase perfect pairings like we’re auditioning for a food network panel.
Here’s the practical bit people forget: temperature changes texture. Take cheese out about 30 minutes before serving. Don’t leave meats sitting out for hours, especially at warm parties. If the event runs long, put out smaller amounts and refill.
For serving suggestions, pair this board with sparkling water, lemonade, iced tea, wine, mocktails, or margaritas. Since I enjoy easy party food, I like this cheese board beside soup, salad, pasta, or grilled chicken. Pizza nights work, too. It fills the gaps beautifully, and nobody complains about a dinner table with extra crackers. Easy wins again. A refill bowl helps, too.
Cheese Board Aesthetic Mistakes I’d Avoid
The biggest aesthetic mistake is using too many beige foods. Crackers, bread, nuts, and cheese can blend together fast. Beige has its place, of course. But an all-beige board can look sleepy, and sleepy snacks rarely get saved.
Color fixes that problem quickly. Add grapes, berries, herbs, pickles, olives, or dried apricots. You don’t need all of them. A little contrast can make the cheese board look fresh. Even one green detail can do a shocking amount of work. That tiny color pop can make budget ingredients look planned. Suddenly, the whole board looks brighter.
Another mistake is hiding the good stuff. If you buy beautiful brie or a fun jam, give it space. Don’t bury it under crackers like it owes someone money. Place special items where people can see them, then tuck simple items around them.
I’d also avoid making every item the same size. Tiny cubes, tiny crackers, tiny grapes, tiny nuts. Cute, but flat. Mix wedges, slices, folds, clusters, and bowls. The board needs shape changes so the eye doesn’t get bored.
Now for the reframe: a cheese board doesn’t need to look restaurant-level to look beautiful. In fact, a little looseness makes it more welcoming. Guests understand a board they can eat from. They get nervous around boards that look like edible wallpaper.
If you want better photos, place the board near natural light and clear the background. Then shoot from above and at a slight angle. That gives you two Pinterest-friendly views without moving every almond. Bless that little shortcut. Pretty should still be practical, or it starts acting suspicious. Tiny choices matter here.
FAQs For Nervous Snack People
A few cheese board questions come up almost every time. They’re worth answering before the crackers open. Also, nervous snack people are my people. We like details, but we don’t need a clipboard.
- How far ahead can I make a cheese board? You can arrange cheese, meats, bowls, fruit, and pickles up to 4 hours ahead. Cover the board and refrigerate it. Add crackers, bread, nuts, and herbs right before serving.
- How much cheese do I need per person? Plan 2 ounces per person for appetizers. Plan 3 to 4 ounces per person when the board replaces a meal. However, add extra crackers because people always reach for them.
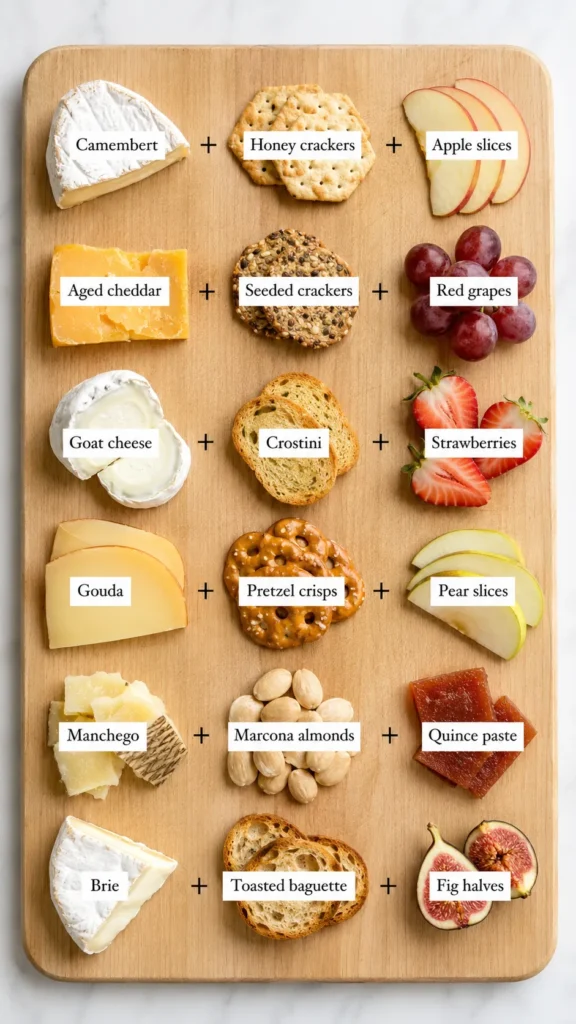
- What cheeses work best together? Choose one soft cheese, one firm cheese, and one bold or smoky cheese. Brie, cheddar, and gouda make an easy trio. Goat cheese, havarti, and manchego also work well.
- Can I make this without meat? Yes, and it can still look gorgeous. Add more nuts, fruit, pickles, roasted chickpeas, hummus, or extra cheese. A vegetarian board can still have great texture.
- What can I use instead of a board? Use a platter, tray, baking sheet, dinner plate, or shallow basket lined with parchment. A cheese platter board does not need to come from a fancy kitchen store.
- How do I keep crackers from getting soggy? Keep crackers away from wet items. Add them right before serving. Also, place extras in a side bowl for easy refills.
- What’s the easiest theme for beginners? Try a farmhouse-style board with cheddar, brie, grapes, salami, crackers, jam, and nuts. It gives that classic charcuterie board simple look without much fuss.
A Pretty Board Is Really Just A Tiny Party Plan
I’ve found that a cheese board works because it gives people something easy to gather around. It doesn’t ask for a seating chart. Nor does it demand a perfect menu. Instead, it gives everyone a reason to drift toward the same spot. Then they can pretend they’re “just grabbing one more cracker.”
That’s why I like boards for parties, holidays, girls’ nights, book clubs, and random weekends. They can lean fancy or casual without changing the whole plan. Add flowers nearby, and it looks bridal shower ready. With pizza and paper plates, it becomes movie night food with better lighting.
As a mom, I also appreciate food that doesn’t require me to time twelve hot things at once. A board lets me prep, arrange, and move on with my life. That alone deserves a tiny kitchen trophy.
Pinterest loves a pretty spread, but real people love one they can eat without confusion. That’s the sweet spot. Pretty enough to save, simple enough to serve, and flexible enough to match the day.
So, when I think about cheese board ideas, I don’t think about perfection. I think about color, texture, and whether people can grab what they want. Because if guests wonder whether they can eat the almonds, we’ve gone too far.
Give me a board that looks generous, tastes balanced, and survives real humans standing around it. That’s the kind of party pretty that earns its place. No crown required.