Some parties just need that one thing that makes people stop and stare. For me, that thing is a grazing table. It’s the kind of setup that looks impressive but doesn’t require culinary school.
I’ve found that people light up when food feels abundant and inviting. Nobody wants stiff trays passed around the room. Guests want to wander, snack, chat, and go back for more. A grazing table makes that easy. It feels generous without being fussy.
Here’s what I tend to notice. The prettiest spreads are rarely complicated. They’re layered, relaxed, and full of color. Cheese beside fruit. Crackers tucked into corners. A little sweet next to something salty. It looks thoughtful but never uptight.
Living in Orlando, I see party ideas everywhere, especially during busy event seasons. Outdoor gatherings practically beg for something this flexible and social. Heat, humidity, and casual vibes all work in its favor.
Still, I get why it can feel intimidating. Big boards and long tables can look expensive online. Social media sometimes makes it seem over-the-top or out of reach. That’s not the reality. You don’t need rare ingredients or fancy tools.
Instead, you need a plan that keeps it simple. You need balance, not perfection. You need confidence more than anything else.
Once you understand the basics, it becomes surprisingly fun. And honestly, there’s a little strategy behind that effortless look.

This site contains affiliate links; please take a look at the disclosure for more information.
What Is a Grazing Table, Really?
Let’s clear something up right away.
A grazing table is not just a giant charcuterie board. It looks similar, yes. But the vibe is different.
A charcuterie board sits politely in the middle of the table. Meanwhile, a grazing table takes over the entire space. Instead of staying contained, it invites people in and encourages movement. Food spreads outward, creating layers and texture. The result feels abundant without ever tipping into formal.
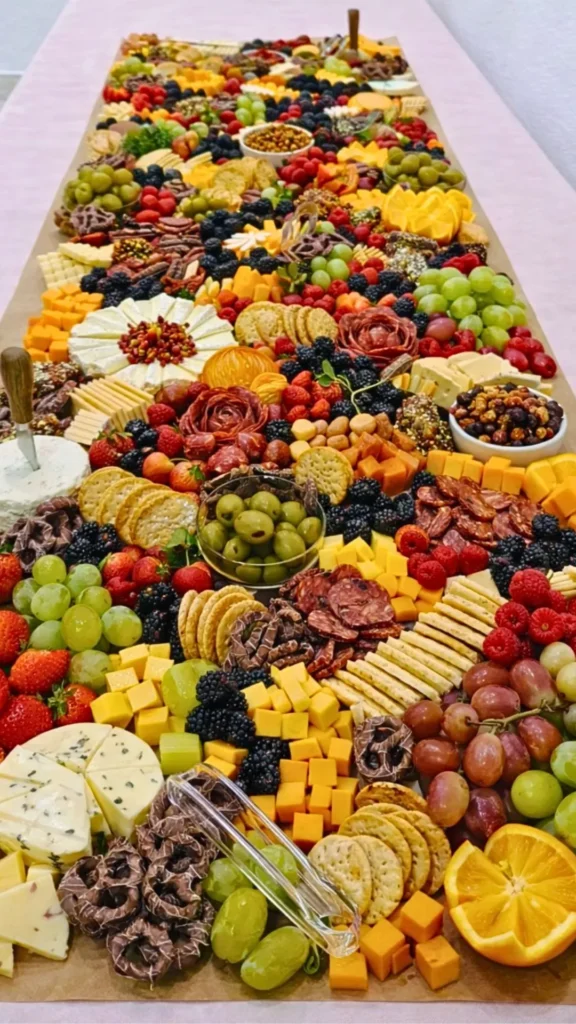
Here’s the simple version. It’s a curated spread of cheeses, meats, fruit, crackers, dips, and little extras arranged directly on a table surface. No plated courses. No assigned seats. Just movement.
And that’s the part people underestimate.
It’s less about the food and more about the flow.
Instead of everyone waiting for a plate to arrive, guests wander. They chat. They circle back for more. The grazing table becomes interactive without needing instructions.
You might be thinking, “So it’s just snacks?” Not exactly.
Done well, it can replace a full meal. Done casually, it becomes an appetizer moment. The structure stays the same. The intention shifts.
Typical grazing table elements look like this:
- A mix of cheeses, soft and firm
- Folded cured meats
- Fresh fruit and maybe dried fruit
- Crackers and sliced bread
- Nuts, olives, pickled bites
- Something sweet tucked in
Notice there’s no strict rule book. That’s intentional.
Here’s the reframe. It’s not about piling food randomly. It’s about creating layers that feel generous and welcoming.
And once you see it that way, the concept stops feeling fancy. It starts feeling doable.
Which is exactly why it works so well.
Setting Up
Let’s talk about the part nobody photographs first. The table itself.
I know it’s tempting to jump straight to cheese and berries. But your grazing table only looks effortless if the base makes sense. Otherwise, it turns into a crowded snack pile.
Bigger isn’t always better. That might surprise you. A smaller table with intention beats a long one with empty gaps.
Start with something sturdy. Wobbly tables and stacked platters are not friends. If space feels tight, raise items instead of expanding outward. Cake stands. Wooden crates. Even flipped bowls under boards. Height creates drama without extra food.
And here’s a quiet shift in thinking. You’re not decorating a table. You’re building a landscape.
That mental switch changes everything.
Cover the surface with butcher paper or a neutral cloth. I prefer butcher paper because it feels relaxed and unfussy. Plus, cleanup is simple. However, a linen tablecloth works if you want softness.
Now a small but powerful move. Add texture before food touches the table.
- A few loose herb sprigs
- Lemon leaves
- Eucalyptus tucked in corners
- Small bowls placed first as anchors
Notice what I didn’t say. You don’t need elaborate floral installations. Most grazing table setups look better when restraint leads the way.
Here’s something people don’t expect. Empty space is not your enemy. It gives the eye a place to rest. When everything touches, nothing stands out.
If you’re thinking, “But mine won’t look Pinterest-worthy,” slow down. The foundation does most of the work. Once the base feels grounded, the food almost arranges itself.
And that’s where it starts getting fun.

Choosing the Right Foods
Here’s where people overthink it. They assume a grazing table needs rare cheeses and imported olives. It doesn’t.
Variety matters more than price. Contrast matters more than trend.
I’ve found that balance creates that “wow” moment, not extravagance. Start with a mix of cheeses and meats, yes. But don’t just grab three random wedges and call it done. Think in opposites.
Soft next to firm. Sharp beside creamy. Salty beside mild.
For example:
- Brie or goat cheese for softness
- A sharp cheddar for bite
- Salami for spice
- Prosciutto for silkiness
Notice what’s happening? Texture starts telling the story before taste even joins in.
Now let’s reset for a second. Fruit isn’t just decoration. It’s strategy.
Grapes and berries add sweetness, but they also create breathing room visually. Sliced apples bring freshness. Even dried apricots can anchor a section of your grazing table with color and chew.
Veggies deserve more credit too. Cherry tomatoes and cucumbers keep things light. Carrots add crunch. Pair them with hummus or ranch, but keep dips contained in small bowls. Otherwise, chaos.
Carbs are non-negotiable. Crackers and sliced baguettes carry everything else. Mix shapes and sizes so guests don’t compete for one option. Add nuts for crunch. Tuck in chocolate or a drizzle of honey for a surprise.
Here’s the assumption I’d gently challenge. Bigger selection doesn’t always mean better experience. Too many choices can overwhelm people. A thoughtful, edited grazing table feels intentional.
And once that balance clicks, you’ll notice something. Guests don’t just eat. They linger.
Arranging the Grazing Table So It Looks Effortless
Alright. You’ve got the food. Now comes the part that makes people nervous.
Arranging a grazing table sounds artistic. It’s not. It’s strategic pretending-to-be-casual.
Start with your anchors. Big cheeses. Bowls of dip. A dramatic bunch of grapes. Place those first so the table has weight. Otherwise, everything floats around like snack confetti.
Here’s the twist. Perfect symmetry actually ruins a grazing table.
I know. That feels wrong.
Instead of lining things up, cluster them. Let edges overlap. Tuck salami slightly under cheese. Let crackers lean instead of sitting stiffly. Abundance feels welcoming. Precision feels catered.
Quick reset. If you’re staring at the table thinking it looks messy, that’s probably a good sign.
Now fill the gaps:
- Fold meats into loose ribbons
- Slide berries into small spaces
- Scatter nuts in little pockets
- Break cracker lines into sections
Notice how I said break? Long, straight lines make the spread look staged. Movement makes it look generous.
Height matters more than people think. Add a cake stand. Flip a small bowl upside down under a board. Elevation adds drama without adding food. That’s the quiet trick no one explains.
Here’s the assumption I’d rethink. You don’t need to place every item before guests arrive. A grazing table can evolve. Refill casually. Adjust quietly. That movement makes it feel alive.
And one more thing. Step back. Actually walk away and return. You’ll see balance instantly.
When the layout feels layered and relaxed, you’ll notice something shift. It stops looking like snacks. It starts looking like an experience.

Step by Step Grazing Table Setup Without the Stress
Okay. Deep breath.
A grazing table sounds like a production, but it’s really a sequence. Once you see the order, it stops feeling overwhelming and starts feeling doable.
First, gather what you need. Not everything in your kitchen. Just the essentials.
Materials for your grazing table:
- A sturdy table or surface
- Butcher paper or a neutral tablecloth
- Boards, platters, and small bowls
- Cheese knives and small tongs
- Small plates and napkins
- Optional greenery like rosemary or eucalyptus
That’s it. No specialty store required.
Now let’s talk food. Keep categories simple so your grazing table stays balanced:
Cheese: soft, hard, and one bold option
Meat: salami, prosciutto, maybe chorizo
Fresh: grapes, berries, sliced apples
Crunch: crackers, baguette slices
Bright: olives or pickled onions
Creamy: hummus or tzatziki
Sweet: dark chocolate or fig jam
Extra: nuts scattered in small clusters
Notice something? You’re building in layers, not tossing items randomly.
Here’s the order that makes it click:
- Cover the table. Clean base first.
- Place large cheeses and dip bowls as anchors.
- Add platters around them for structure.
- Fold meats into loose ribbons near cheese.
- Tuck fruit and vegetables into open spaces.
- Stack crackers and bread in sections.
- Scatter nuts and sweets to fill gaps.
- Add small bowls of jam or chutney last.
Pause for a second. It doesn’t have to look perfect.
Most people assume they need to finish everything before guests arrive. You don’t. Refill casually as the night moves.
Step back at the end. Adjust lightly. Place utensils where hands naturally reach.
And suddenly, what looked complicated now looks intentional.

Grazing Table Tips That Make the Whole Thing Work
Here’s the part nobody posts about. Logistics.
A grazing table can look stunning, but if guests can’t reach things easily, it turns awkward fast. Access matters more than aesthetics.
Place serving tools where hands naturally go. Cheese knives near cheese. Small tongs near meats. Tiny spoons in dips. That sounds obvious, but I’ve seen spreads where guests hesitate because they don’t know what to grab.
And hesitation kills momentum.
Add more utensils than you think you need. Someone always sets one down in the wrong place. Suddenly two cheeses share one knife. Not ideal.
Small plates and napkins should sit at the beginning of the flow, not the end. Otherwise, people hover, juggling food. If you want mingling, remove friction.
Here’s something people don’t consider. Traffic patterns.
If the grazing table is the main meal, center it. Let it anchor the room. However, if it’s just an appetizer moment, tuck it slightly off to the side. That way conversations keep moving.
Quick reset. Watch how people enter the space. That’s where your grazing table energy should start.
I tend to notice that one-sided access creates bottlenecks. If possible, allow guests to approach from multiple angles. That single shift changes the entire experience.
Also, don’t overload the table at once. Start full but leave room to replenish. Refilling feels intentional, not chaotic.
Here’s the reframe. The goal isn’t just to feed people. It’s to keep the vibe relaxed.
When guests move smoothly, grab easily, and linger comfortably, the grazing table stops being decor. It becomes the heartbeat of the gathering.
Keeping Your Grazing Table Fresh Without Stress
Let’s talk about the quiet worry no one mentions.
What if the grazing table sits too long?
Food safety matters, yes. However, panic isn’t necessary. A little planning solves most of it.
Start by choosing smart items. Hard cheeses last longer than soft ones. Cured meats hold up well. Nuts, crackers, and chocolate are low-maintenance. That mix already buys you time.
Soft cheeses and dairy dips need more thought. Instead of placing everything out at once, use smaller portions. Refill gradually from the kitchen. That way your grazing table always looks abundant without sitting exposed for hours.
Here’s a small shift that changes everything. Think in waves, not one giant reveal.
Place perishable items on trays you can swap easily. Keep backups chilled and ready. When a bowl runs low, quietly replace it. Guests rarely notice the switch. They only notice the fullness.
Pause for a second. You don’t need to keep every item cold the entire night. You just need a refresh rhythm.
I tend to notice that hosts assume everything must be displayed at once. It doesn’t. In fact, rotating items keeps the grazing table visually interesting. A new fruit appears. A different dip replaces the first. Suddenly the spread feels dynamic.
Another practical move? Avoid direct sunlight and heat vents. Orlando humidity has taught me that heat changes everything quickly. Shade helps more than fancy cooling trays.
Here’s the reframe. Fresh doesn’t mean constant refrigeration. Fresh means attentive.
When you plan for replenishing instead of perfection, the grazing table stays inviting all evening.
Adding Personal Touches to Your Grazing Table
Here’s where it gets fun.
A grazing table doesn’t have to look like everyone else’s. In fact, I think it shouldn’t. This is the moment where your personality quietly shows up.
Start with the theme, but keep it subtle. Summer party? Add watermelon cubes and strawberries. Fall gathering? Maybe figs and darker grapes. Seasonal shifts change the whole mood without changing the structure of your grazing table.
Quick thought. You don’t need custom décor to make it personal.
Instead, layer in small details that reflect your taste:
- A favorite local honey
- A jam you actually love
- Crackers from a brand you swear by
- A family-style dip recipe you trust
Notice what’s happening? The table stops being generic and starts telling a story.
Here’s something people don’t expect. Simpler often feels more thoughtful. A few intentional swaps beat a dozen random extras.
Labels can add charm too. Small chalkboard tags or handwritten cards make guests smile. They also remove guesswork, especially with unique cheeses or dips. That tiny detail changes the comfort level instantly.
Pause for a second. Personal doesn’t mean complicated.
Living in Orlando, I’ve seen plenty of over-the-top event spreads. However, the ones people talk about later usually have one small, memorable detail. Not extravagance. Intention.
Here’s the reframe. Your grazing table doesn’t need to impress strangers online. It needs to feel like you.
When you add those quiet personal touches, guests notice. They linger a little longer. And suddenly, the table feels less staged and more welcoming.
Grazing Table Ideas for Different Occasions
Here’s the part I love most.
A grazing table can change personalities without changing structure. Same concept. Different mood. That’s the magic of it.
Holiday gathering? Lean into comfort. Add cranberry sauce, spiced nuts, maybe a cheese cut into a festive shape. Suddenly the grazing table looks seasonal without screaming theme park.
Summer party feels different. Lighten it up. Think fresh fruit, cold cuts, cucumber slices, maybe a chilled pasta salad tucked in a bowl. Heat changes appetite, so keep things bright and easy.
Pause for a second. You don’t need to reinvent the table every time. You’re just adjusting the tone.
Brunch deserves its own twist. Mini pancakes stacked in little piles. Bagel slices with cream cheese. Yogurt in small cups with granola sprinkled on top. That kind of grazing table surprises people because they expect savory only.
Now here’s a surprising opinion. Elegant doesn’t mean complicated.
For a more upscale event, swap basics for elevated versions. Smoked salmon instead of salami. Gourmet cheeses instead of standard cheddar. A few olives and pickled vegetables add depth quickly. You don’t need twenty upgrades. Two or three make the point.
Living in Orlando, I’ve seen how event seasons shift fast. Outdoor summer spreads look nothing like winter holiday tables. However, the backbone stays consistent.
Here’s the reframe. The occasion changes the ingredients, not the approach.
Once you understand that, you stop starting from scratch every time. And that’s when hosting starts feeling lighter instead of overwhelming.
Last Thoughts
I used to think a grazing table was something that only other people could pull off. You know, the ones with perfect lighting and slow-motion cheese pulls on Pinterest.
Then I realized something. It’s not about perfection. It’s about atmosphere.
When I set up a grazing table now, I don’t chase flawless symmetry. I chase ease. I want guests to wander up, grab something, talk, come back, and never feel rushed. That rhythm matters more than the layout.
There’s something generous about it. Food spreads out instead of being portioned out. Choice replaces pressure. Conversation replaces courses.
Living in Orlando has shown me how gatherings can shift quickly from formal to flip-flop casual, especially outdoors. A grazing table handles both without complaint. It works at a backyard birthday or a holiday open house. That flexibility still surprises me.
Here’s what I’ve found. Hosting feels lighter when I stop trying to impress and start trying to welcome. The table becomes part of the mood, not a performance.
Once you build one, the mystery disappears. Suddenly, textures stand out more than trends. Layers start making more sense than rigid recipes. Confidence grows without you even noticing.
That’s the quiet shift.
So the next time you’re planning something, don’t overthink it. Lay the paper down. Place the anchors. Let it build naturally.
Because at the end of the night, people rarely remember the exact cheeses. They remember how easy it felt to gather around the table.
And that’s the whole point.


