Easter food has a funny way of getting very serious, very fast. One minute, there is ham and rolls on the menu. The next minute, somebody wants the table to look cute, too. That is exactly why stuffed crescent roll carrots keep pulling me in. They bring the fun, add a little cheeky charm, and still earn their place next to the real food.
I’ve found that the best holiday recipes make people smile before the first bite. These do that right away. They look like little carrots, but I fill them with creamy egg salad or ham salad, so they do more than sit there and look pretty. I love serving something playful that still helps feed people.
As a mom, I always notice recipes that give the table some personality without turning the kitchen into a full-blown mess. This one does that so well. The ingredient list stays simple, the shape does half the work, and the finished carrots make it look like I tried way harder than I actually did. That kind of Easter cooking math works for me every single time!
This recipe also starts off looking almost too cute to bother with, and then it suddenly makes perfect sense. I roll the dough, wrap it, bake it, and fill it, and somewhere in the middle, it turns from a grocery store shortcut into centerpiece material. That shift is where things get interesting, because a few small choices can change how the whole tray turns out.

Some of the links on this page are affiliate links. That means if you click and make a purchase, I may earn a small commission at no extra cost to you. If you’re curious about the fine print, you can check out my full disclosure.
Set Up For Stuffed Crescent Roll Carrots Before The Dough Comes Out
This recipe goes much smoother when I set up the kitchen before the dough ever hits the counter. I’ve found that stuffed crescent roll carrots are not hard, but they do move fast once I start shaping. That is why I like to get the oven hot, line the pan, and pull out the tools first. A little prep here saves me from a lot of annoying back-and-forth later.
I start by preheating the oven to 400 degrees Fahrenheit. That quick blast of heat helps the dough bake up with better shape and color. If I slide the carrots into an oven that is still warming, the dough can spread too much. Then they stop looking like carrots and start looking like a snack that lost the plot.
A few tools make this process much easier:
- A cutting board
- A pizza cutter or knife
- Six metal cream horn molds
- A pastry brush
- A baking sheet
- Parchment paper or non-stick foil
I also like to mix the egg wash before I do anything else. One egg plus 1 teaspoon of water is all I need. That only takes a minute, but it makes the shaping step move faster later. I do not worry about the filling yet, though I do like to wash the dill or parsley ahead of time so it is ready to go.
This part is not flashy, but it does matter. Once I start rolling dough and wrapping molds, I do not want to stop and hunt for a pastry brush or tear off parchment. When the kitchen is ready first, the whole recipe feels easier, and that is always a win on Easter.
Cut The Dough Evenly So The Carrots Bake The Same Way
This is the point where stuffed crescent roll carrots start looking like an actual plan instead of a cute Easter kitchen experiment. I open one tube of Pillsbury Crescent Recipe Creations Seamless Dough Sheet and lay it flat on a cutting board. That seamless dough makes this much easier. I do not have to fight perforations, patch seams, or talk myself through avoidable nonsense.
Next, I cut the dough lengthwise into 6 even strips. That part matters more than it seems. If one strip runs wider than the others, that carrot will bake thicker and feel heavier. Then another one will brown too fast, and suddenly the tray looks uneven in a very annoying way.
Before I roll anything, I brush each strip lightly with egg wash. I only use a thin coat here. Too much makes the dough slippery, and that does not help once I start shaping. A light brush gives the outside a smoother finish and helps the dough look more polished after baking.
Then I roll each strip into a long rope, about 17 to 18 inches. This is where the shape starts coming together. I pinch the seam first, then gently roll with both hands until the dough gets thinner and longer. I do not pull too hard, because torn dough makes the next step more frustrating than it needs to be.
A few small things help a lot here:
- I roll from the center outward
- I keep the thickness as even as I can
- I stop before the dough gets too thin
- I try to make all 6 ropes close in size
That little bit of care pays off later. When the ropes match, the carrots bake more evenly and look much better on the tray.

Wrap Each Dough Rope Around The Mold The Smart Way
This is the step where the recipe starts earning compliments. Once I roll the dough into long ropes, I wrap each one around a metal cream horn mold to create the carrot shape. It sounds a little fancy, but it is really just a slow spiral. I start at the pointed end and work upward, letting the dough overlap slightly as I go.
The biggest thing I watch here is the seam. I try to keep it close to the mold so the dough stays in place while it bakes. That also helps the finished carrots look cleaner once I remove the molds. If the dough feels a little soft, that is completely normal. I do not rush this part, but I also do not keep handling the dough longer than needed.
There is one small mistake that can cause the most trouble later. I make sure the dough does not hang over the open end of the mold. If it does, the baked shell can trap the mold inside, and then removing it becomes way more annoying than it needs to be.
As I finish each one, I place it on the lined baking sheet with a little space around it. That helps keep the carrots from sticking together later. When I can, I set them seam side down, which gives them a better shot at holding their shape.
This is also the moment when the recipe looks slightly ridiculous in the best possible way. Raw dough wrapped on metal molds does not exactly scream Easter magic yet. It looks more like a kitchen craft that may or may not work. Then it bakes, and suddenly the whole thing makes sense.
Color And Bake Stuffed Crescent Roll Carrots Until Golden
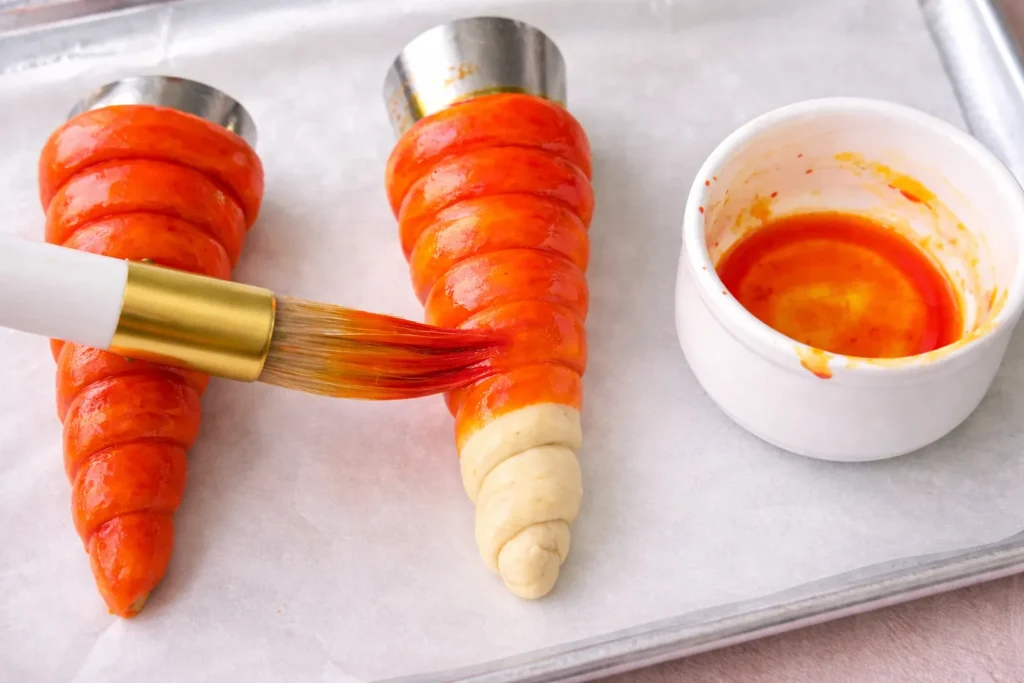
This is the step that gives stuffed crescent roll carrots their full Easter look. Once I wrap the dough around the molds, I brush each one with orange food coloring. That simple step changes them from plain crescent dough into something that actually looks like a carrot on the table. And yes, that bright orange finish is a big part of the fun.
I can use bottled orange food coloring if I have it on hand. If not, I mix yellow and red liquid coloring until I get a true orange shade. I want the color to look right in the bowl before I brush it on the dough. If it leans too red, the baked carrots can look a little off.
There are a few ways I can handle this step:
Brush straight orange coloring over the dough for the boldest carrot look
Use natural orange coloring for a softer finish
Skip the coloring and brush only with egg wash
That last option still works well. The shells bake up golden and pretty, even without the orange finish. They just look less like carrots and more like pastry cones, which is still cute, just in a different way.
Once I finish coloring them, I place the carrots in a 400 degree oven and bake them for 6 to 8 minutes. I watch them closely near the end because the dough can brown fast. I also like to rotate the pan halfway through, since some ovens always brown one side more than the other.
When the shells look lightly golden and set on the outside, I pull them out and let them cool for about 5 minutes. That short wait makes the next step much easier.


Fill And Finish The Carrots Right Before Serving
After a short cooling time, I remove the molds. This part needs a gentle hand. I hold the carrot in one hand, then twist the mold with the other. A slow twist works better than pulling straight out. If one sticks a little, a small wiggle usually does the trick.
Once I remove the molds, I let the crescent shells cool completely before filling them. That step matters more than it seems. Warm shells can soften the filling and make everything look messier. If I want that neat, overfilled carrot look, I need the shells fully cool first.
Then comes the fun part. I fill each carrot with egg salad or ham salad until the filling reaches the opening. I like to mound it just a little over the top because that makes the carrots look fuller and more finished. It also makes the platter look more generous, which never hurts at Easter.
The garnish pulls everything together. I tuck a few sprigs of fresh dill or parsley into the wide end, and suddenly the whole thing looks like an actual carrot. That little green top does a lot of heavy lifting. Without it, the carrots look cute. With it, they look ready for the center of the table.
For the best texture, I fill them close to serving time. I can bake the shells earlier and set them aside, then fill them once the rest of the meal is ready. Leftovers can go into the fridge for up to two days, though they look and taste best on the first day. Still, if a tray of stuffed crescent roll carrots lasts that long, that says a lot.


Egg or Ham Salad Stuffed Crescent Roll Carrots
This is where the cute idea turns into actual lunch. Stuffed crescent roll carrots look playful on the table, but they also do real work. I love recipes like this because they use a short ingredient list and still come out looking like I planned way ahead.
The timing stays very manageable too. Prep takes 37 minutes, bake time is 8 minutes, and the full recipe takes 45 minutes. It makes 8 servings, which works well for Easter brunch, lunch, or a holiday spread with other dishes around it.
The ingredient list stays refreshingly short. I use one tube of Pillsbury Crescent Recipe Creations Seamless Dough Sheet, one egg mixed with 1 teaspoon of water, orange food coloring, 1 ½ cups of egg salad or ham salad, and fresh dill or parsley. That’s the whole lineup. Nothing strange, nothing expensive, and nothing that sends me hunting through three stores.
I start by heating the oven to 400 degrees Fahrenheit. Then I open the dough on a cutting board and slice it lengthwise into 6 even strips. After that, I brush each strip with egg wash, roll it into a long rope, and wrap it around a cream horn mold to create the carrot shape.
Next, I place the shaped dough on a lined baking sheet and brush the outside with orange food coloring. That color is what gives stuffed crescent roll carrots their Easter look. If I want a softer finish, I skip the coloring and use only egg wash.
Then I bake the carrots for 6 to 8 minutes until they turn golden. After a short cooling time, I twist out the molds, let the shells cool completely, and fill them with egg salad or ham salad. A few sprigs of dill or parsley finish the look, and suddenly they go from cute idea to centerpiece material.

Frequently Asked Questions
Can stuffed crescent roll carrots be made ahead of time?
Yes, part of the recipe can be done ahead. The crescent roll shells can be baked earlier in the day and kept at room temperature once fully cooled. The filling should be added closer to serving time so the shells stay crisp and do not get soft.
What is the best filling for stuffed crescent roll carrots?
Egg salad and ham salad both work well. Egg salad gives them a classic Easter look and taste. Ham salad is great too, especially if there is leftover ham from brunch or dinner. A chicken salad filling can work too, but egg salad and ham salad fit the theme best.
Do cream horn molds have to be used?
Yes, they really help create the carrot shape. Without them, the dough will not hold that hollow center needed for the filling. If you plan to make stuffed crescent roll carrots more than once, they are worth buying.
Can regular crescent rolls be used instead of a seamless dough sheet?
Yes, but the seams need to be pinched together first. A seamless dough sheet makes the job easier and gives a smoother finish. If you have regular crescent dough, it can still work just fine with a little extra prep.
Does the orange food coloring change the taste?
No, not in any noticeable way. It mainly changes the look. If you would rather skip it, the dough can be brushed with egg wash and baked until golden. They will still taste great, but they will look more like pastry horns than carrots.
How long do stuffed crescent roll carrots stay fresh?
They are best the day they are made. If needed, they can be stored in the fridge for up to two days. The shells may soften a bit after being filled, which is why many people wait until the last minute to add the salad.
Can stuffed crescent roll carrots be served cold?
Yes, they can. In fact, they are usually served chilled or cool once filled with egg salad or ham salad. That makes them nice for Easter brunch, lunch, or a buffet table where guests are grabbing food throughout the meal.
What can be used instead of dill or parsley on top?
Parsley and dill look the most like carrot tops, but a few small pieces of fresh carrot greens can work too if available. The garnish is mostly there for looks, so it does not need to be perfect. It just gives stuffed crescent roll carrots that finished Easter touch.
Why did the dough stick to the mold?
That usually happens when the dough wraps too far over the open end of the mold or when it cools too long before removal. It helps to leave the end of the mold clear and twist it out gently after the carrots cool for about five minutes.
Can these be used for Easter brunch or just dinner?
They work for both. That is part of their charm. stuffed crescent roll carrots fit right in at brunch, lunch, or dinner, and they look cute no matter where they land on the table.


Stuffed Crescent Roll Carrots
Ingredients
- 1 tube of Pillsbury Crescent Recipe Creations Seamless Dough Sheet
- 1 egg lightly beaten with 1 teaspoon water for egg wash
- Orange food coloring or a mix of yellow and red liquid food coloring to achieve orange hue
- 1 ½ cups of preferred egg or ham salad
- A bunch of fresh dill or parsley for garnish
Instructions
- Begin by heating your oven to a temperature of 400 degrees Fahrenheit.
- Spread out the Crescent Recipe Creations Seamless Dough Sheet on a cutting board.
- Slice the dough sheet lengthwise into 6 strips of equal width.
- Lightly coat one of the dough strips with the prepared egg wash.
- Stretch the strip into a log, aiming for a length between 17 to 18 inches.
- Spiral the dough log around a cream horn mold to create a carrot shape.
- Proceed with the remaining dough strips.
- Take a baking sheet and line it with either non-stick aluminum foil or parchment paper for easy cleanup.
- Gently paint the orange food coloring over each crescent dough carrot to achieve a vibrant look.
- Place the dough carrots onto the prepared baking sheet.
- Transfer the baking sheet into the oven and bake for about 6 to 8 minutes, or until the dough turns a golden brown color.
- After baking, let the crescent carrots rest for roughly 5 minutes to cool slightly.
- Gently twist the cream horn molds to release and remove them, then allow the crescent carrots to cool completely.
- Spoon your chosen egg or ham salad into each of the crescent carrots.
- To finish, insert a few sprigs of fresh dill or parsley into the wide end of each crescent carrot to resemble the greens of a carrot.
- Your Crescent Roll Carrots are now ready to be served and enjoyed.
The Easter Table Does Not Need to Be Boring
I’ve found that the dishes people remember are rarely the stiff, perfect ones. They remember the food that made them smile first. That is why stuffed crescent roll carrots work so well. They look playful, they taste familiar, and they give the table a little personality without turning dinner into a full production.
As a mom, I always notice which recipes get people talking before anyone even sits down. This is one of those. Someone points, someone laughs, and then suddenly everybody wants one. That kind of reaction is half the fun for me. Holiday food should still taste good, of course, but I also want it to have a little charm and a little nerve.
There is also something satisfying about taking a store-bought shortcut and turning it into something that looks far more special. That is probably why this recipe sticks in people’s heads. It does not ask for fancy ingredients or a giant budget, yet it still brings a big Easter moment to the table. And let’s be real, that is the sweet spot for any holiday meal.
I can already picture these on a brunch board, tucked beside fruit, deviled eggs, and a ham that took itself very seriously. They are cute enough for Pinterest, but they are not just there to pose. They actually get eaten, which is a very important detail. Pretty food is nice, but pretty food that disappears first is the whole point.