Valentine’s Day is a time for love and creativity. Whether you’re a seasoned crafter or just looking for a fun way to celebrate, Valentine crafts bring joy to everyone. These projects can be as simple or as detailed as you want. The best part? They’re perfect for kids, teens, and adults alike.
Crafting is a great way to bond with loved ones. It’s also an opportunity to create keepsakes that hold sentimental value. Homemade cards, decorations, and gifts show effort and thoughtfulness. They don’t have to be fancy or expensive. What matters is the care you put into them.
Kids love Valentine crafts because they’re colorful and fun. Teens enjoy them as a way to express themselves. Adults find crafting relaxing, and it’s a way to make unique gifts. From heart-shaped wreaths to handmade cards, the possibilities are endless. If you’re short on time, there are plenty of quick options that don’t require a lot of supplies.

This site includes affiliate links; you can check the disclosure for more details.
Gathering supplies doesn’t have to be stressful. Basic items like construction paper, glue, and markers work well. You can also reuse materials you already have, like buttons, fabric scraps, or even old magazines. It’s a great way to upcycle while creating something beautiful.
Spending time on Valentine crafts can also help you unplug. It’s a chance to step away from screens and focus on something tangible. Plus, it’s hard to feel stressed when you’re cutting out hearts or gluing on glitter. Whether you’re crafting with family, friends, or by yourself, it’s a fulfilling way to celebrate love.
Easy Ideas for Kids
Keeping kids entertained is easier with simple Valentine crafts. These projects don’t require advanced skills or costly supplies. Even the youngest kids can enjoy making something special for their loved ones.
- Paper Plate Hearts: Grab some paper plates, paint, and scissors. Let kids paint the plates red or pink. Once dry, cut out heart shapes. They can decorate with stickers, glitter, or even pieces of tissue paper.
- Heart-Shaped Animals: Use construction paper to cut out hearts of different sizes. Kids can turn these hearts into animals like a lion, frog, or even a butterfly by gluing the shapes together and adding details with markers.
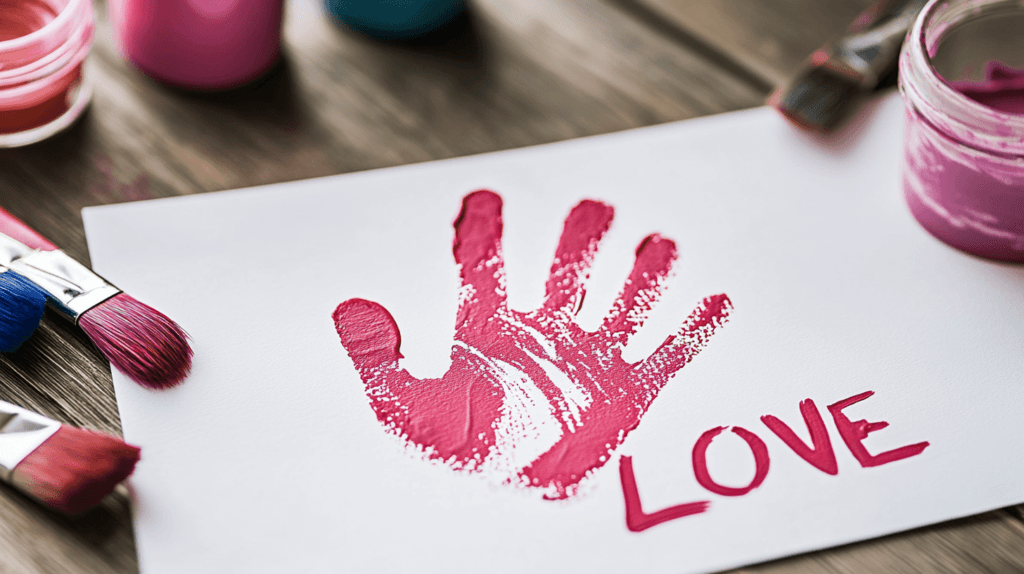
- Handprint Keepsakes: Paint kids’ hands and have them press their handprints onto white paper. Add a cute Valentine’s Day message like “You’ve got my heart!” These make adorable gifts for grandparents.
These crafts are quick to set up and easy to clean up. They’re also great for classrooms, parties, or family afternoons. Kids love seeing their creations come to life, and these crafts give them a sense of accomplishment.
To make it more engaging, encourage kids to personalize their crafts. Let them pick their colors, add their designs, and decide who gets their finished project. It’s a sweet way for them to share the love this Valentine’s Day.

Valentine Crafts for Teens
Teens might seem too old for Valentine crafts, but many love the chance to get creative. Crafting gives them a way to express themselves and make thoughtful gifts. These ideas work well for teens and don’t feel childish.
- DIY Friendship Bracelets: Use embroidery floss to make heart-patterned bracelets. These can be customized with favorite colors and given to friends or family.
- Customized Picture Frames: Buy plain frames and decorate them with paint, rhinestones, or small charms. Add a favorite photo to complete the gift.
- Heart Garland: Cut out hearts from scrapbook paper or fabric. String them together to create a garland. It’s a fun way to decorate their room or locker.
Teens often appreciate crafts that double as decor or gifts. They’ll feel proud to give something handmade. If they’re unsure about crafting, remind them there’s no “wrong” way to make art. Creativity has no rules.
Crafting can also be a social activity. Teens might enjoy hosting a Valentine’s craft night with friends. Provide snacks, supplies, and music for a laid-back evening. It’s a chance to have fun while making something meaningful.
![Crayola Washable Kids Paint Set (12ct), Classic and Glitter Paint for Kids, Arts & Crafts Supplies, Toddler Painting Kit, 3+ [Amazon Exclusive]](https://m.media-amazon.com/images/I/51KPJWkf12L._SL500_.jpg)
Romantic Ideas for Adults
Valentine crafts aren’t just for kids and teens. Adults can get in on the fun, too. These projects are perfect for date nights, gifts, or even personal relaxation.
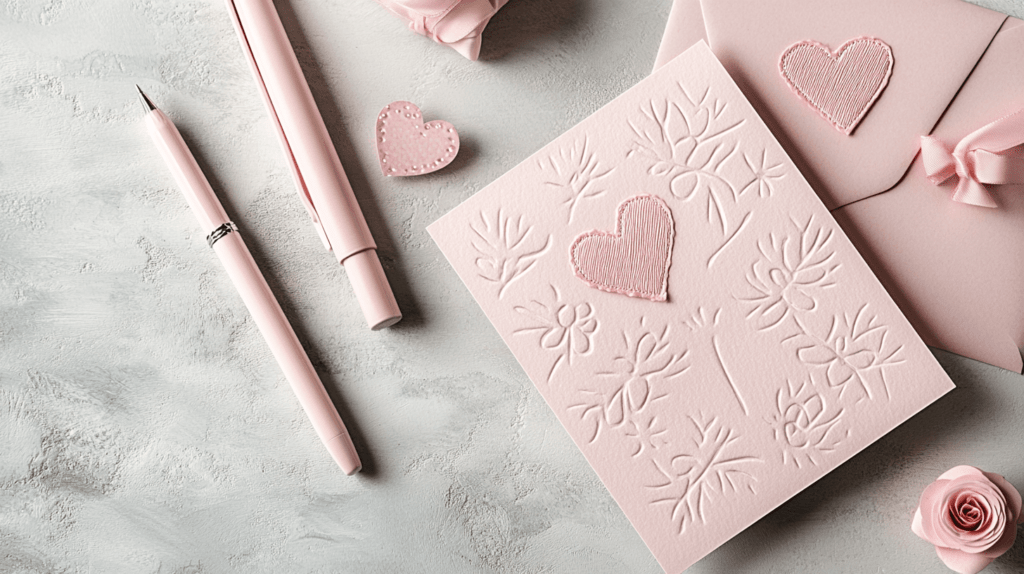
- Handmade Cards: Instead of buying a card, create one. Use cardstock, stamps, or calligraphy pens to make a personalized card. Write a heartfelt note inside for an extra touch.
- Photo Collage: Collect favorite photos and arrange them in a heart shape. You can do this on paper or digitally. Frame it for a thoughtful gift.
- Candle Making: Make scented candles in jars. Add a tag with a sweet message like “You light up my life.” These are thoughtful and practical gifts.
Crafting as an adult can feel therapeutic. It’s a chance to slow down and focus on something creative. Plus, handmade gifts always feel more special. You’re not just giving an object; you’re giving time and effort.
If you’re crafting with a partner, it’s a fun way to spend quality time together. Share ideas, laugh over mistakes, and enjoy the process. The result will be a keepsake that reminds you of your time together.

Affordable Supplies for Valentine Crafts
Crafting doesn’t have to break the bank. Many Valentine crafts use items you probably already have. If you need extra supplies, you can find affordable options at local stores or online.
- Construction Paper: A basic pack goes a long way. Use it for cards, decorations, or any paper-based craft.
- Glue and Tape: Essential for assembling projects. Glue sticks are great for kids, while hot glue guns work well for detailed work.
- Markers and Crayons: Perfect for adding color and personality.
- Recycled Materials: Look around your house. Old magazines, cardboard, and fabric scraps can all be used.
- Dollar Stores: Great for finding inexpensive craft supplies like glitter, stickers, and ribbon.
Being resourceful is part of the fun. Challenge yourself to use what you already have before buying more. Not only does this save money, but it also adds a unique touch to your crafts. Sometimes the most unexpected materials make the best projects.
Creative Valentine Crafts Using Everyday Items
Sometimes the best Valentine crafts come from items you already have lying around the house. It’s fun to repurpose everyday things into something adorable and meaningful. Plus, this approach is budget-friendly and great for last-minute inspiration.
- Jar of Love Notes: Grab an empty mason jar, some colorful paper, and a pen. Cut the paper into small squares or heart shapes. Write sweet messages, compliments, or even fun memories on each one. Fold them up and fill the jar. Decorate the outside with ribbon or stickers. This is a thoughtful gift for a partner, friend, or family member.
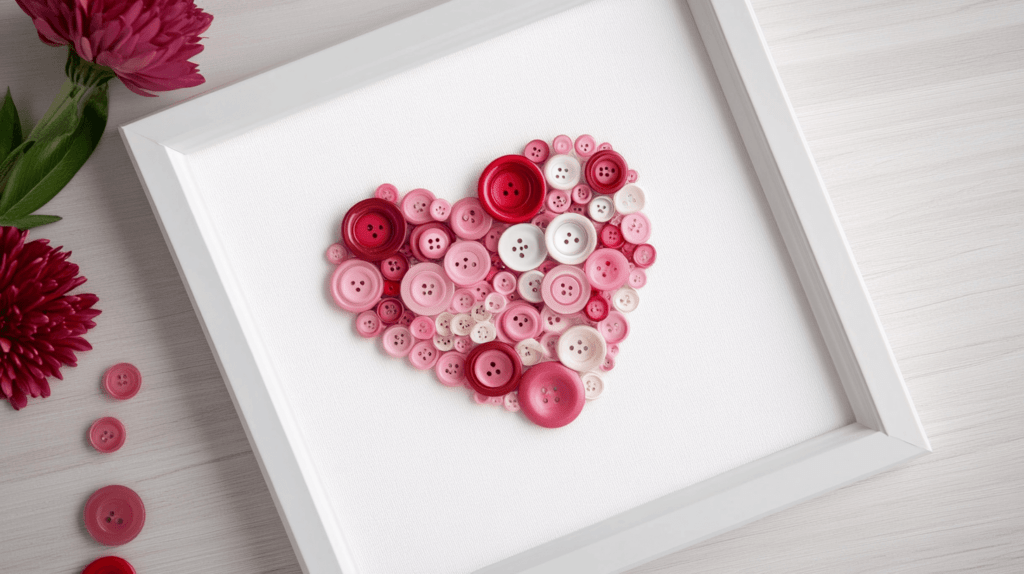
- Button Heart Art: Have extra buttons from old sewing projects? Create a unique piece of art by gluing buttons onto a piece of cardstock in the shape of a heart. Use different sizes and colors for a textured, eye-catching look. Frame it to turn it into a keepsake.
- Wine Cork Stamps: Save those wine corks! Carve a heart shape onto one end of the cork, and use it as a stamp. Dip it into paint and decorate cards, gift bags, or even wrapping paper. It’s quick, easy, and adds a personal touch.
- CD Heart Mobiles: If you have old CDs collecting dust, transform them into shiny heart mobiles. Cut the CDs into heart shapes (carefully, with strong scissors), punch a hole in the top, and string them onto fishing line. Hang them in a window for a sparkly Valentine’s Day decoration.
Using everyday items for Valentine crafts not only saves money but also adds a personal and creative twist. These projects show that with a little imagination, even the most ordinary objects can become something special. And really, isn’t that what Valentine’s Day is all about—turning the simple into the extraordinary?

Instructions for More Detailed Valentine Crafts
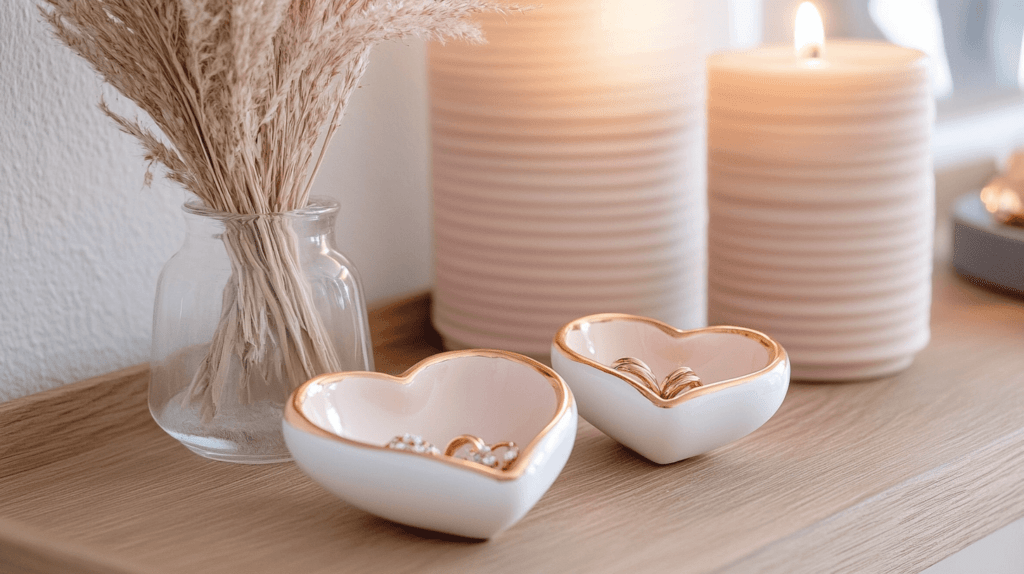
Clay Heart Trinket Dishes
Materials Needed:
- Air-dry clay
- Rolling pin
- Heart-shaped cookie cutter or knife
- Sandpaper (optional)
- Acrylic paint or spray paint
- Paintbrush
- Clear varnish (optional)
Instructions:
- Take a small ball of air-dry clay and roll it out to about 1/4-inch thickness using a rolling pin.
- Use a heart-shaped cookie cutter to cut out the shape. If you don’t have one, carefully cut a heart shape with a knife.
- Gently lift the clay heart and shape it into a dish by pressing the edges upward. You can use a small bowl to help form the curve.
- Let the clay dry completely, following the instructions on the package. This usually takes 24-48 hours.
- Once dry, smooth any rough edges with sandpaper.
- Paint the dish with acrylic paint or spray paint in your desired colors. Let it dry completely.
- For extra shine and protection, apply a coat of clear varnish. Let it dry before using.

Heart-Shaped Bird Feeders: Valentine Crafts
Materials Needed:
- 3 cups birdseed
- 2 packets unflavored gelatin
- 3/4 cup water
- Heart-shaped cookie cutters
- Wax paper
- String or twine
Instructions:
- Heat the water in a saucepan until warm, then stir in the gelatin until fully dissolved.
- Remove from heat and stir in the birdseed until evenly coated.
- Place the heart-shaped cookie cutters on a sheet of wax paper. Spoon the birdseed mixture into the cutters, pressing it down firmly with a spoon.
- Poke a small hole at the top of each heart using a straw or skewer. This is where the string will go.
- Let the feeders dry and harden for 24 hours.
- Gently remove the feeders from the cookie cutters and thread string or twine through the holes.
- Hang them outside and enjoy watching the birds!
Candle Making
Materials Needed:
- Soy or beeswax flakes
- Candle jars or tins
- Wick (with metal base)
- Wick stickers or glue dots
- Fragrance oil (optional)
- Crayons or candle dye (optional)
- Double boiler or microwave-safe bowl
- Stirring stick
Instructions:
- Secure the wick to the bottom of the jar using a wick sticker or glue dot. Wrap the top of the wick around a pencil or skewer to keep it centered.
- Melt the wax flakes in a double boiler or microwave. If using a microwave, heat in 30-second intervals, stirring in between, until fully melted.
- If desired, add fragrance oil (follow package instructions for amount) and a small amount of dye for color. Stir well.
- Carefully pour the melted wax into the jar, holding the wick steady. Leave about 1/2 inch of space at the top.
- Let the candle cool and harden completely (about 4-6 hours). Trim the wick to about 1/4 inch before lighting.
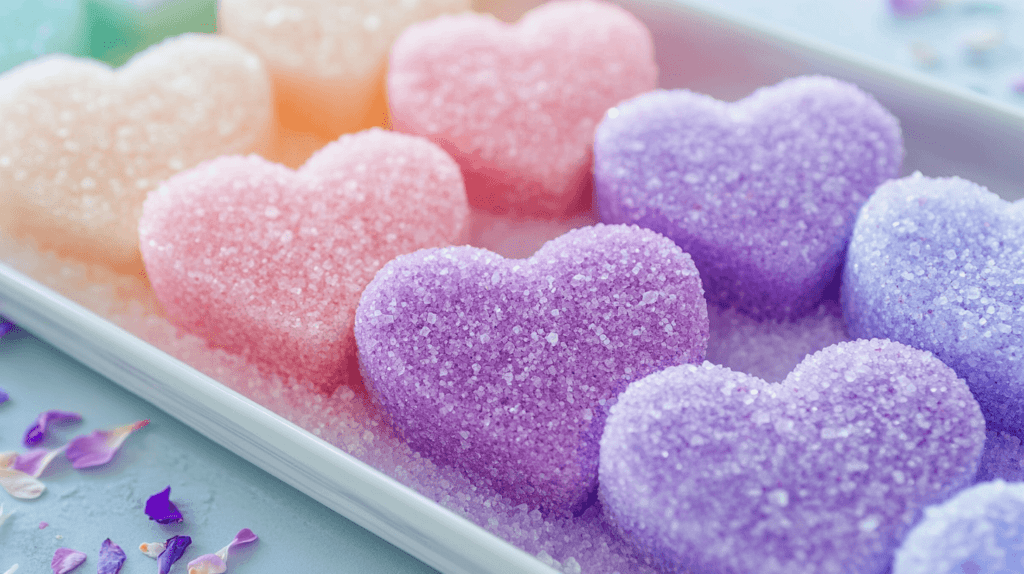
Heart-Shaped Bath Salts
Materials Needed:
- 1 cup Epsom salt
- 1/2 cup sea salt or Himalayan pink salt
- 1/4 cup baking soda
- 10-15 drops essential oil (lavender, rose, or your favorite scent)
- A few drops of food coloring (optional)
- Heart-shaped silicone molds
- Mixing bowl
- Spoon
Instructions:
- In a mixing bowl, combine the Epsom salt, sea salt, and baking soda. Stir until well blended.
- Add a few drops of essential oil to the mixture. Mix thoroughly to ensure the fragrance is evenly distributed.
- If you want colored bath salts, add a few drops of food coloring and stir until the color is consistent. Be careful not to add too much liquid, as it can dissolve the salts.
- Spoon the mixture into heart-shaped silicone molds, pressing it down gently to pack it in.
- Let the molds sit for about 24 hours so the salts harden and take shape.
- Once fully set, carefully remove the heart-shaped bath salts from the molds.
- Store them in an airtight container or package them in a jar or bag with a ribbon for gifting.
These heart-shaped bath salts make perfect DIY Valentine’s Day gifts. They’re easy to make, smell amazing, and add a touch of luxury to any bath!
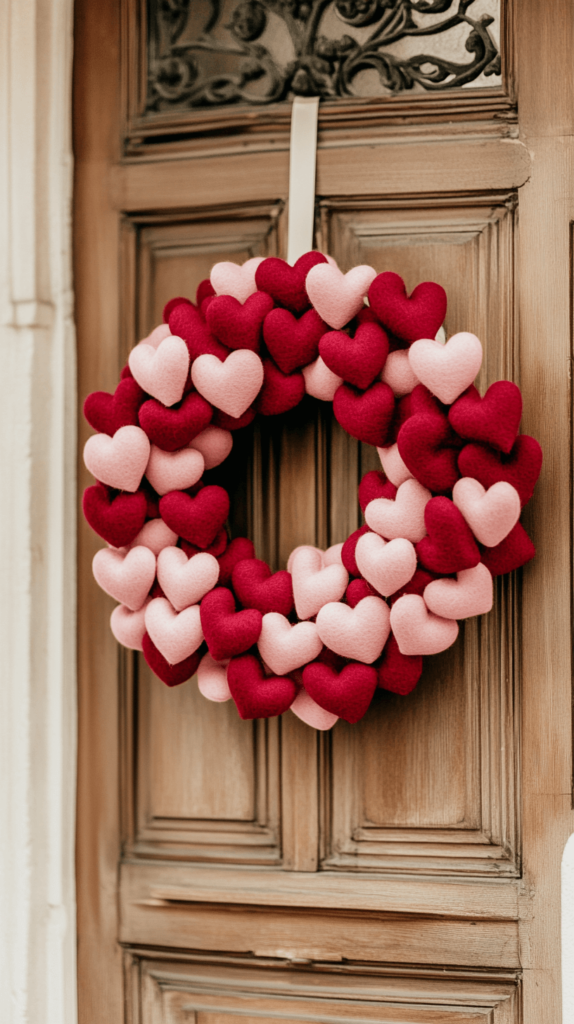
How to Make a Valentine’s Day Wreath
A Valentine’s Day wreath is a simple yet beautiful way to bring some love into your home. It’s fun to make and looks amazing hanging on your front door or above a mantel. Here’s how you can create one that’s festive and totally you.
Materials You’ll Need:
- Foam wreath form (available at craft stores)
- Felt sheets in red, pink, and white
- Scissors
- Hot glue gun and glue sticks
- Ribbon for hanging
- Optional: faux flowers, glitter, or small heart decorations
Step-by-Step Instructions:
- Cut the Hearts: Start by cutting heart shapes out of the felt. You’ll need a mix of sizes—some large and some small. If freehand isn’t your thing, use a cookie cutter or stencil to trace the shapes before cutting.
- Layer the Hearts: Lay the hearts out around the foam wreath form, overlapping them slightly to cover all the space. Play around with the arrangement until you’re happy with how it looks.
- Glue Them Down: Once you’ve got your design set, start gluing the hearts to the foam wreath. Use your hot glue gun to secure them, working in sections. Be careful with the glue—it’s hot!
- Add Decorations (Optional): If you want to go all out, add some extras! Glue on faux flowers, sprinkle a little glitter, or stick on small heart-shaped trinkets for extra charm.
- Attach the Ribbon: Cut a piece of ribbon and glue or tie it to the back of the wreath form. This will be your hanger.
- Hang It Up: Once everything is dry, your Valentine’s wreath is ready to display!
This wreath is so easy to customize. You can go bold with glitter and bright colors or keep it soft and simple with just a few touches. Either way, it’s sure to add a pop of Valentine’s cheer to your space!
Add Volume to Your Hearts
If you want the hearts on your Valentine’s Day wreath to look a little puffier, it’s super easy to adjust! Here’s how you can give those hearts some extra dimension:
Materials You’ll Need in Addition to the List Above:
- Polyester stuffing (like the kind used for pillows) or cotton balls
- Needle and thread (optional)
Updated Steps for Puffy Hearts:
- Cut Two of Each Heart: Instead of just one heart per shape, cut two identical hearts for each size. You’ll need one for the front and one for the back.
- Layer and Glue or Sew: Place two hearts together, aligning the edges. Use a hot glue gun to seal the edges, leaving a small opening. If you prefer, you can sew around the edges instead for a neater finish.
- Stuff the Hearts: Take a small amount of polyester stuffing or pull apart a cotton ball and gently insert it into the opening. Use a pencil or chopstick to help push the stuffing into the corners of the heart. Don’t overstuff—it just needs enough to look puffy.
- Seal the Opening: Once stuffed, glue or sew the opening shut. Repeat for all your hearts.
- Assemble the Wreath: Follow the original steps to arrange and glue the puffy hearts onto your wreath form. The added dimension will make the wreath look even more festive and unique!
These puffy hearts add a soft, cozy vibe to the wreath and really make it stand out. Plus, they’re so satisfying to make—you’ll want to use them in all your Valentine crafts!
Final Thoughts
Valentine crafts are a heartfelt way to celebrate love and creativity. They’re more than just decorations or gifts—they’re opportunities to connect with the people you care about. Whether you’re crafting with kids, teens, or adults, there’s something magical about turning simple supplies into meaningful keepsakes.
The best part is that Valentine crafts can fit any skill level, budget, or schedule. From paper hearts to handmade candles, every project carries a bit of your personality. These crafts remind us that love isn’t about perfection; it’s about thoughtfulness and effort.
So this Valentine’s Day, grab some supplies and start crafting. Whether it’s a solo project or a group activity, you’ll create more than just crafts. You’ll create memories to cherish long after the glue dries.