Thanksgiving charcuterie board ideas always make the holiday feel easy and fun. I love how they let everyone snack and chat while the turkey finishes in the oven. A board feels welcoming, like opening your front door and saying come on in. It keeps the mood light. No pressure. Just good food within reach. I’ve found most people hover around the board without realizing it. They take a slice of cheese, add a cracker, then stay to talk about plans, football, or pie.
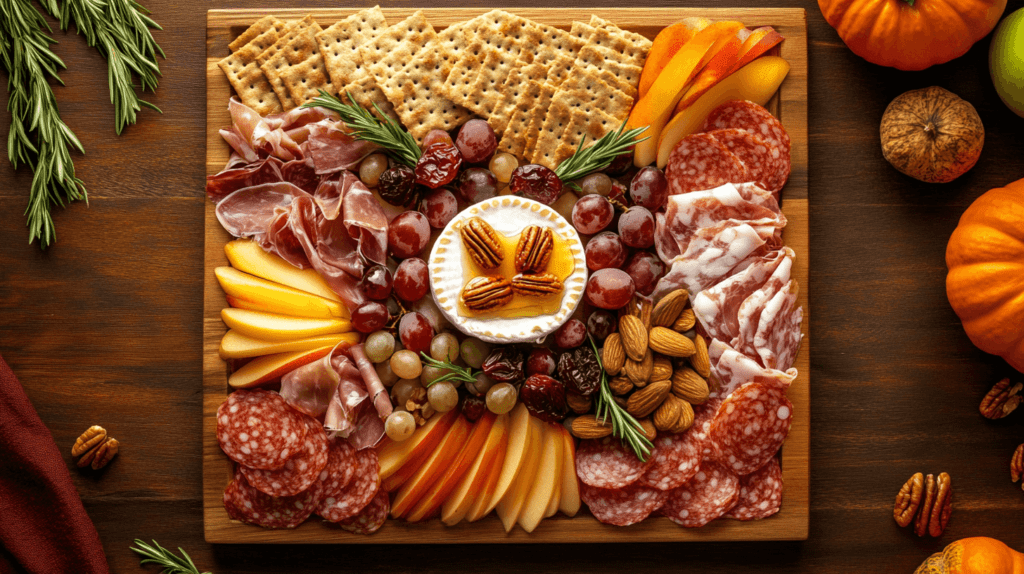
I like to build my boards with simple fall flavors. Sharp cheddar. Sliced apples. Salty turkey. A little cranberry something. These small bites remind me of crisp fall days, even though I’m here in Florida wishing for cooler weather. The colors help the whole table look festive. Reds, oranges, deep greens. It’s like painting with snacks. Nothing fancy. Just a mix of things people love.
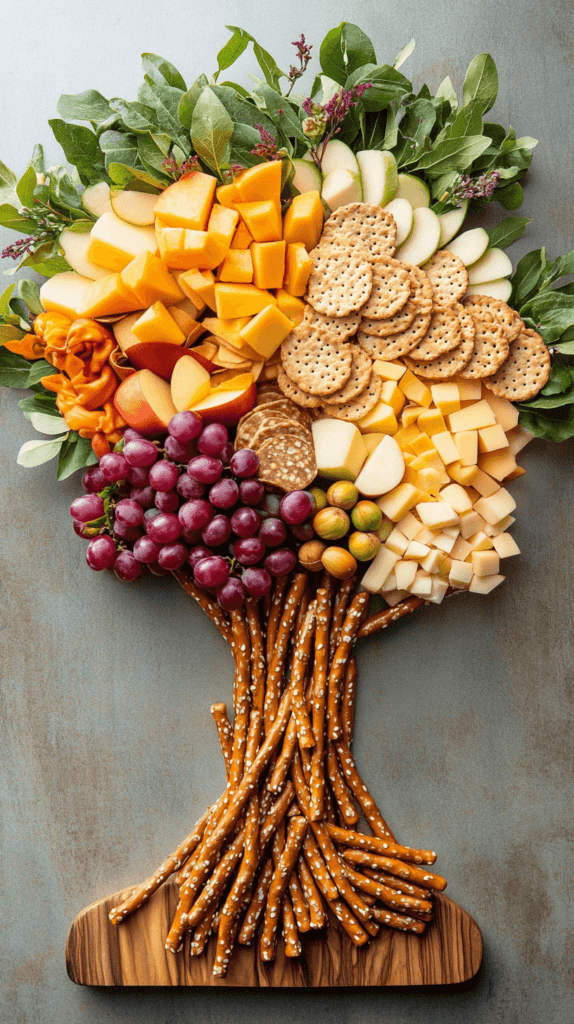
I start with cheese so the board has a solid base. Then I add crackers and fruit so guests can make small combos. Little bowls of nuts or dips help fill gaps. Turkey slices or salami add protein for bigger appetites. I tuck everything close together so it feels full. This makes the board look generous without much effort. Sometimes I add cute touches, like a small pumpkin or rosemary sprigs, to give it a cozy holiday feel.
You can keep it savory or add pops of sweetness. I love adding caramel dip with apple slices. I also like chocolate bark when I want a little dessert moment. There’s no right way to do it. I move things around until it looks balanced. If something feels off, I shift it again. Building the board turns into a little creative break on a busy day. Guests enjoy the variety, and I enjoy how easy it is to serve.
This site includes affiliate links; you can check the disclosure for more details.
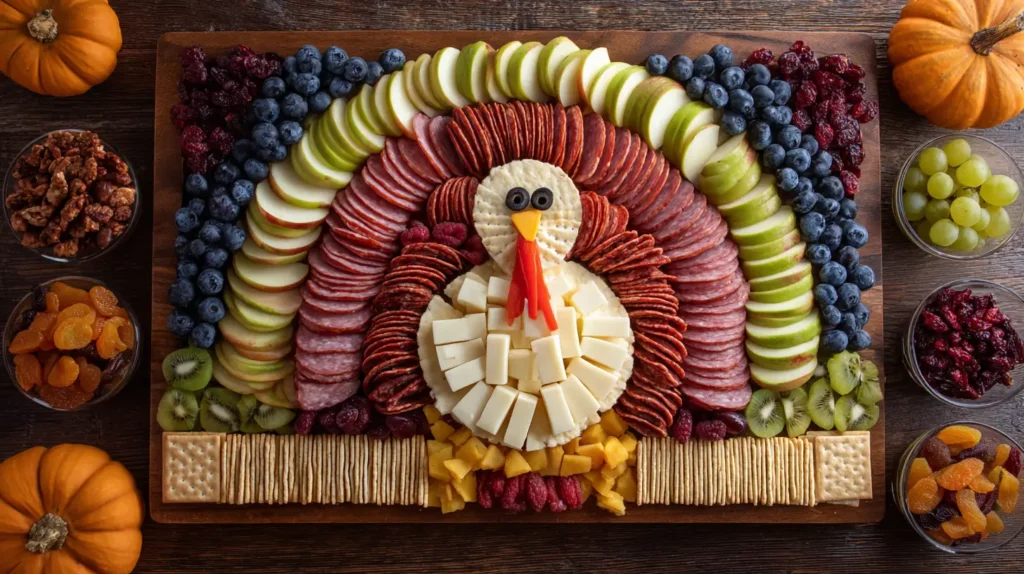
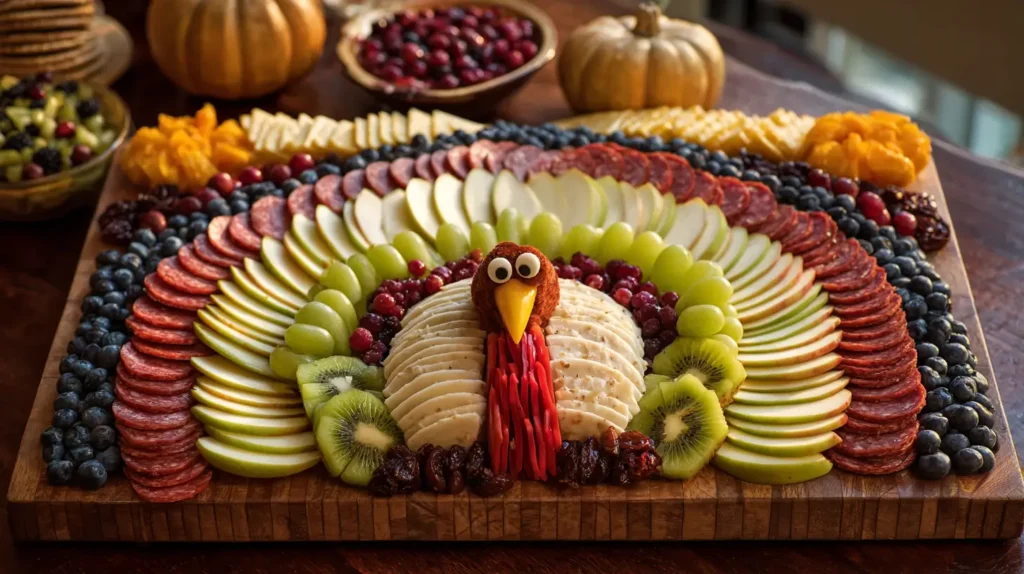
How To Create This Thanksgiving Turkey Board
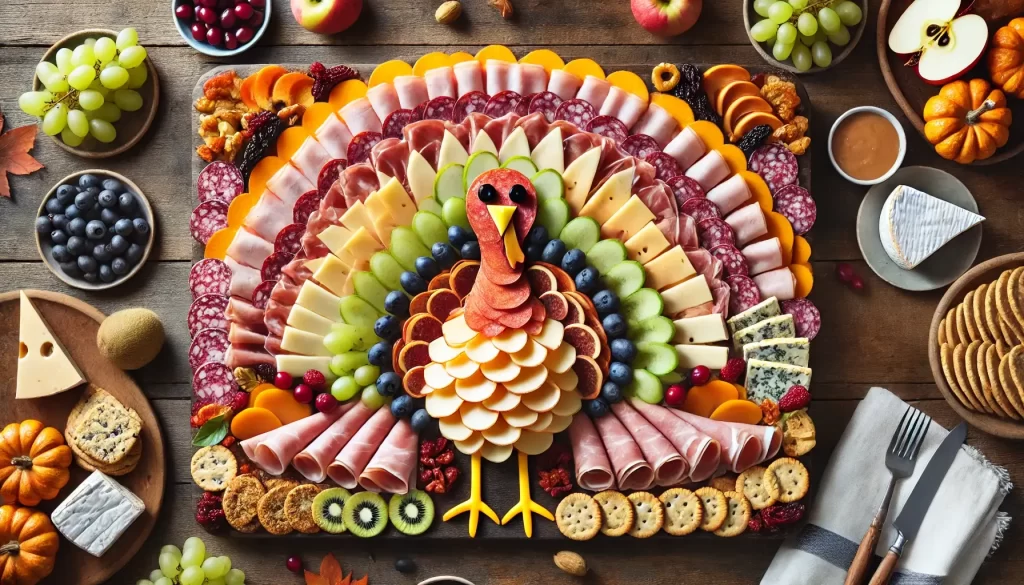
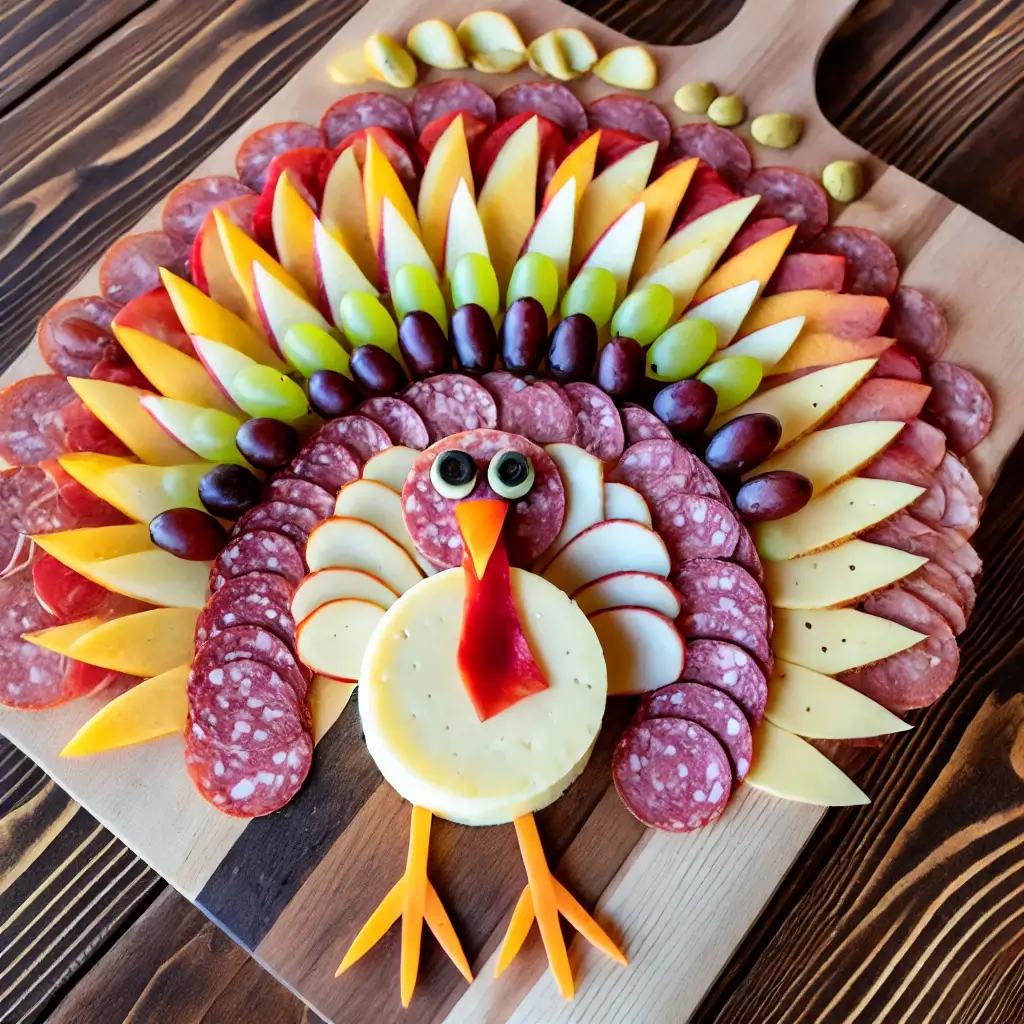
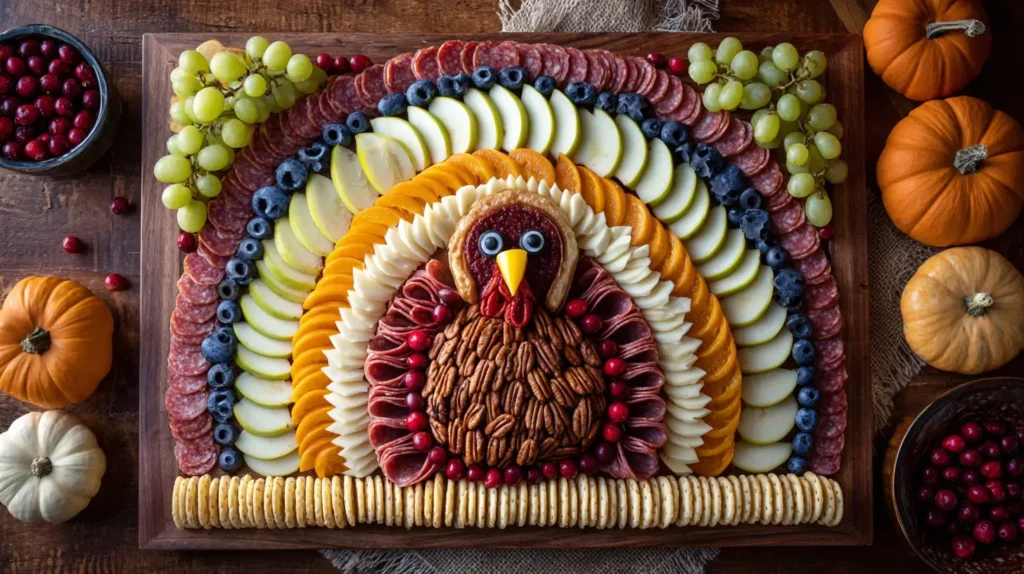
I start by placing the turkey body in the center of the board. Thin apple slices or pear slices stack into a soft oval. They make the shape feel full without being heavy. Then I layer round slices of cured meat to build the chest. I tuck each slice slightly under the next so the curve feels smooth. A small cluster of blueberries sits around the bottom edge. It gives a fun pop of color and helps define the shape.
From there, I build the feathers. I fan out rows of meat, cheese, and fresh fruit. I place salami first because the color is bold and grabs attention. Next, I add sharp cheddar. The slices spread like bright gold feathers. Then I tuck in green grapes and apple slices. I place them in gentle arches to keep the tail wide. Then, I repeat layers until the whole board looks full. Finally, I keep the slices close so there are no gaps. It all feels more polished that way.
For the head, I use a round slice of salami or pepperoni. Then I add two black olive pieces for eyes. A small triangle of cheese works as the beak. A thin strip of red pepper becomes the wattle. These tiny touches bring the whole bird to life. I place crackers along the bottom like a little perch. It feels playful and gives guests their first grab-and-go snack.
I fill the extra space around the turkey with nuts, dried fruit, and berries. These small pieces help the layout feel balanced. Sometimes I add mini pumpkins near the corners. They make the board look festive without taking up space. Once everything is placed, I step back and move a few slices until the colors feel even. The result looks impressive but stays easy. Guests love it, and it always becomes the center of the table.
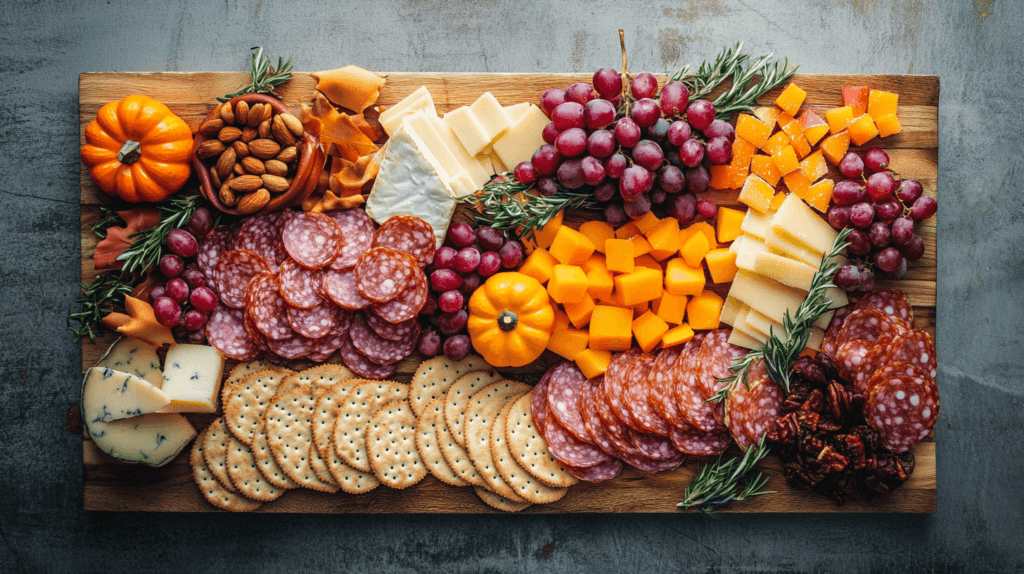
The Basics of a Thanksgiving Charcuterie Board
A traditional charcuterie board usually features a mix of cured meats, cheeses, fruits, and nuts, but for Thanksgiving, we’re adding seasonal twists. Think cranberries, spiced nuts, and seasonal fruits like apples and pears. Here’s a quick checklist of items to gather for a fall-themed board:
- Cured meats: Salami, prosciutto, turkey slices
- Cheese: Sharp cheddar, brie, Gouda, and a soft cheese like goat cheese with cranberries
- Crackers and breads: Wheat crackers, baguette slices, pretzels
- Fruits: Dried apricots, apples, pears, figs, grapes
- Nuts: Candied pecans, almonds, walnuts
- Spreads: Cranberry chutney, fig jam, honey, pumpkin butter
- Vegetables: Roasted Brussels sprouts, baby carrots, celery sticks
- Extras: Olives, pickles, dark chocolate squares
You can mix and match these items depending on your taste, but what makes a Thanksgiving charcuterie board special is how you display it. Let’s break down a few ways to arrange your board depending on its shape.
Square Thanksgiving Charcuterie Board: Keep It Simple and Symmetrical
A square board offers clean lines, so it’s great for a neat presentation. The symmetry can make everything look organized, even if it’s packed with items.
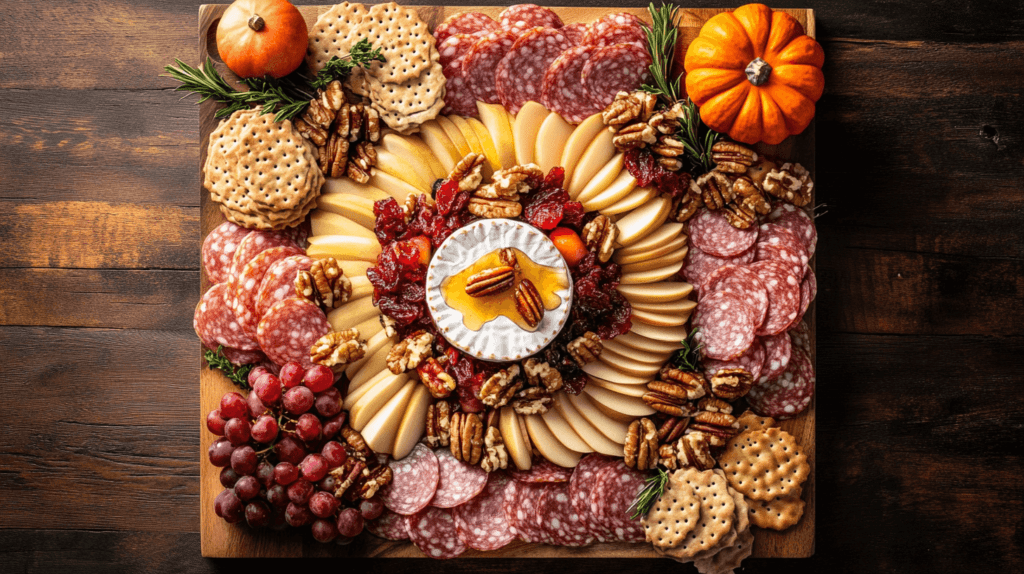
- Centerpiece cheese wheel: Place a small wheel of brie or cheddar in the middle of the board. You can top the brie with honey and walnuts for extra flavor.
- Four corners of meat: Fan out turkey slices or salami into the four corners of the square to anchor the board.
- Fruits and nuts in between: Fill in the gaps between the meats with fruits like dried cranberries, apple slices, and figs. Add candied pecans or spiced almonds in small clusters.
- Crackers along the edge: Arrange crackers and bread slices along the outer edge of the square for easy grabbing.
If you want a fall twist, try adding mini pumpkins or sprigs of rosemary for decoration. A few sprinkles of pomegranate seeds can add a pop of color as well.
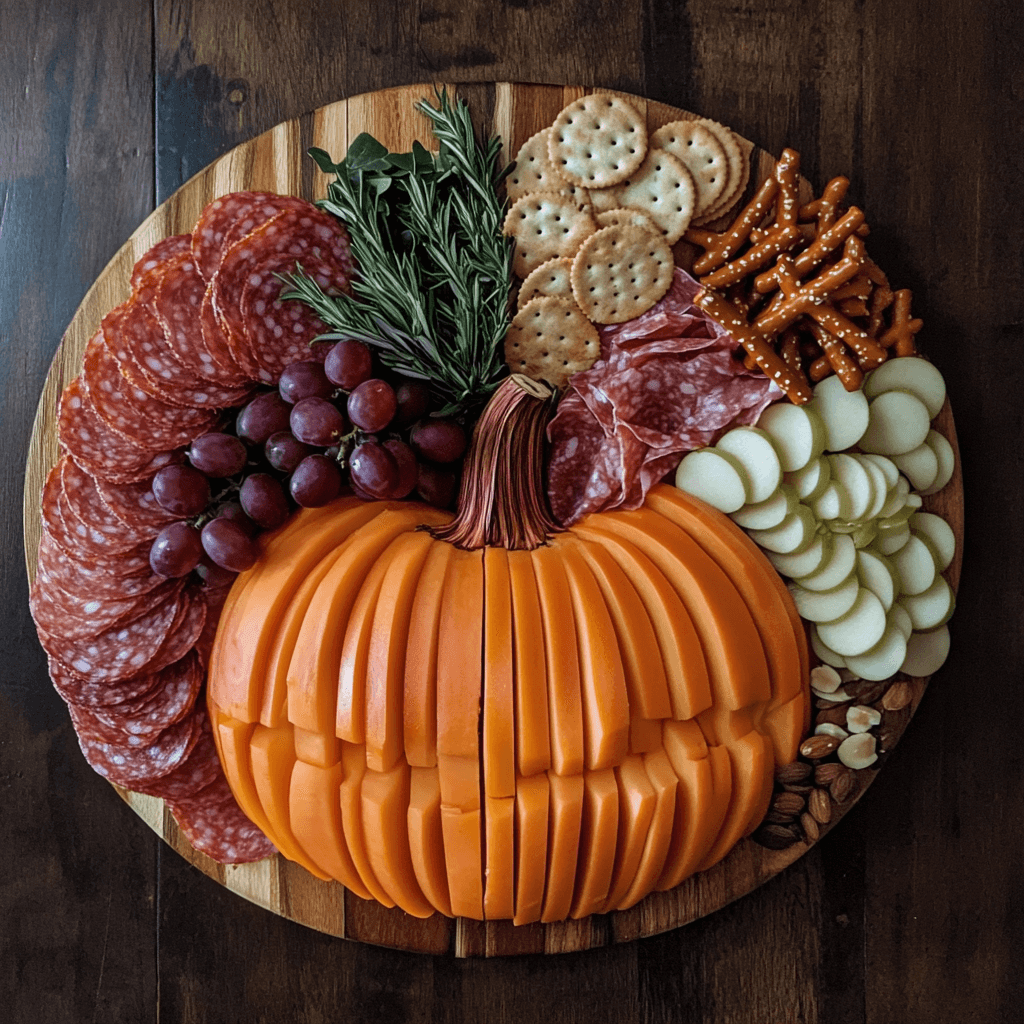
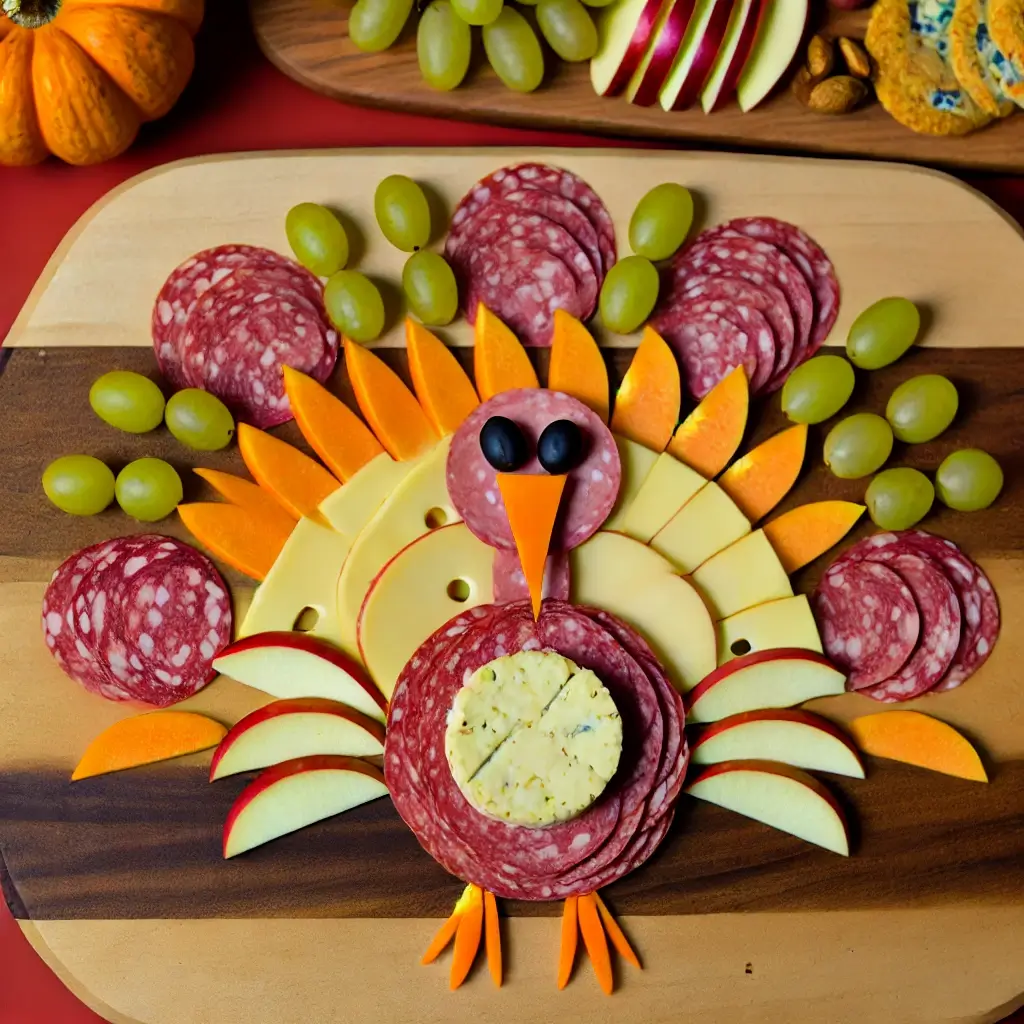
Circular Thanksgiving Charcuterie Board: The Turkey Design
A circular board is perfect for creating a Thanksgiving-themed turkey display. This is a fun idea, especially if you have kids at the table. Here’s how to shape your snacks into a turkey:
- Body of the turkey: Start with a small bowl of hummus or a round cheese ball in the center of the board as the turkey’s body.
- Turkey feathers: Fan out sliced meats, like turkey or prosciutto, in semi-circles around the bowl to create the turkey’s feathers. Use alternating layers of meat and cheese slices to give it more dimension.
- Face and beak: For the turkey’s face, use a slice of cheese or a cracker to form the head, then use a piece of carrot or pepper as the beak. Small olives or raisins can work as eyes.
- Fill the gaps: Surround the turkey with crackers, fruits, and nuts to finish the board. Add sliced veggies like cucumber or bell peppers to complete the design.
Not only does this design scream Thanksgiving, but it’s interactive and fun for your guests to break apart.
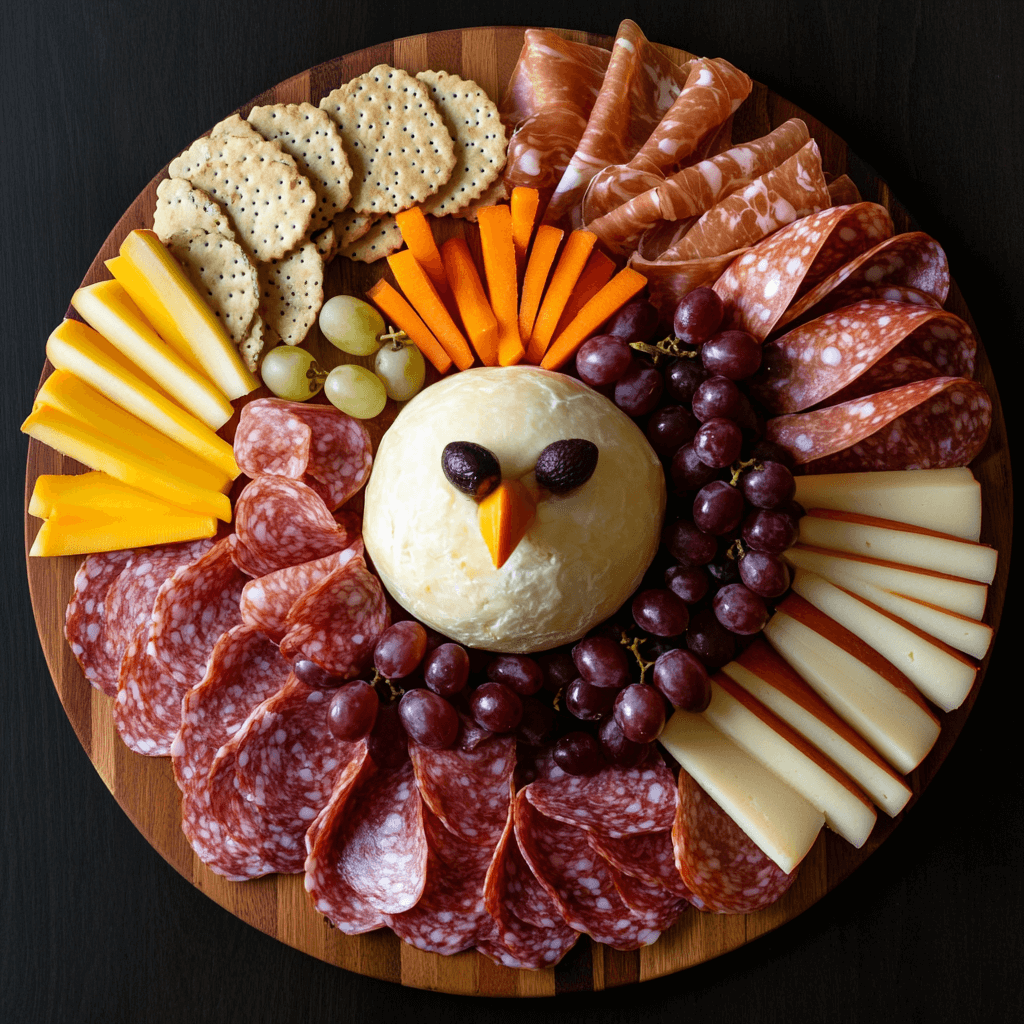
How To Build This Thanksgiving Charcuterie Board
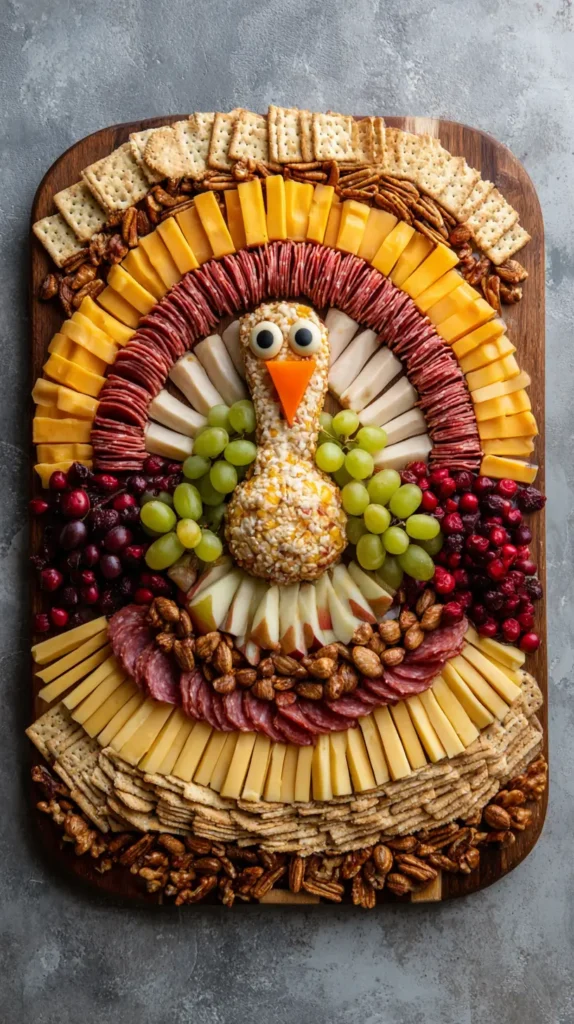
I start by placing the round cheese slice toward the bottom center of the board. That circle becomes the body of the turkey and makes a great anchor. Then I add one slice of salami above it as the head. Two small olive slices sit on top for the eyes. A thin strip of red pepper creates the wattle. A small triangle of yellow cheese works as the beak. Once the basic face is in place, the rest feels simple.
Next, I build the colorful feathers. I tuck rows of sliced salami around the body so they curve like wings. Then I fan out apple slices, alternating red and yellow for a soft sunset look. Grapes go on top to add even more texture. I repeat rows until the whole tail spreads wide. It feels like painting, only with food. I keep pieces close so the design looks full. If a gap shows, I slide in another slice.
For the legs, I cut skinny cheese sticks and add little feet shapes at the bottom. They point down toward the edge so it looks playful. A few olives or nuts along the top finish the scene. The board comes together fast once the main shapes are set. I adjust the fruit and meat until the colors feel balanced. The final look is bold, fun, and very on theme for Thanksgiving charcuterie board. Guests love it, especially kids. It looks impressive but stays easy, which is my favorite way to entertain on a busy holiday.
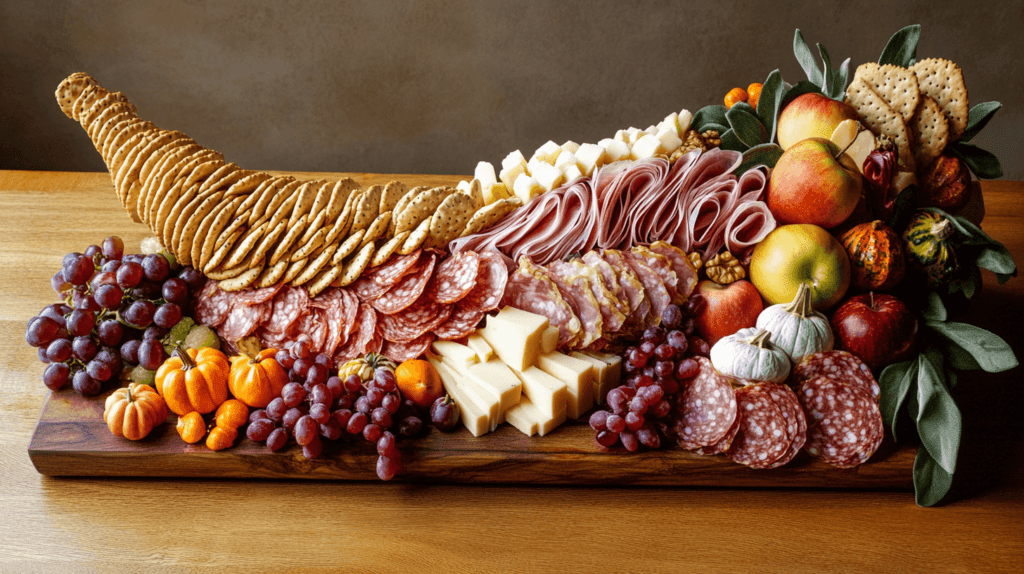
Rectangular Thanksgiving Charcuterie Board: The Cornucopia Look
A rectangular board gives you the space to get creative with a cornucopia design. You can mimic the look of the traditional Thanksgiving cornucopia by arranging your items in a fan-like shape that spills across the board.
- Start with a curved line: Begin in one corner of the board and place a small grouping of breadsticks or pretzel rods in a slight curve to represent the opening of the cornucopia.
- Fan out the food: Fan out different items like slices of cheese, meats, and fruits from the “cornucopia” opening, spreading them out across the board. Drape meats like prosciutto or salami in loose waves for texture.
- Fill in the empty spaces: Add in dried fruits, nuts, and dark chocolates to fill any empty spots. Keep the colors fall-themed by using orange, red, and brown foods like dried apricots, cranberries, and figs.
This board gives a nod to the classic cornucopia, while offering a more modern, grazing-style twist.
Fun Thanksgiving Shapes for Any Board
Beyond the standard shapes, there are plenty of ways to arrange your food in Thanksgiving-themed shapes, no matter the board you’re using. Here are five fun ideas to make your board stand out:
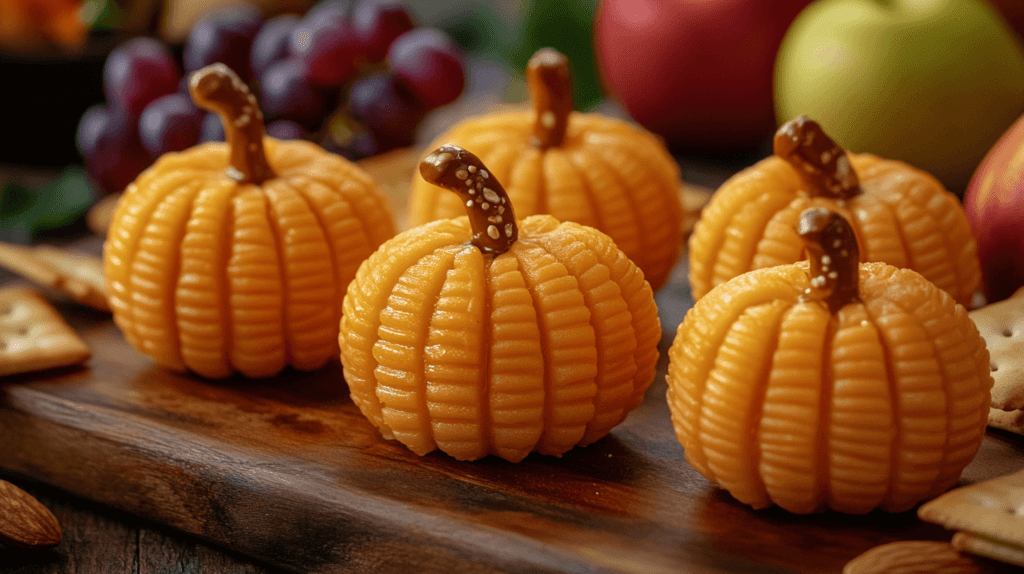
- Mini Pumpkin Cheese Balls: Roll softened cream cheese into balls, coat them with crushed pecans or paprika, and add a pretzel stick on top for the stem. Arrange a cluster of these pumpkin-shaped cheese balls on your board for a festive touch.
- Leaf-Shaped Crackers: To add a fall touch to your charcuterie board, consider using leaf-shaped crackers. You can either purchase pre-made leaf-shaped crackers or make your own using leaf-shaped cookie cutters and your favorite cracker dough recipe. Arrange the crackers around the board or use them to frame certain sections, creating a festive autumn look. These little details add a lot of character and bring out that Thanksgiving vibe on your charcuterie board.
- Pilgrim Hat Cookies: Place small chocolate cookies with a mini peanut butter cup on top, creating little pilgrim hats. These can be arranged in the corners or as a fun surprise among the savory items.
- Acorn-Shaped Treats: Use Hershey’s Kisses, mini vanilla wafers, and a small dab of chocolate frosting to create acorn-shaped sweets. These can fill gaps and add a playful element to the board.
- Turkey-Shaped Veggies: If you want a healthier option, arrange slices of cucumbers, bell peppers, and carrots in the shape of a turkey’s feathers. Use a small dip bowl in the center for the body.


Fall-Themed Shapes for Thanksgiving Charcuterie Boards
There are several fun and festive Thanksgiving or fall-themed shapes you can arrange food into on a charcuterie board! Here are a few creative ideas:
1. Cornucopia (Horn of Plenty)
- Arrange the food to flow out of the “horn” (using breadsticks, crackers, or pretzels to form the cornucopia’s mouth) and have items like sliced meats, cheeses, fruits, and nuts spilling out from it in a cascading design.
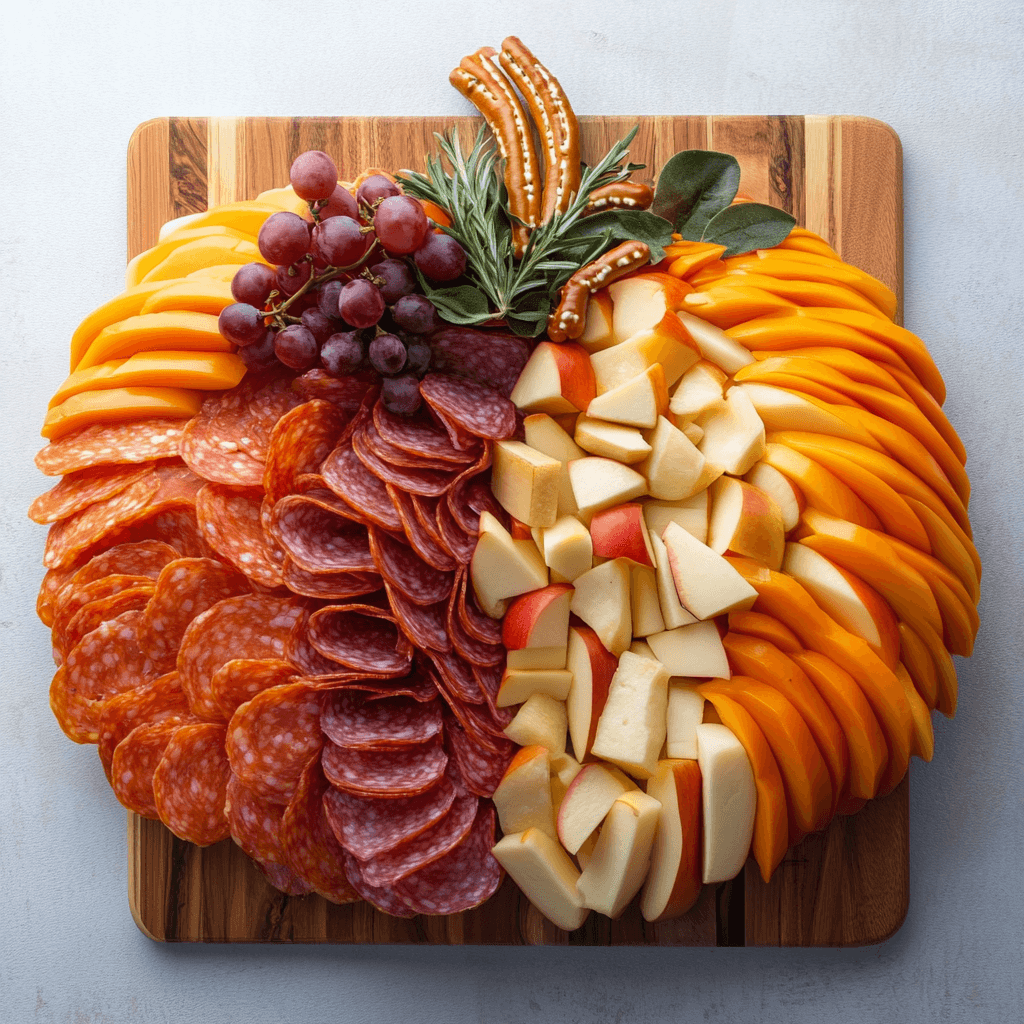
2. Pumpkin
- Use round items like cheese balls or arrange slices of cheese and meat in curved rows to form the pumpkin’s shape. Add crackers or pretzel sticks for the stem and leafy greens or herbs for the pumpkin vines.
3. Acorn
- Use larger cheeses or meat slices to create the base of the acorn and use crackers or nuts to create the textured top part. Add smaller items like grapes or nuts as decoration around it.
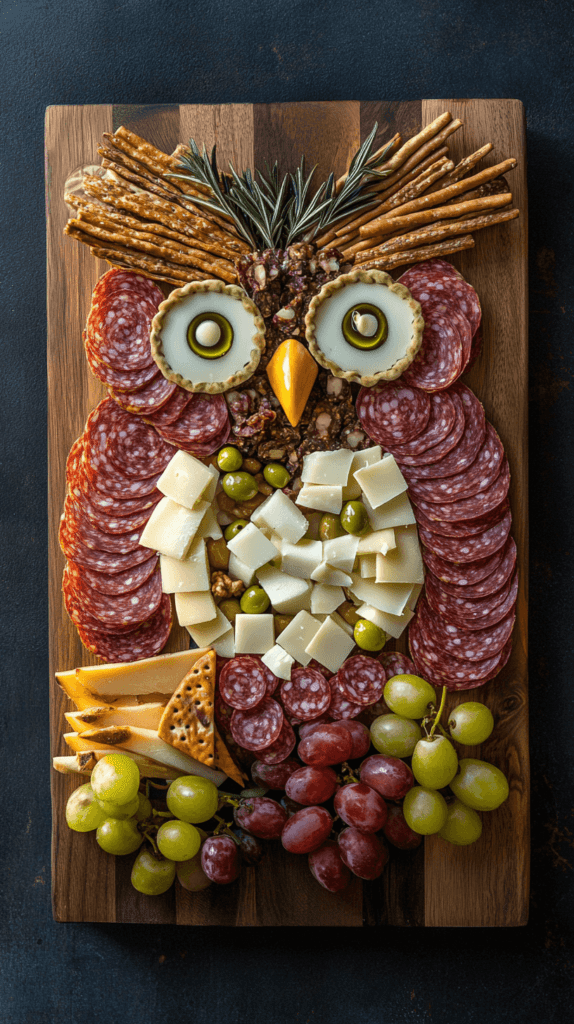
4. Owl
- Use a round cheese or dip bowl for the owl’s face, with sliced meats or cheese as the wings. Use olives for the eyes and almonds or small pretzels for the beak and feet. This creates a fun and quirky look that’s still autumn-inspired.
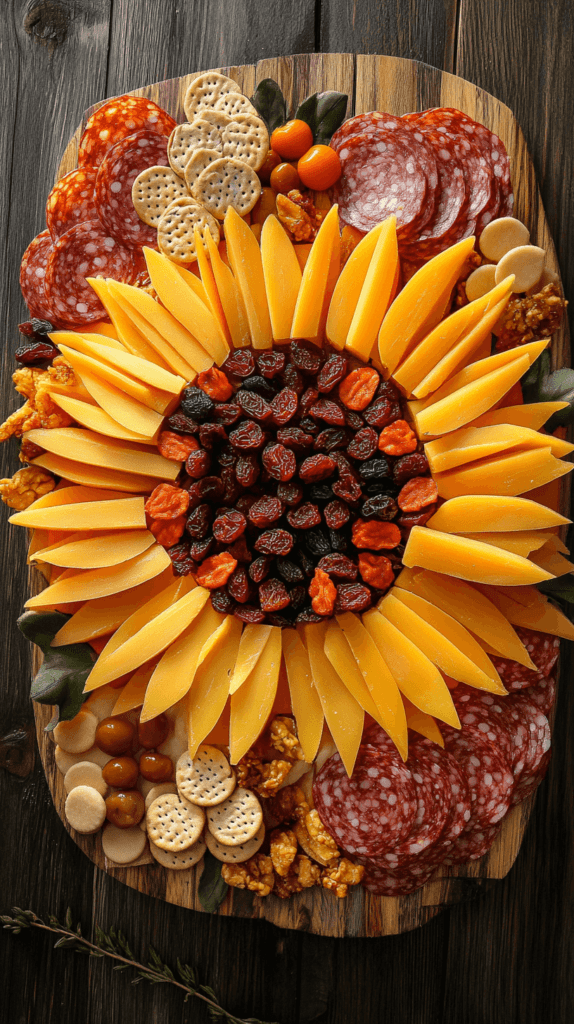
5. Sunflower
- Arrange slices of yellow cheddar or gouda to form the petals, and place darker items like olives or seeds in the center to represent the sunflower head. Fruits like dried apricots or figs could be layered between the petals for added texture.
6. Tree with Falling Leaves
- Create the trunk of the tree with breadsticks or pretzels, then use small cheese or fruit slices to form the branches. Scatter colorful fall fruits like grapes, apple slices, or dried cranberries to represent falling leaves.
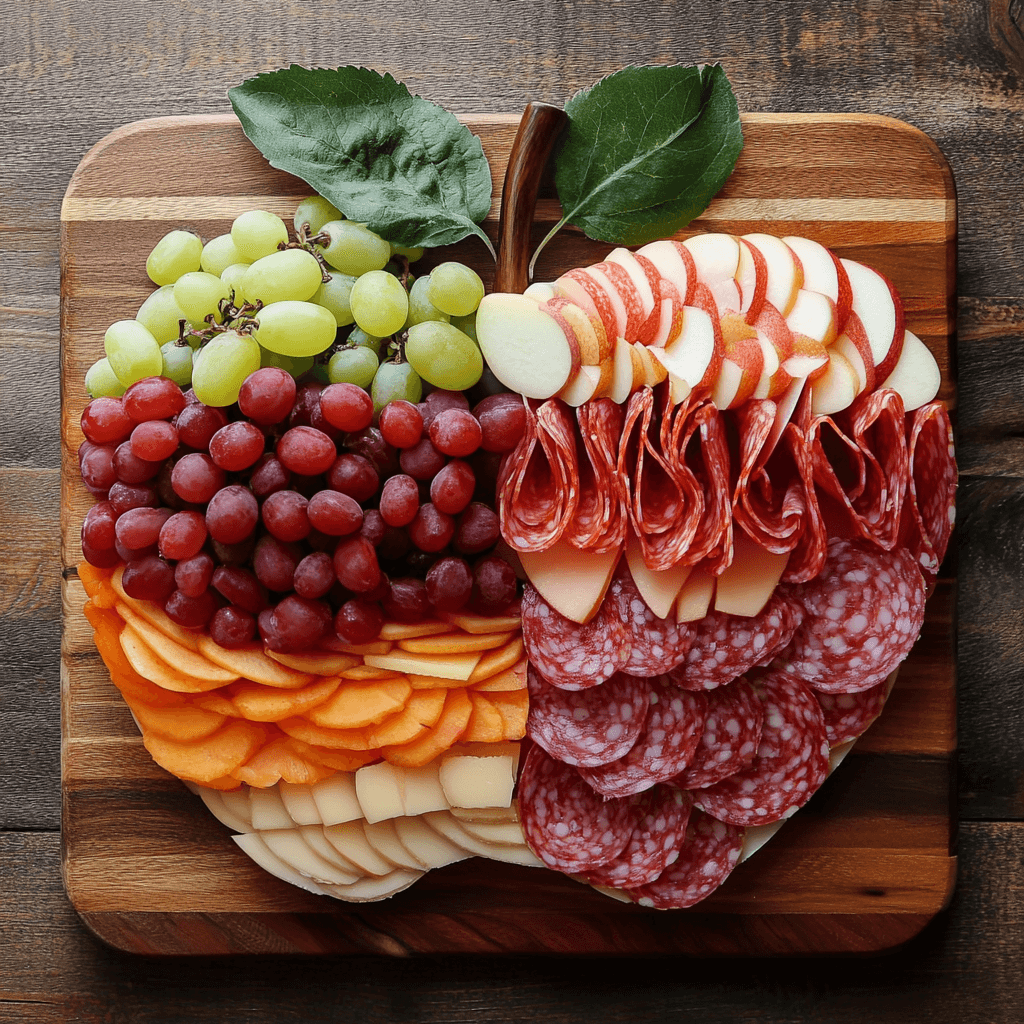
7. Apple
- Arrange sliced apples and other red-colored fruits, cheeses, or meats in the shape of a large apple. Use a small green fruit or herb for the leaf and a pretzel or cracker for the stem.

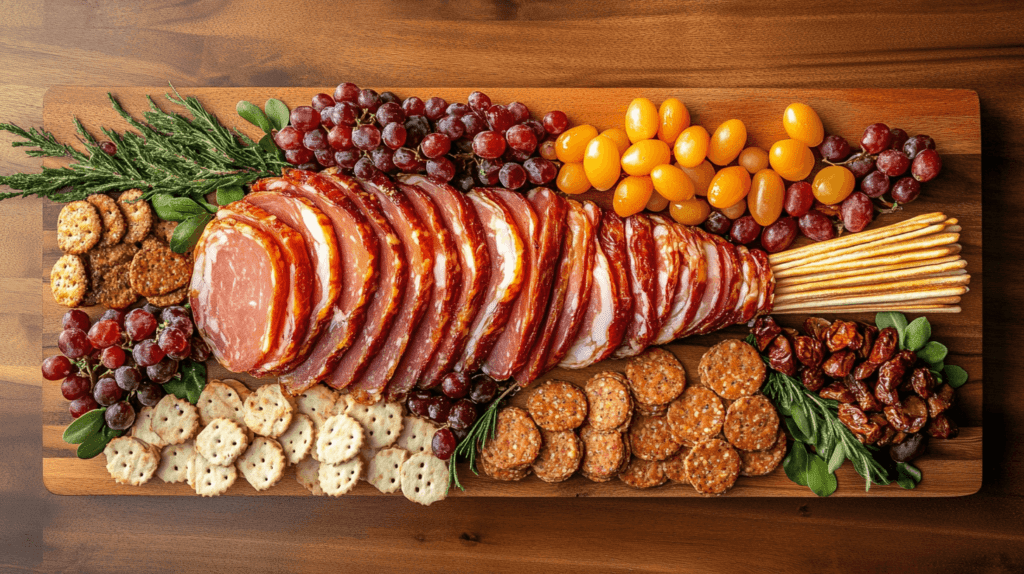
8. Turkey Drumstick
- Shape the food into a large turkey leg using meat slices for the drumstick. Use pretzel sticks or breadsticks as the bone to complete the shape.
Making Your Board Practical and Pretty
While creativity is key, you don’t want to sacrifice ease. Your board should look great, but it also needs to be practical for serving. Here are a few tips to keep in mind:
- Keep it balanced: Make sure your board has a variety of textures and flavors. Include something sweet, something salty, and something crunchy.
- Pre-slice the cheese: No one wants to struggle with cutting cheese at a party. Slice everything ahead of time to keep the flow easy.
- Small bowls for dips: If you’re serving dips like hummus or jams, use small bowls to contain them and prevent any mess.
- Labeling: If you’re serving specialty cheeses or unique items, consider adding small labels or toothpick flags to help guests know what they’re grabbing.
Thanksgiving-Themed Garnishes
I love adding tiny details that make a board feel special. Those finishing touches are where the fun lives. They take almost no time but add so much charm. I usually start with fresh herbs because they smell amazing and make everything look intentional. Rosemary works well since the needles feel woodsy, almost like you placed tiny pine branches around the treats. Thyme has a softer look, and I’ll tuck little sprigs near cheese or dried fruit. It feels casual, not fussy, which is right up my alley.
Mini pumpkins are another favorite. I’ll set two or three on the edge of the board so they don’t get in the way of snacking. They bring that cozy fall vibe in one quick step. If I can’t find pumpkins, I’ll use small gourds. They last forever and look cute without trying. Sometimes I place them near apples or crackers so the colors play off each other. It’s a simple way to make your Thanksgiving charcuterie board feel like decor and food all in one.
I also like edible flowers. They surprise people, which keeps things fun. Marigolds or nasturtiums add color without being too bright. They sit nicely near cheese because the smooth texture helps them stay put. If you’re nervous about flowers, start with just one or two. They create a little moment that makes guests say oh that’s pretty. That’s all you need.
When I want more warmth, I’ll add a few cinnamon sticks or star anise. They smell like fall and make the board look thoughtful. I don’t expect anyone to eat them. They’re just there for looks, like a tiny mantel display on your table. These details turn a simple board into something worth talking about. It’s easy, relaxed, and makes the whole spread feel ready for the holiday.
Wrapping It Up
I love how a Thanksgiving charcuterie board makes hosting feel easy. It lets people snack, talk, and settle in without feeling rushed to the table. I’ve found that a board helps break the ice. Guests wander over and start building little bites. It keeps things relaxed while the kitchen does its thing. It feels like a small celebration before the big meal even starts.
I keep the process simple. I pick fall flavors, add color, and fill the board until it looks full. Sharp cheddar, apples, turkey slices, and a sweet dip fit right in. I tuck things close so every spot feels inviting. A small pumpkin on the edge makes the whole board look ready for the holiday. Simple steps look thoughtful without adding work.
I also like how these boards scale. You can make a big one for a crowd. You can make a small one for a quiet night. Either way, the result feels special. A fun turkey shape always gets attention. Kids love it. Adults love it. It brings a smile and sparks conversation. The food becomes part of the decor, which feels smart and budget friendly.
I live in Florida, so fall looks different here. We trade crunchy leaves for warm breezes. Still, this spread brings that cozy feeling inside. Cranberry bites, soft cheese, and spiced touches make the season feel close. It reminds me that the mood of Thanksgiving starts with good company, not weather.
You can play with new ideas every year. Try new cheese. Add chocolate bark. Use rosemary for an earthy touch. I like saving my favorite layouts on Pinterest, which helps when I’m planning ahead. The goal is simple. Make it pretty. Make it tasty. Enjoy the moment. When the board is done, I step back and smile. It turns a simple snack into a memory.