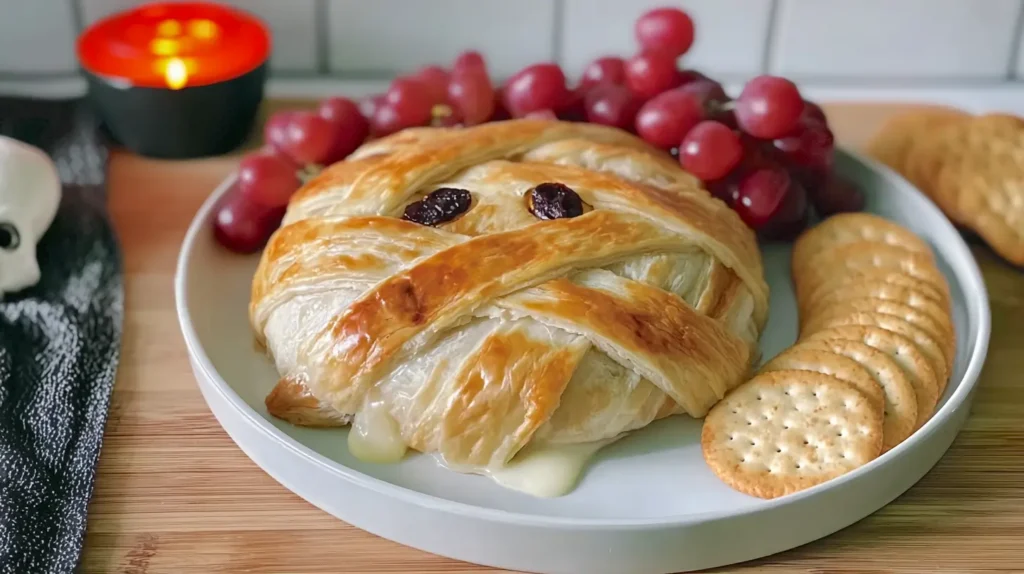
Every Halloween, I like having at least one recipe that’s spooky but still classy enough for adults. Enter mummy brie. It’s just a wheel of brie cheese wrapped in puff pastry strips, baked golden, and finished with goofy little eyes. Silly? Yes. Festive? Absolutely. And the taste? Pure melty, flaky heaven that feels way fancier than the effort it takes.
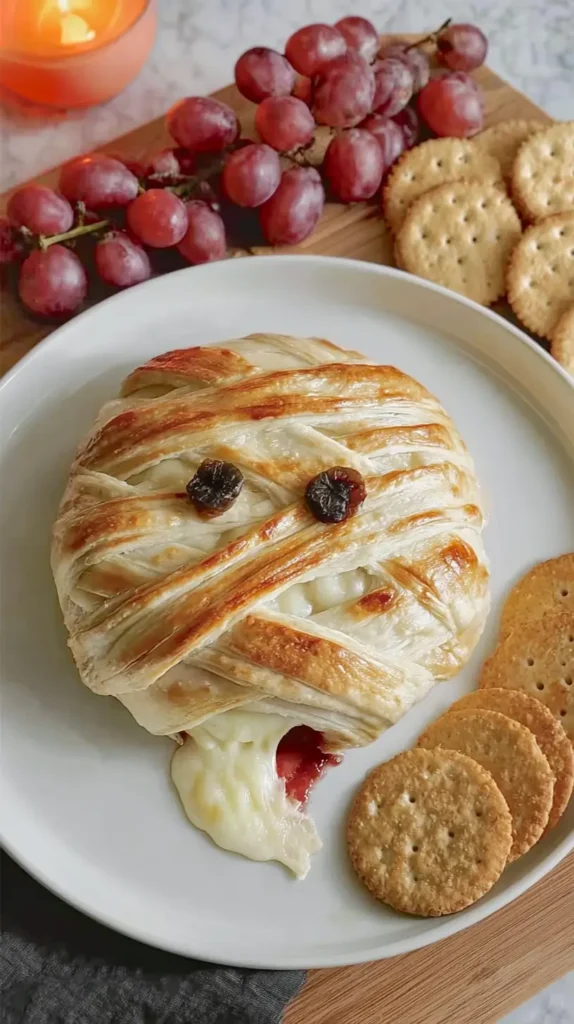
There’s something about food that makes people laugh before they eat it. It sets the mood right away, like saying, “Sure, we’re here for snacks, but also—look at this guy staring back at you.” And once the knife cuts in, brie oozes everywhere like a dramatic Halloween reveal. Half appetizer, half centerpiece, all fun.
The beauty is in the simplicity. A few ingredients, a few strips of pastry, and you’ve got yourself a little edible character. Puff pastry does the heavy lifting, brie brings the richness, and you get to play costume designer with your food. You don’t need to be crafty to pull it off. If you can cut and layer, you’re already ahead.
I’ll be sharing everything here—from ingredients to wrapping tricks, plus clever ways to serve and customize. Consider it your ultimate guide to whipping up a spooktacular Halloween dish without having to play oven monitor all night long.
Living in Orlando makes Halloween feel like a full-on production—theme parks blasting fog, haunted houses at every corner—and here I am in the kitchen, baking cheese into a mummy. It’s my way of adding a little drama to the table without needing strobe lights or fake cobwebs.
So grab that puff pastry, find your brie, and let’s bring a Halloween mummy to life—one bite at a time.
Just a heads up, some of the links here are affiliate links. That means if you decide to make a purchase, I might earn a little something (without costing you a dime). You can check out my full disclosure for all the details.
Why Mummy Brie is a Must for Halloween Parties
Halloween food can go two ways. It can be over-the-top gory, or it can be cute with a little spook factor. Mummy brie lands right in the middle, which makes it perfect for any age group.
Kids love it because it looks like a silly little creature on the table. Adults love it because it’s brie baked in buttery pastry—hard to argue with that. It’s one of those rare appetizers that checks every box.
Another thing I notice is how people react when you set it down. No one just says, “Oh, cheese.” They light up and laugh, and sometimes even ask if they’re allowed to eat it. And then, once someone finally takes the first slice, the whole table dives in.
Here’s why I think it works so well:
- It’s interactive. Guests peel away layers of pastry like they’re unwrapping the mummy themselves.
- It’s versatile. You can serve it with crackers, apple slices, or even sliced baguette.
- It’s dramatic. When that brie starts to ooze, it feels like the mummy is “bleeding cheese.”
- It’s approachable. Unlike some fancy appetizers, everyone knows and loves baked cheese.
Food at parties should do more than just fill stomachs. It should spark conversation and bring a sense of fun. And in my experience, mummy brie does exactly that. It’s a conversation starter, a photo-worthy dish, and a comfort food all in one.
The best part? It doesn’t look or taste like it only belongs at Halloween. Change the candy eyes for rosemary sprigs, and suddenly it’s just a classy baked brie. That’s versatility I can get behind.
Must-Have Ingredients
One thing I’ve learned: simple recipes are the ones I return to over and over. And mummy brie is as simple as it gets. You don’t need a long list of fancy ingredients, just a few basics that do the job right.
Here’s what goes into it:
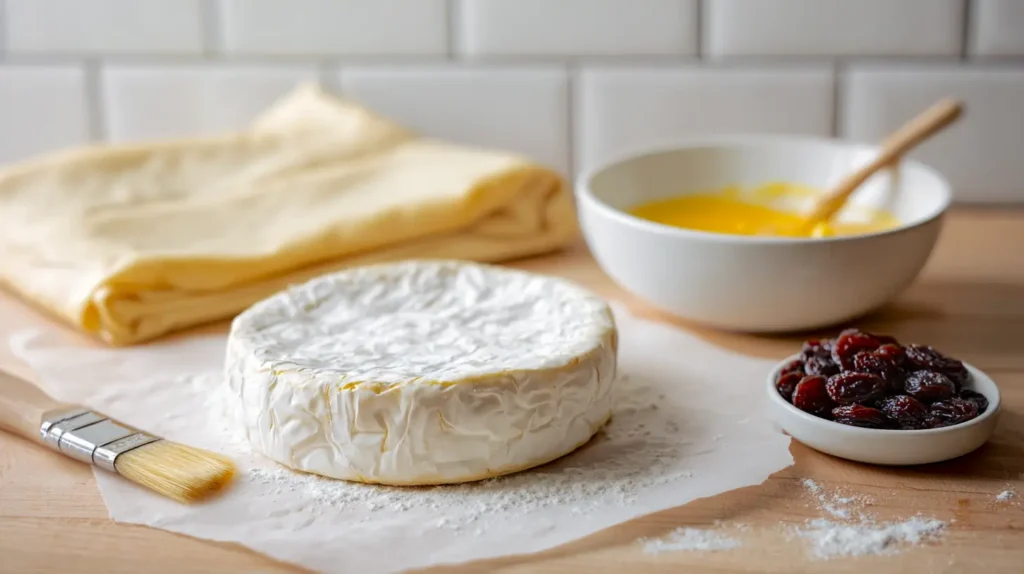
- One wheel of brie cheese (around 8 ounces works best)
- One sheet of puff pastry, thawed if frozen
- One egg (for the egg wash that makes it golden)
- Two raisin eyes (candy eyes or sliced olives if you want savory “eyes”)
Optional extras that make it fun:
- A drizzle of honey for sweetness
- A spoonful of fig jam or raspberry preserves under the pastry
- A sprinkle of everything bagel seasoning before baking
- Fresh herbs like thyme tucked inside for fragrance
That’s it. No complicated shopping list, no specialty items you’ll never use again. The brie and puff pastry are the stars here. Everything else is just personality.
One little tip I’ve found helpful is to get the puff pastry cold but still flexible. If it’s too soft, it stretches too much. Too frozen, and it cracks. Think of it like working with chilled Play-Doh—it should bend without snapping.
This is where the fun part comes in. You’re not just wrapping a cheese wheel. You’re creating a character. Every strip of pastry adds texture. Every crisscross makes it more “mummy-like.” It’s low stakes, but it feels crafty.
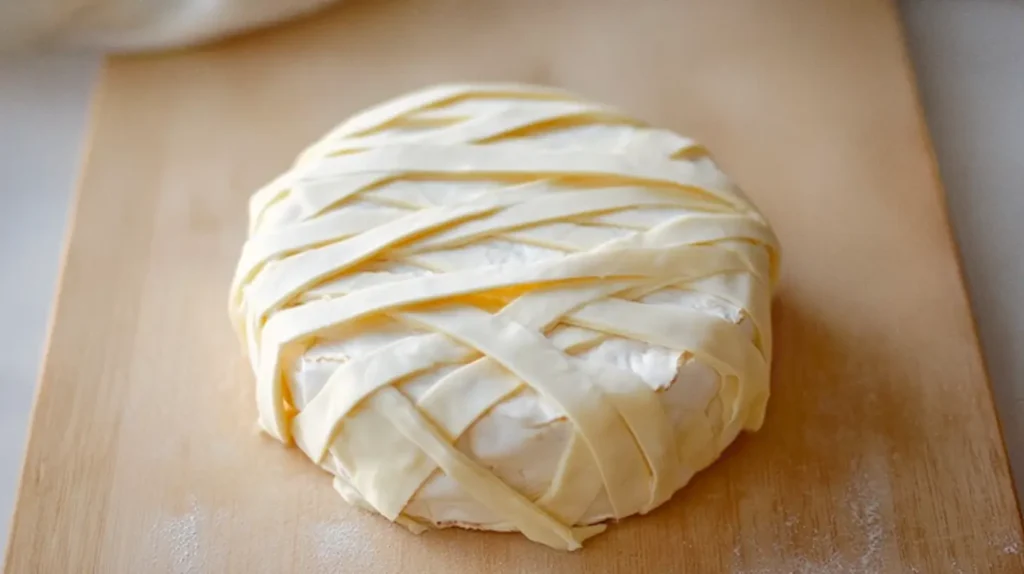
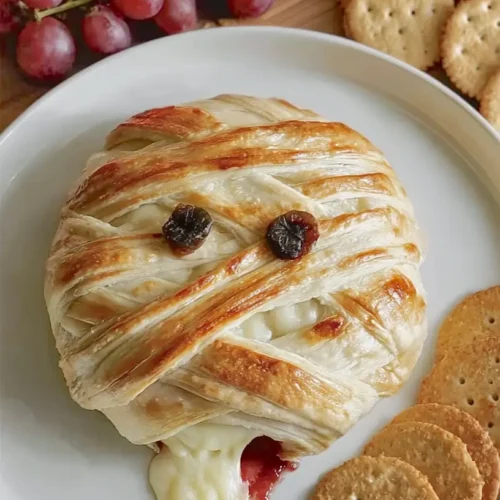
How to Wrap the Cheese Like a Mummy
Now, let’s talk technique. Wrapping the cheese is what transforms plain baked brie into mummy brie. The goal isn’t perfection—it’s personality.
Here’s how to do it step by step:
- Place your brie wheel in the center of the puff pastry sheet.
- Slice the pastry into thin strips with a knife or pizza cutter.
- Start draping the strips across the brie in random crisscrosses.
- Leave small gaps so the cheese peeks through like mummy “bandages.”
- Save two strips to form a little “brow line” where the eyes will sit.
The beauty of this method is that messy looks better. A too-perfect wrap looks like a pastry gift box. But a loose, uneven crisscross? That’s where it starts to resemble a wrapped mummy.
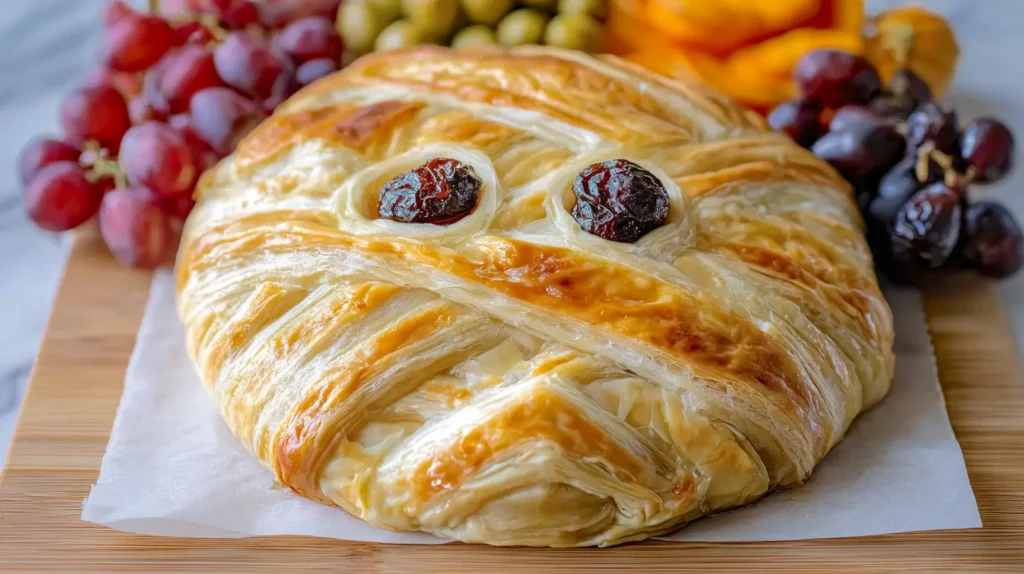
When it comes to the eyes, don’t add them before baking if they’re candy. Place them on after so they don’t melt into weird blobs. If you’re using olives, you can bake them in place since they’ll hold.
Brushing with egg wash before baking makes the pastry shine and helps it turn that gorgeous golden brown. Without it, the strips look dull. So don’t skip that part—it’s worth the extra step.
Once baked, you’ve got a little cheese mummy staring at you from the pan. It’s ridiculous. It’s charming. And it’s the kind of silly detail that makes Halloween food unforgettable.
Giving Your Mummy Brie a Personality
Here’s the thing nobody talks about—when you make mummy brie, you’re basically creating a character. It’s not just cheese wrapped in pastry, it’s a whole little edible creature sitting on your table. And the way you arrange those pastry strips totally changes its personality. Tilt them diagonally, and suddenly your mummy looks like it’s mid-sprint. Wrap them haphazardly with big gaps, and you’ve got a lazy mummy who couldn’t be bothered to finish dressing. Lay the “bandages” in neat, even lines? That’s the overachiever mummy who probably color-codes its planner.
What I love about this is that no two mummies ever come out the same. It’s like snowflakes, but cheesier. Yours might look wide-eyed and startled, while mine ends up looking smug with its gooey little grin. And that’s half the fun—your guests will project personalities onto the poor thing before they devour it. I’ve seen people argue whether the eyes looked terrified or mischievous before finally breaking in for a bite. It’s part food, part party entertainment, and maybe a tiny bit of performance art if you lean into it.
That’s also why this recipe has so much staying power. You can’t say that about a bowl of chips. Chips don’t stare back at you. Chips don’t make people giggle nervously before eating them. But a mummy brie with those awkward puff pastry wrappings and melting brie “guts”? That’s the kind of appetizer that makes a party feel alive—or undead, depending on how you look at it.
Baking Tips to Get It Just Right
I’ve discovered the hard way that baked brie can transform from a delightful masterpiece to a gooey mess if you’re not paying attention. Timing matters.
For mummy brie, you want the pastry golden and crisp, but the cheese still holding shape inside. That usually means baking at 375°F for around 20 minutes.
Here are some tips that make a difference:
- Chill the wrapped brie for 10 minutes before baking. It keeps the pastry layers neat.
- Place it on parchment paper. Otherwise, you risk melted cheese welding itself to your pan.
- Don’t overbake. Once the pastry is golden, pull it. The cheese continues to soften as it sits.
- Let it rest for 5 minutes before cutting. If you slice too soon, it oozes everywhere.
Another trick is adding a little jam under the pastry layer before wrapping. Raspberry or fig gives a sweet-tart contrast to the brie. It also helps hold the pastry in place while baking.
And let’s be honest, it looks way fancier than it is. People see a golden, puffed-up mummy brie and think you spent hours. In reality, it’s just 20 minutes of oven time and a few pastry strips. That’s my kind of Halloween hack.
If you want to double the batch, bake two smaller brie wheels instead of one giant one. That way, everyone gets their own “mini mummy,” and you avoid a cheese traffic jam around the platter.
Brie Filling Surprises and Mummy Eyes
One of my favorite twists on mummy brie is tucking in a surprise filling. That little pocket of jam or preserves under the pastry is like hidden treasure. You cut in expecting simple melted brie, but instead, there’s a pop of sweetness or tang that makes it unforgettable. Raspberry jam gives it that spooky red “bleed,” while fig adds a moody, earthy flavor that feels almost medieval—like your mummy just crawled out of a castle crypt. Apricot, though, that’s the sunshine rebel of the bunch, sneaking into a Halloween party wearing flip-flops.
And let’s talk about the eyes for a second. Candy eyes are cute, sure, but raisins? Raisins add a weirdly realistic touch, like this ancient little brie mummy has been trapped in a tomb too long. Olives give it a sharp, salty edge, while blueberries make it look wide-eyed and innocent. The point is, the eyes are your chance to play. Swap them out depending on the mood of your party. Want creepy? Stick with dark, shriveled raisins. Want playful? Blueberries or even grapes cut in half.
I think this is the part of the recipe that really lets your personality shine. It’s not just about wrapping cheese; it’s about giving it character. Some mummies come out looking goofy, some look startled, and some—especially the ones with jam oozing—look like they belong in a low-budget horror flick. And honestly, that’s what makes the dish memorable. It’s edible storytelling, one slice at a time.

Playful Twists to Experiment With
Here’s where you can really play. The classic mummy brie is always a hit, but you can change it up depending on your crowd.
Some fun spins I’ve tried or seen work well:
- Spicy Mummy: Add a layer of pepper jelly under the pastry for a sweet heat surprise.
- Savory Mummy: Sprinkle garlic powder or parmesan over the pastry strips before baking.
- Sweet Mummy: Drizzle with honey after baking and serve with apple slices.
- Mini Mummies: Use baby brie rounds for individual servings. Great for buffet-style parties.
You can also play with the “eyes.” Candy eyes are cute, but black olives look spookier. Peppercorns pressed into cream cheese dots also work. Or, if you’re feeling cheeky, place two small grape tomatoes as bulging eyes—it’s absurd but hilarious.
One thing I love is how forgiving it is. Even if the pastry strips slide or bake unevenly, it just makes the mummy look scruffier. And let’s face it, most real mummies don’t have perfect bandages either.
Think of it like costumes. Some people go full Hollywood with makeup and effects. Others throw on a sheet and call it a ghost. Both get laughs. Both work. Same with this cheese.

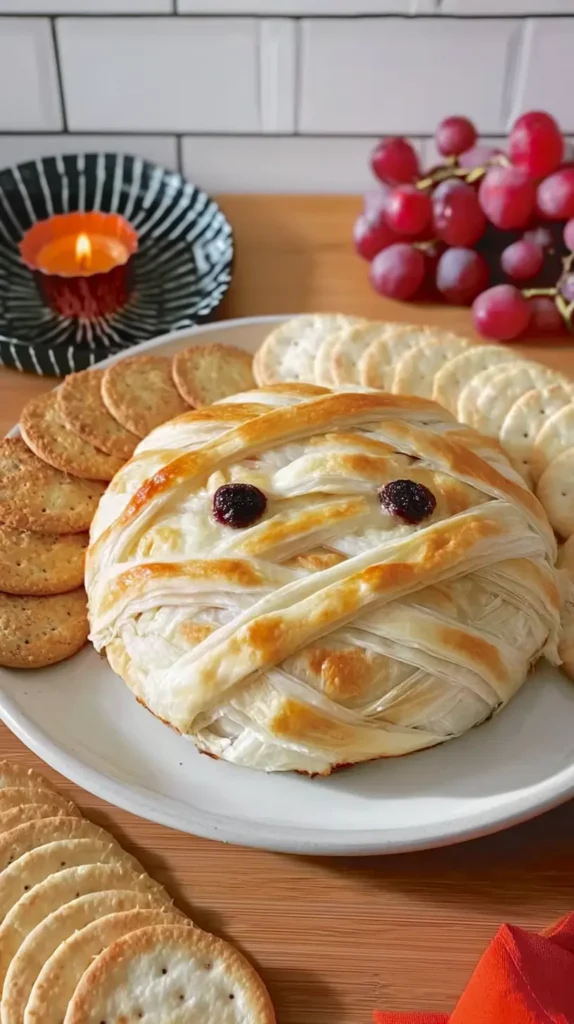
What to Pair with Your Mummy Brie
Presentation matters just as much as flavor. You could plop your mummy brie on a plate alone, but building a little spread around it takes it from cute to wow.
Here are easy pairings that always shine:
- Crackers in different shapes for crunch
- Sliced baguette for something hearty
- Apple or pear wedges for fresh, juicy bites
- Grapes or figs for color and sweetness
- Pretzel rods for a salty twist
I like to scatter the accompaniments around the brie on a big platter. It looks abundant without much work. Add a sprig of rosemary here, a cluster of grapes there, and suddenly it’s photo-ready.
One thing I always notice is how people love having both sweet and savory options with brie. Someone might dip into honey on one bite, then grab a salty cracker the next. It’s the mix-and-match approach that keeps people coming back for more.
And don’t underestimate the drama of that first slice. The way the cheese melts out is part of the show. Guests will gather just to see it happen. If you lean into the performance, it makes the whole moment feel special.
Mummy Brie
Ingredients
- 1 wheel brie cheese about 8 ounces
- 1 sheet puff pastry thawed if frozen
- 1 egg beaten
- 2 raisins for eyes or candy eyes added after baking, or sliced olives if savory is preferred
- Optional: 1 tablespoon fig jam or raspberry preserves
- Optional: 1 teaspoon honey for drizzling
- Optional: 1 teaspoon everything bagel seasoning
- Optional: 2 sprigs fresh thyme
Instructions
- Preheat oven to 375°F (190°C).
- Line a baking sheet with parchment paper.
- Place brie wheel in the center of the puff pastry sheet.
- Cut puff pastry into thin strips with a sharp knife or pizza cutter.
- Drape pastry strips loosely over the brie in random crisscrosses, leaving small gaps so cheese can peek through.
- Save two strips to form a brow line where the eyes will go.
- If using jam, spread it lightly over the brie before adding pastry strips.
- If using herbs, tuck them under the pastry strips.
- Brush pastry strips with beaten egg to create shine and help browning.
- Bake for 18–22 minutes until pastry is puffed and golden brown.
- Remove from oven and cool 5 minutes before serving.
- Add raisin eyes on top after baking. If using olives, bake them in place with the pastry.
- Serve warm with crackers, grapes, or sliced apples.

Wrap-Up Time
When I think about Halloween food, I don’t picture complicated spreads. I picture recipes like mummy brie. Simple, silly, and tasty enough that no leftovers survive the night. It’s the kind of dish that proves you don’t need hours of prep to impress.
I’ve found that these small, festive touches create the biggest memories. It’s not about the most elaborate haunted house table or the scariest themed dessert. It’s about the laughter when someone says, “Wait, is that cheese staring at me?” That’s what people remember.
And here’s the honest part—my house has seen five kids wipe out snacks faster than theme park crowds on a churro cart. If mummy brie makes it past ten minutes, I consider that a miracle worth noting. That’s the beauty of it: fun to look at, gone in a flash, and somehow still easier than the store-bought stuff.
The best part? It works outside Halloween too. Change the decorations, swap the eyes for herbs, and it becomes a year-round favorite. Food that flexible earns a permanent spot in my kitchen.
If you decide to try it, take pictures before everyone digs in. Trust me, this one doesn’t linger. And if you share it on Pinterest, you’ll probably end up giving someone else the idea for their next gathering.
At the end of the day, that’s what I love about recipes like this. They’re not just food—they’re conversation, joy, and a little bit of whimsy wrapped in pastry. And honestly, who wouldn’t want that on their table?