Every year, kids Halloween crafts sneak onto my to-do list whether I plan for it or not. The school sends home a “fun project” notice, the neighborhood organizes a party, or my own brain decides a glue-stick emergency is happening. Either way, the glitter comes out, the kitchen table disappears under paper scraps, and I’m suddenly knee-deep in orange construction paper.
I’ve learned something about these projects over the years: kids will love them if they can actually do them. The fastest way to lose their interest is to turn it into a parent-only Pinterest showcase. You know what I mean—the kind of “kid craft” that somehow needs power tools and six different specialty paints. That’s not what we’re doing here.
These ideas are about making something fun, hands-on, and perfectly imperfect. I’m talking paper ghosts with wobbly eyes, painted pumpkins that might just be 90% paint water, and spooky spiders with far too many legs. The mess is part of the charm. So is the fact that they might end up looking more cute than creepy.
I like crafts that use what you already have. Paper plates, yarn, cardboard from last night’s Amazon box—you name it. There’s no reason to buy ten dollars worth of googly eyes when marker eyes do the job. That’s where the creativity comes in. And sometimes, those last-minute swaps turn out better than the plan.
Sometimes I’m the mom who has a craft table ready days in advance, and other times I’m digging through the junk drawer at 4:00 p.m. looking for tape that actually sticks.
This is not about being the “perfect craft mom” (if that even exists). This is about laughing through a crooked bat wing, letting the glue dry where it dries, and maybe even learning to love glitter again. These crafts are for all the real-life moments between homework, dinner, and “Mom, can you help me find the tape?” Because in the end, the best part isn’t the craft—it’s the kid sitting across from you making it.
Some of the links on this site are affiliate links, which just means I may earn a small commission (at no extra cost to you) if you make a purchase. You can check out my full disclosure for all the details.
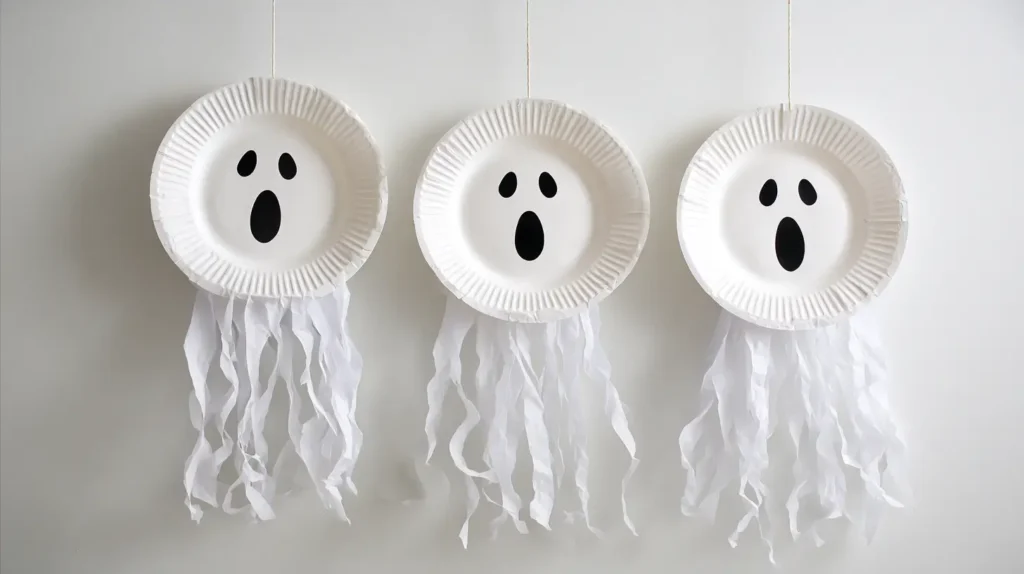
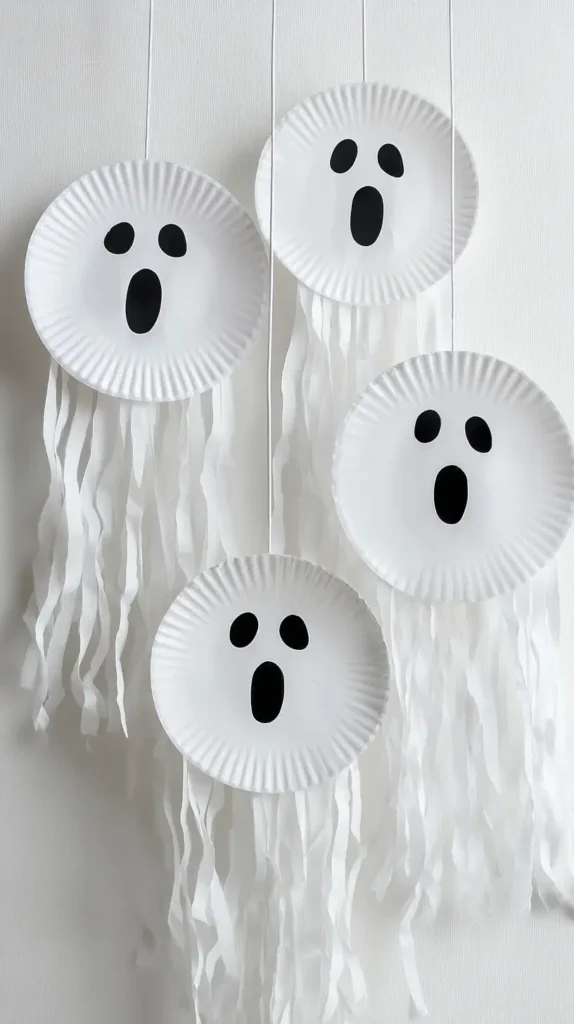
Paper Plate Halloween Ghost Crafts for Kids
Paper plate ghosts are the unsung hero of Halloween craft time. They’re cheap, quick, and nearly impossible to mess up. Plus, kids can make them without much help, which is always a win in my book.
You just need paper plates, scissors, string, and something to make faces—markers, cut-out paper, or even stickers. Let the kids cut wavy strips from the bottom of the plate to make the ghost’s “tail.” If scissors are tricky for younger ones, you can prep this part ahead of time.
For faces, anything goes. Big round eyes with a surprised “O” mouth? Classic. A goofy grin with teeth? Even better. The less symmetrical, the cuter they get.
A few tips I’ve learned:
- If you hang them by a window, the breeze makes them “float.”
- Let kids add glitter or tissue paper if they want to get fancy.
- Yarn or ribbon works just as well as string for hanging.
The best part? These ghosts can be done in under fifteen minutes. That means you can knock out a bunch for a classroom decoration blitz or just keep making them until the paper plates run out. They’re also flat, which makes storing them for next year easy.
Paper plate ghosts also work well in group settings. I’ve seen kids swap ghost faces to make “families” or team up to create giant ones by gluing plates together. It turns into a whole little ghost town, and suddenly, you’ve got decorations for every doorway.
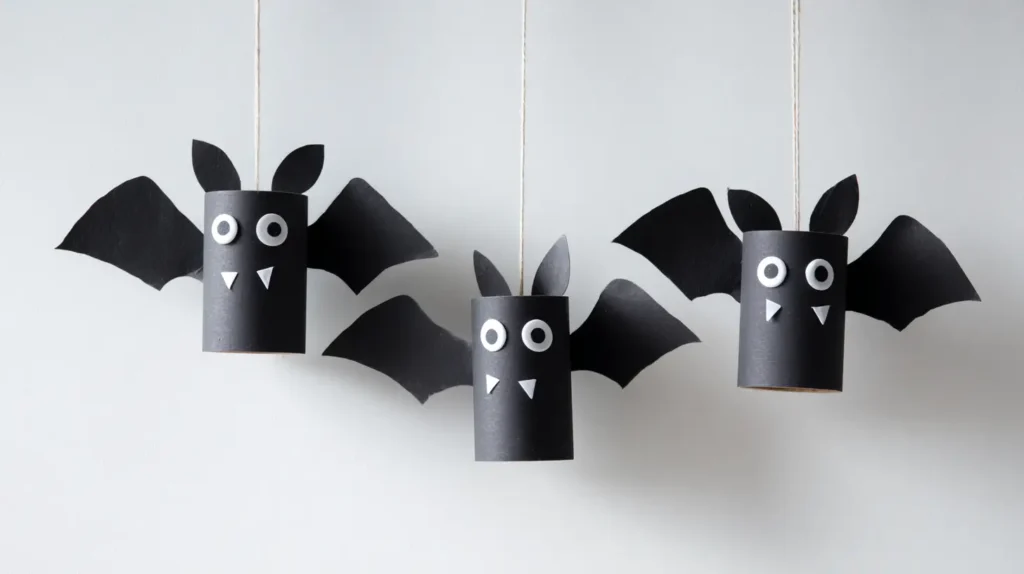
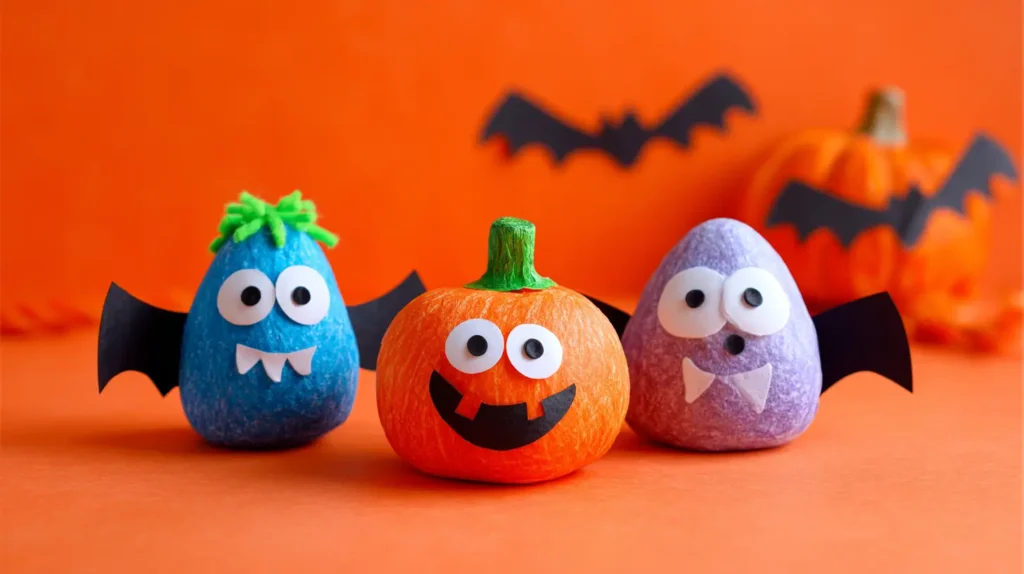
Toilet Paper Roll Bats
Toilet paper roll bats are proof that recycling can be adorable. The base is already the perfect size for little hands, and the bat shape comes together with just a few folds and cuts.
Start with the roll itself. Have kids paint it black (or purple if they want something fun). While the paint dries, cut out bat wings from black construction paper. I like using a simple curved shape so the kids can cut their own without frustration.
Once the rolls are dry, fold the top edges inward to make little bat ears. Then, glue or tape the wings to the back. Eyes can be googly or drawn on. If you’ve got white paint pens, kids can add fangs or silly expressions.
Some quick tips:
- Use tape instead of glue for wings if you want to keep it mess-free.
- Add a small piece of string on top so the bats can hang upside down.
- For a glitter bat (yes, it’s a thing), brush glue on the wings before sprinkling.
What I love about this craft is how different each bat ends up looking. Some will have giant eyes, others tiny smirks. They also look fantastic in a group, especially if you hang them at different heights in a corner or over a doorway.
It’s a craft that’s low-cost, easy to adapt, and quick enough to fit into a short afternoon. The bonus? You’ll never look at a toilet paper roll the same way again.
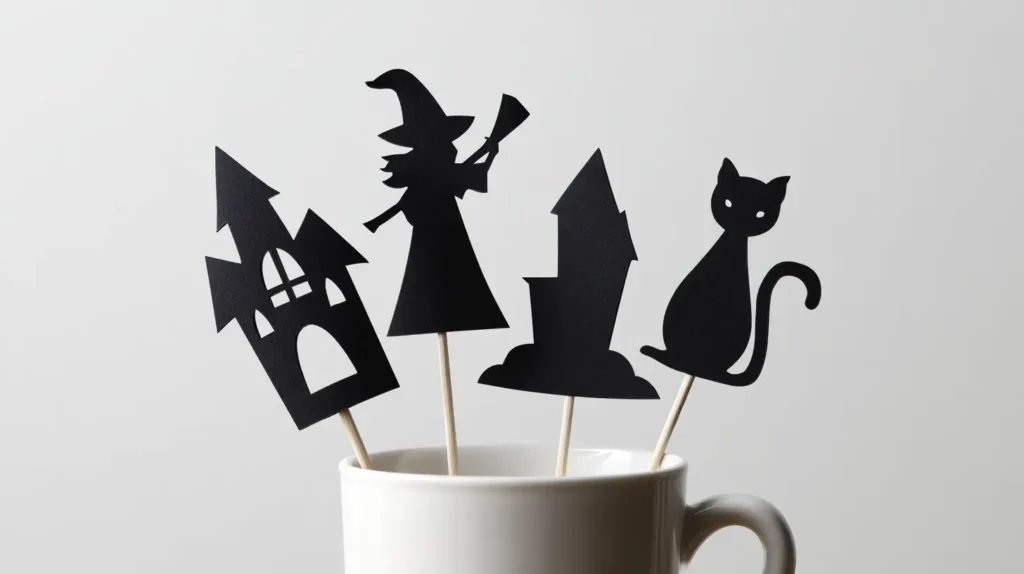
Shadow Puppet Storytelling
One of the most unexpectedly magical kids Halloween crafts I’ve ever seen involves nothing more than a flashlight, paper, and a little imagination. Shadow puppet storytelling turns craft time into a mini theater, and the kids don’t even realize they’re basically making their own movie.
It starts with cutting shapes from black cardstock—witches with pointy hats, crooked little houses, lanky cats, maybe even a ghost shaped like a potato. (Because let’s be honest, kids’ scissors have a mind of their own.) Have a perfectionist on your hands? It’s time to break out the Cricut, Mom! You tape each shape to a stick—skewers, straws, or whatever you’ve got—and suddenly you’ve got a cast of spooky characters ready to perform.
The real fun starts when you turn off the lights, shine the flashlight at a blank wall, and let the shadows come to life. Kids make up their own stories on the spot—sometimes scary, sometimes ridiculous—and the puppets start interacting in ways you never planned. A ghost might accidentally chase a pumpkin, or a bat might get stuck in a tree until someone “rescues” it with a very dramatic ending.
This craft doesn’t just give you something to hang on a wall. It gives you an entire night of giggles and storytelling that changes every time you do it. You can keep adding new characters as the season goes on, and before you know it, there’s a whole Halloween “universe” of puppets.
It’s the kind of project that grows with the kids, too. Little ones will be happy waving a single ghost across the wall. Older kids start getting into plot twists, voices, and even “special effects” by moving the flashlight around. And the best part? When you’re done, all the pieces tuck away flat in a folder, ready to make a comeback next year.

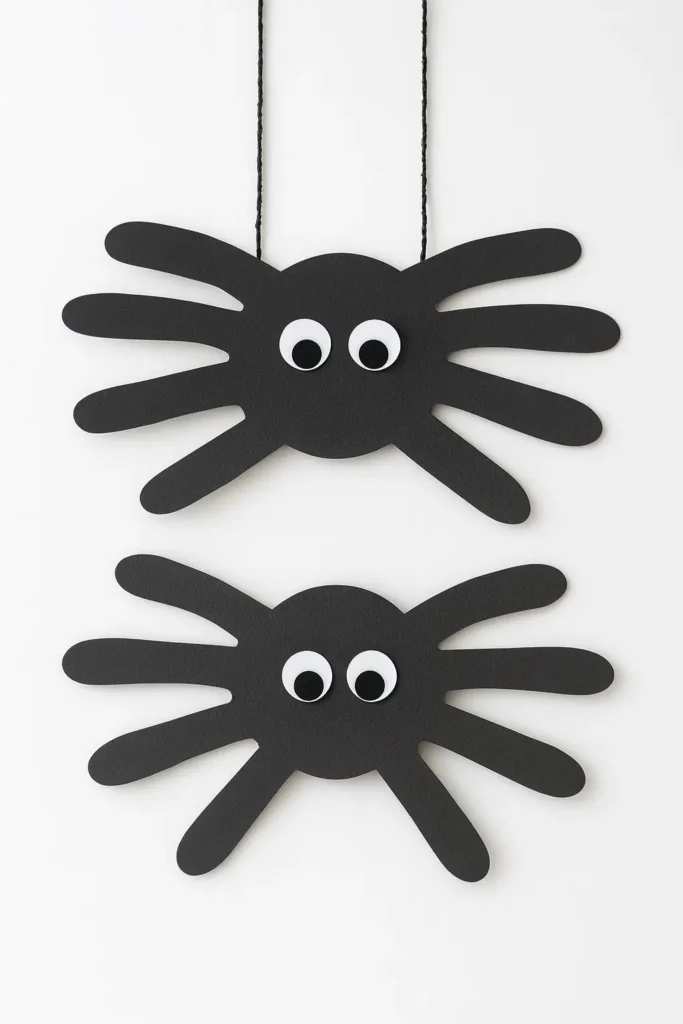
Handprint Spider Kids Halloween Craft
Handprint spiders are one of those crafts that kids never forget making. There’s something about tracing your own hand, cutting it out, and turning it into something “creepy” that feels magical.
Here’s how it works: have the kids trace both hands on black paper and cut them out. Overlap the palms in the middle so the fingers become legs, then glue them together. Add a round paper circle on top for the spider’s body.
Eyes are a must, of course. Two eyes look cute. Eight eyes look extra spooky. And if a kid decides their spider only needs one giant eye? Let it happen.
Ways to make them more fun:
- Use patterned scrapbook paper for legs instead of plain black.
- Let kids bend the “legs” upward for a 3D effect.
- Add a piece of yarn from the top so it looks like the spider is hanging.
These are perfect for decorating walls, classroom boards, or even taping to the fridge. You can also scale the craft up by using bigger paper so the spiders are extra oversized. Kids love holding them up to their face like a mask, too.
The real magic of this craft is how simple it is. It’s easy enough for preschoolers but still fun for older kids to make more detailed. Plus, it’s a little keepsake—you’ll always know how small their hands were that year.
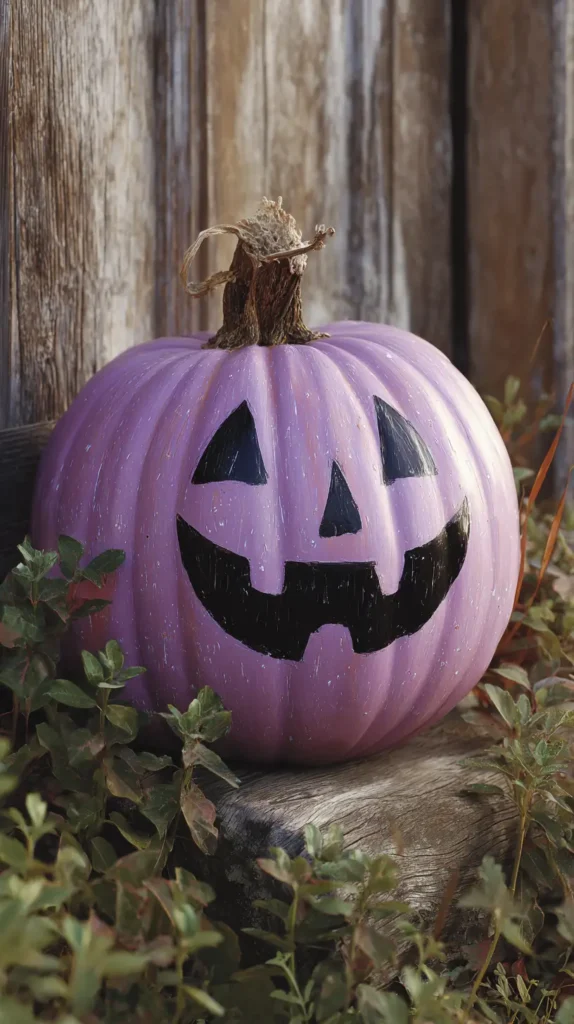
Pumpkin Painting That Skips the Carving Mess
Carving pumpkins is fun, but it’s not exactly a weekday activity. That’s where painted pumpkins come in. No scooping seeds, no sharp knives—just a quick setup and endless creativity.
You can use real pumpkins or the small craft store foam ones. Cover the table with newspaper, hand out paint, and watch the ideas fly. Some kids go classic with jack-o’-lantern faces, while others paint entire scenes or turn their pumpkin into a character.
Things I’ve found help:
- Give each child their own paper plate for paint mixing.
- Use acrylic paint for bright, opaque coverage.
- Have hairdryers nearby for quick drying if layering colors.
You can also mix up the materials. Glitter glue, stickers, yarn for hair—the more options, the more unique each pumpkin looks. Foam pumpkins have the advantage of being reusable, so kids can see their work again next year.
Painted pumpkins work especially well for younger kids who might not be ready for carving tools. And honestly, the results are often more colorful and creative than a carved face. Plus, they last longer on the porch.
This is the kind of project you can scale up for a whole group, too. A “pumpkin painting station” at a Halloween party keeps kids busy and gives them something to take home.

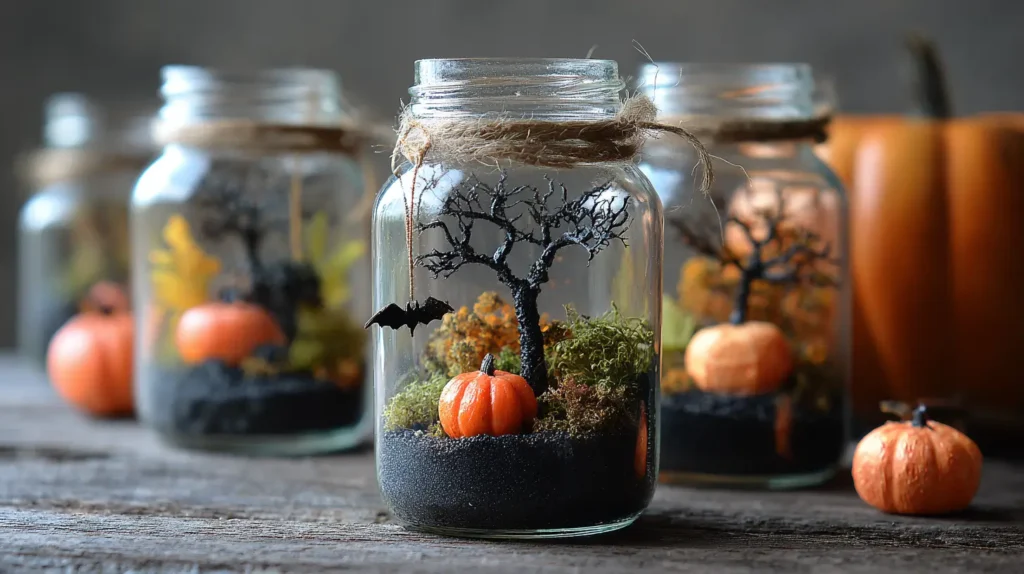
Mini Haunted Terrariums
Older kids want Halloween projects that feel less like “arts and crafts time” and more like they’re making something real. That’s where mini haunted terrariums come in. They’re tiny worlds in a jar—part spooky scene, part creative challenge—and they hit that sweet spot of being hands-on without feeling too young.
All you need is a clear jar or plastic container with a lid. The base can be anything from black sand to crumpled tissue paper. Then comes the fun: building a little Halloween scene inside. Kids can use small plastic figures, twigs for trees, tiny fake pumpkins, and even scraps of moss for “creepy” ground cover. A bit of fishing line can turn a paper bat into something that “floats” midair.
The real hook for this age group is that it feels like they’re designing something collectible. They can arrange and rearrange the pieces until it’s perfect—like a mini set design. Some go for haunted forests, others for graveyard scenes, and some will surprise you with a vampire tea party. There’s no wrong approach, and the storytelling that happens while they work is half the fun.
Once finished, the terrariums look amazing on a bookshelf or as a Halloween table decoration. They’re also easy to store, which means the kids can pull them out next year, add new details, and watch their tiny haunted worlds grow over time. And for kids who like a challenge, they can even swap jars with friends and try to “out-spook” each other. It’s a Halloween project that’s just the right mix of creepy, cool, and creative.

Popsicle Stick Haunted Houses
Popsicle stick crafts never really go out of style, and haunted houses are the perfect spooky twist. You can keep them simple or go big with multiple layers and decorations.
Start by gluing popsicle sticks into a house shape—square or rectangle for the base, triangle for the roof. Once dry, paint the sticks black, purple, or even orange.
Here’s where the creativity comes in:
- Add paper windows and doors with drawn-on details.
- Glue on small plastic spiders or bats for texture.
- Make a “haunted” fence from cut-down sticks.
If you want to make them stand up, glue the base to a piece of cardboard. Or add string to hang them as wall decor.
This is a great craft for kids who like building things. It’s hands-on, lets them design their own layout, and gives plenty of room for adding little characters or scenes inside the “house.”
For group settings, you can pre-assemble the basic house shapes so kids can focus on decorating. It’s amazing how different each one turns out, even with the same starting point.
Haunted house popsicle stick crafts are sturdy enough to save for next year, too. Wrap them in tissue paper and store flat—they’ll hold up surprisingly well.
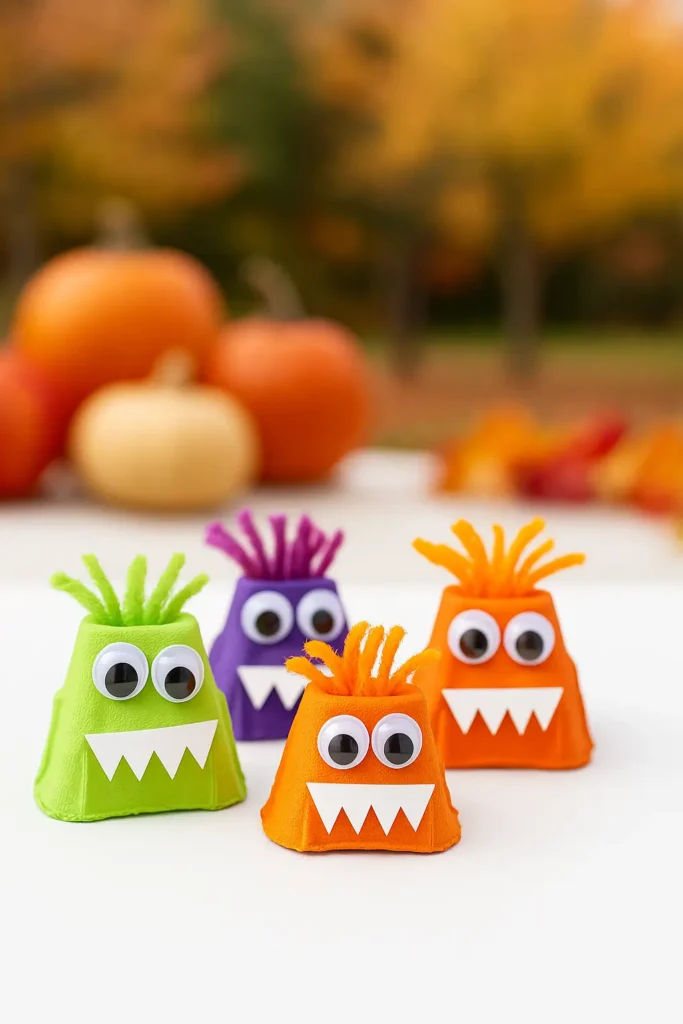
Egg Carton Monsters
If you’ve got an empty egg carton, you’ve got the start of a craft project. These little monsters are perfect for using up scraps of craft supplies and letting kids go wild.
Cut the egg cups apart and let kids paint them in whatever colors they like. Once dry, they can glue on eyes (drawn or googly), add paper teeth, and even give them yarn hair.
Fun variations:
- Stack two cups for a “taller” monster.
- Add pipe cleaner arms for a poseable effect.
- Use metallic paint for a “robot” monster look.
The beauty of egg carton monsters is that there’s no “right” way to make them. Every single one turns out completely unique, and kids love showing theirs off.
They’re small enough to make a bunch in one sitting, too. You can line them up on a windowsill or use them as little table decorations for a Halloween party.
This is a perfect low-cost, high-creativity craft. It’s also one of those projects that works just as well for younger kids as it does for older ones who want to get more detailed.
My Final Thoughts on Kids Halloween Crafts
When it comes to kids Halloween crafts, the magic is in the making, not the final product. I’ve noticed that the more relaxed I am about the “rules,” the more fun everyone has. It’s not about perfect paint lines or symmetrical shapes—it’s about the story they tell while making it and the little bursts of pride when they hold it up to show you.
Craft time has this way of slowing things down, even if it’s just for twenty minutes before dinner. You stop thinking about laundry or emails, and you just watch a kid’s brain at work. It’s messy and loud and sometimes involves more glue on the table than the paper, but it’s real.
I think that’s why I keep coming back to these kinds of projects year after year. They’re not just seasonal decorations. They’re little time capsules of who they are right now—the wobbly cut lines, the overuse of glitter, or the painted rocks, and the bat with six eyes “because it’s cooler that way.”
I’ve got holiday boxes in the garage with ghosts my kids made more than a decade ago, and every year I still laugh at the one with the glued-on nose that somehow ended up on the forehead.
And yes, I’ve definitely pinned more ideas on Pinterest than I’ll ever get to, but that’s part of the fun too. The inspiration is endless, and you can always tweak a craft to fit what you’ve got at home.
In the end, the best crafts are the ones that let kids be themselves. Let them mix colors, draw weird faces, or add ten extra legs to a spider. Because someday, you’ll find that ghost from three years ago in the holiday box, and it’ll make you smile just as much as it did the day they made it.