I love Easter crafts for kids because spring energy needs somewhere safe to land. Kids hit this season buzzing, opinionated, and wildly optimistic. Easter crafts for kids turn that excitement into something tangible, colorful, and proudly imperfect. They also give adults a reason to say yes without instantly regretting it.
I’ve found that Easter brings a special brand of optimism. Suddenly, pastels show up everywhere. Everyone believes in fresh starts, including kids with glue sticks. Meanwhile, kids want projects that look festive but don’t demand patience they simply don’t have. That tension is real, but it’s also manageable.
I tend to notice that kids don’t crave complicated instructions. They want freedom, bold colors, and permission to decide things themselves. Easter crafts for kids work best when they invite choices instead of rules. The more relaxed the craft, the longer kids stick with it. That’s not an accident.
Living in Orlando means spring arrives early and announces itself loudly. Sunshine pours in, windows open, and suddenly everyone wants to do something. Crafting becomes the bridge between outdoor excitement and indoor sanity. (It’s either that or chaos.) I’ve found that having a plan helps.
This list previews crafts kids actually finish and proudly show off. Each idea leaves room for personality, mistakes, and confident creativity. Nothing here aims for perfection. Everything here aims for joy, ownership, and that “I made this” moment kids love. And honestly, that’s the whole point.
Some of the links on this page are affiliate links. That means if you click and make a purchase, I may earn a small commission at no extra cost to you. If you’re curious about the fine print, you can check out my full disclosure.
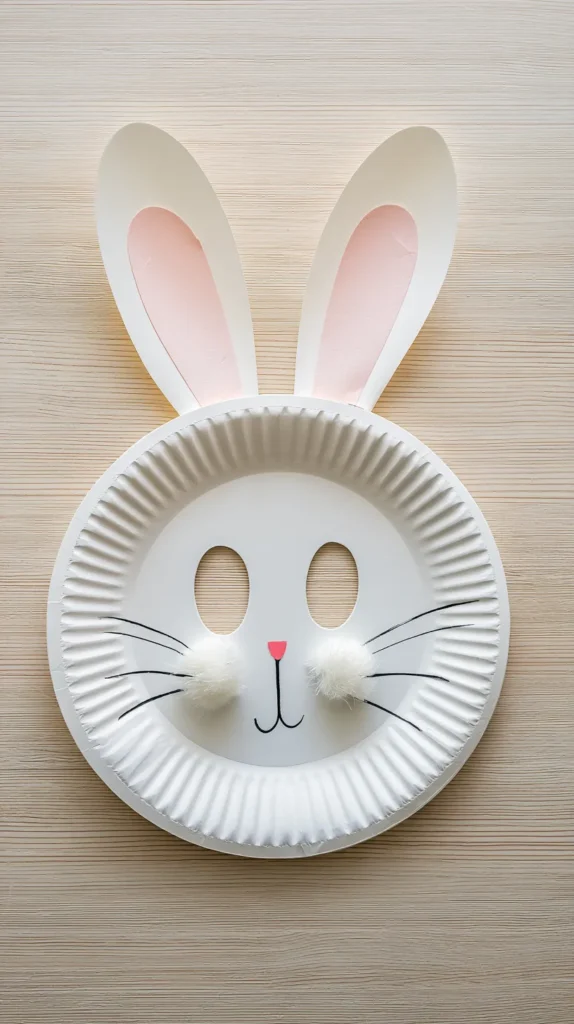
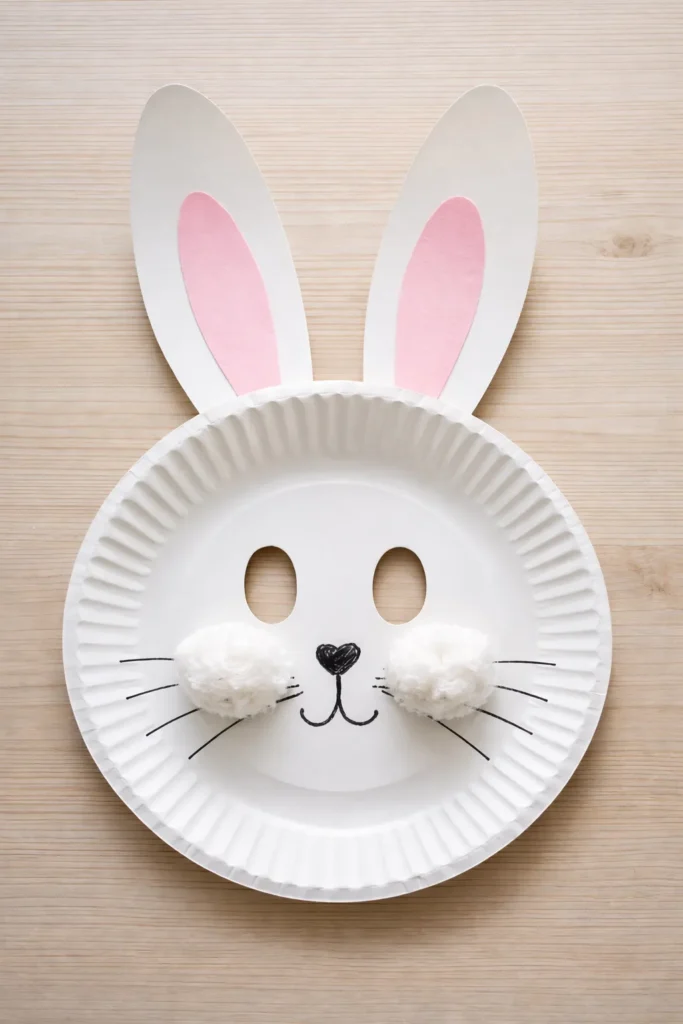
Paper Plate Bunny Masks That Invite Drama
This craft works because it turns crafting into play immediately. Kids don’t just make a bunny mask. They become the bunny. Easter crafts for kids land better when imagination leads the way.
I’ve found that paper plates lower expectations in the best way. Plates already feel temporary, which removes pressure. That mindset helps kids relax and try bold ideas. Bunny masks also spark storytelling without prompting. Suddenly, everyone has a character.
Start by setting up a clear workspace. Each child needs one paper plate, scissors, glue, and markers. Construction paper works for ears and noses. Elastic string or yarn helps the mask stay put. Cotton balls and pom-poms add texture, but they’re optional.
First, flip the plate over and lightly mark eye holes. Then cut the holes carefully. Next, cut two long oval ears from construction paper. Glue the ears to the top edge of the plate. Press firmly and wait a moment.
After that, decorate the face. Draw eyes, whiskers, and mouths with markers. Glue on cotton balls for noses or cheeks. Let kids choose colors freely. Symmetry isn’t the goal here.
Once the face is finished, punch one hole on each side. Tie elastic or string through the holes. Adjust the length so the mask sits comfortably. Tight masks ruin the mood.
Things that help keep momentum:
- Pre-cut ears for younger kids.
- Offer unexpected colors, not just pastels.
- Encourage oversized features instead of tiny details.
I tend to notice that Easter crafts for kids shine when projects turn into costumes. Bunny masks invite movement, voices, and confidence. Once the masks go on, play takes over. That’s the real success sign.
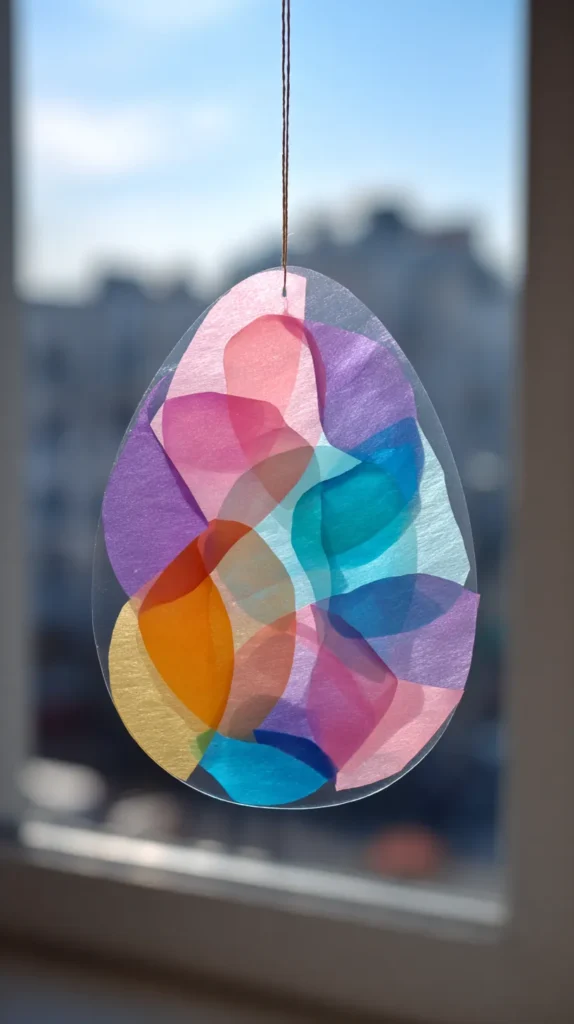
Easter Egg Sun-catchers Craft for Kids That Catch Light
This craft leans into spring brightness in the best way. It looks best when sunlight joins the project, which feels very on brand for Easter. I’ve found that Easter crafts for kids work better when nature helps finish the job.
Start by gathering supplies before kids sit down. You’ll need clear contact paper or self-laminating sheets, tissue paper in several colors, and scissors. A simple egg template helps keep shapes consistent. Tape also helps keep things steady during setup.
First, cut egg shapes from the backing side of the contact paper. Then peel the backing off and place the sticky egg shape flat on the table. Sticky side should face up. This step matters more than it sounds.
Next, tear tissue paper into small pieces. Squares, strips, and blobs all work. Let kids layer the tissue freely onto the sticky surface. Overlapping colors create new shades, which kids always notice. “Wait, that turned purple!” happens every time.
Once the egg shape is filled, peel the backing from a second sheet. Carefully place it over the top to seal everything in. Press gently across the surface to remove air pockets. Then trim around the egg shape cleanly.
Punch a small hole at the top if needed. Thread string or ribbon through the hole. Hang the suncatcher near a sunny window. Step back and let the light do the work.
This craft works especially well because:
- There’s no drying time.
- The mess stays contained.
- The results look impressive immediately.
I tend to notice that Easter crafts for kids benefit from quick payoff. Suncatchers deliver instant pride without waiting. Kids love seeing their work glow. That satisfaction sticks.
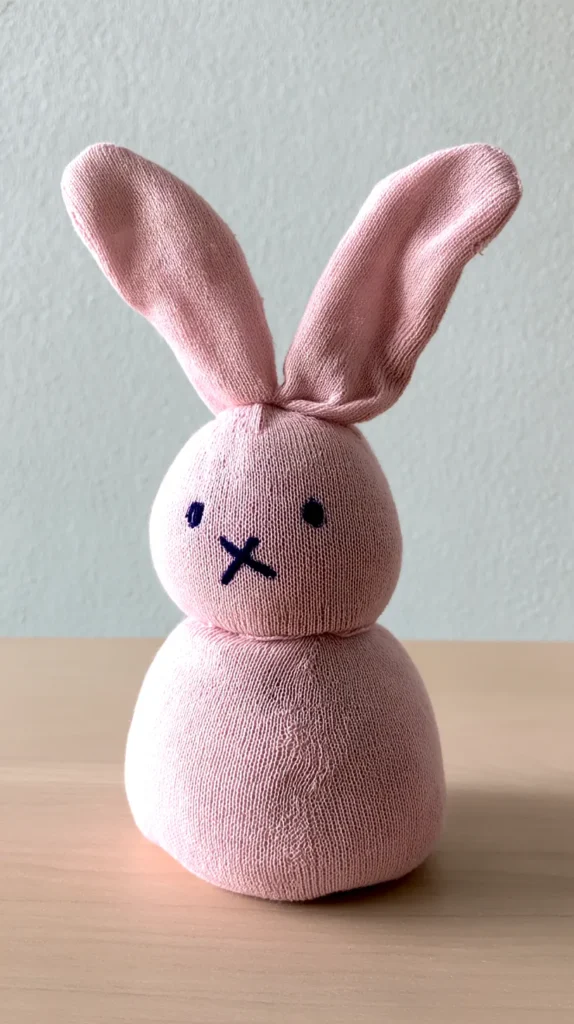
Sock Bunnies That Lean Charming, Not Perfect
This craft starts with a single lonely sock, which already sets the mood. One sock finally gets a starring role. Easter crafts for kids land better when nothing feels precious or fragile. Socks quietly tell kids, “Relax, I’ve got this.”
I’ve found that sock bunnies work because they forgive absolutely everything. Stuffing shifts. Shapes wobble. Proportions wander. Somehow, it still turns out charming. Rice or fiberfill both work here, depending on what’s hiding in the closet. Rubber bands do the heavy lifting, which feels fair.
Start by laying the sock flat on the table. Pour stuffing into the toe end first and tap it down gently. Once the body looks rounded, twist a rubber band around the sock to form the neck. Then add more stuffing above that section for the head. Tie another rubber band and admire the vague bunny shape forming.
Next, create the ears. Cut straight down from the open end of the sock, splitting the fabric into two long sections. Trim the tips into points or leave them rounded. Either choice works. At this stage, it should finally look like something intentional. (That’s the relief moment.)
Now add the face. Draw simple eyes and a mouth with markers, or glue on felt pieces. Keep features spaced wide. Crowded faces tend to look stressed. Optional details come next, if kids want them.
A few things I tend to notice keep this enjoyable:
- Show it once, then casually step aside.
- Grab extra rubber bands before one snaps dramatically.
- Let the bunny look slightly confused. That’s usually the favorite.
- Resist the urge to “fix” anything unless invited.
Easter crafts for kids shine when kids can hold the result. Sock bunnies invite names, loyalty, and dramatic storytelling.
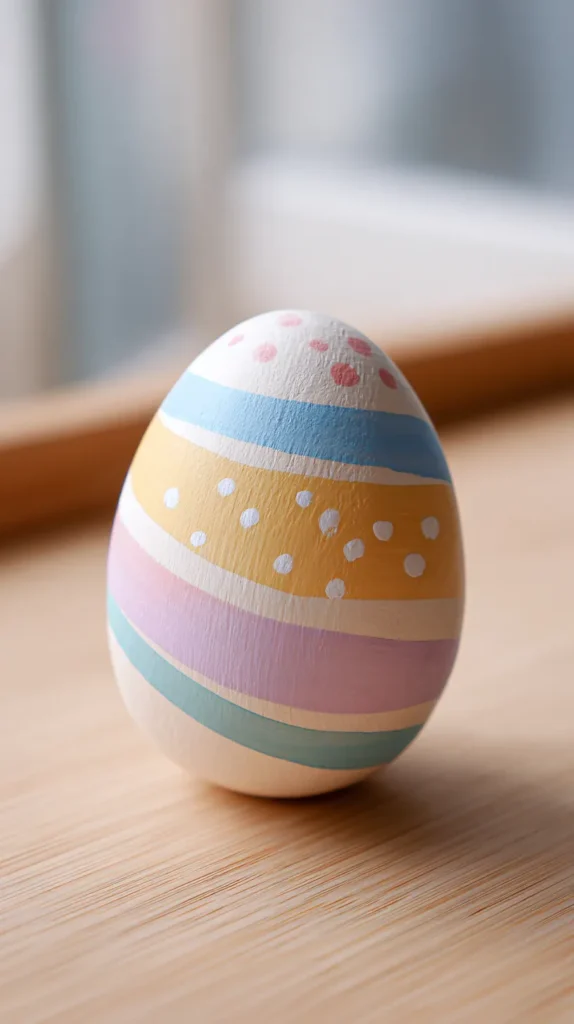
Kids Painted Wooden Easter Egg Craft That Feels Heirloom-Inspired
Wooden eggs raise the stakes just enough to feel exciting. They’re still kid-friendly, but they don’t scream disposable. Easter crafts for kids sometimes benefit from that quiet seriousness. Kids sit up straighter when something feels like it might stick around.
I’ve found that wooden eggs change the whole mood at the table. Suddenly, kids slow down a bit. Not dramatically, but noticeably. There’s a sense of “this matters,” even if paint still ends up everywhere. That balance is the sweet spot.
Start by setting out one wooden egg per child. Acrylic paint works best here because it sticks well and shows color clearly. Give each child a small palette or paper plate with just a few colors. Too many options derail things fast. Brushes should be thicker than you think. Tiny brushes invite frustration.
First, paint the base color. Encourage kids to cover the entire egg, even if it looks streaky. That texture actually helps later. Let the egg dry completely before moving on. This part matters more than it sounds. Wet paint ruins patience.
Once dry, add simple patterns. Stripes work beautifully. Dots always succeed. Color blocks feel bold and intentional. I tend to notice that simple designs read stronger than tiny details. Perfection isn’t the goal here.
A few things I’ve found help:
- Rotate the egg while painting, not the brush.
- Limit colors so decisions stay easy.
- Let brush marks show. They add character.
- Praise bold choices, even surprising ones.
Once finished, let the eggs dry fully before touching. Display them somewhere visible. Easter crafts for kids feel more meaningful when they last beyond the holiday. Wooden eggs often reappear year after year, quietly proving their worth.

Easter Bunny Tail Kids Craft Paintings That Embrace Texture
This craft leans hard into texture, which kids instantly understand. Cotton balls become the paintbrushes, and that twist changes everything. Easter crafts for kids tend to work better when the tools feel unexpected. The novelty alone pulls kids right in.
I’ve found that starting with a simple bunny outline sets everyone up for success. Use white cardstock or thicker paper so paint doesn’t warp it. Place a bunny shape in the center of each page. The tail area should stay blank and obvious. That visual cue matters.
Pour paint into shallow trays or paper plates. White paint works as the base, but pastels add interest. Light pinks, soft yellows, and pale blues layer beautifully. Hand each child a cotton ball or two. Fingers stay cleaner, which helps some kids relax immediately.
Next, dip the cotton ball lightly into paint. Then stamp it onto the bunny tail area. Encourage gentle pressing instead of swiping. That motion creates the fluffy texture everyone wants. Layering comes next. Add white on top of pastel. Add pastel over white. The depth builds fast.
Once the tail looks full, step back and let it dry. Resist fixing edges. Slight messiness adds charm here. I tend to notice that uneven texture actually reads more realistic. Kids see that too.
A few things that keep this fun:
- Put paint on the table, not the cotton ball.
- Offer extra cotton balls before they ask.
- Let kids reload paint often.
- Avoid correcting placement unless invited.
Easter crafts for kids shine when the process feels playful. Bunny tail paintings finish quickly but still look intentional. Kids stay engaged because results appear fast. That confidence carries through the rest of the day.
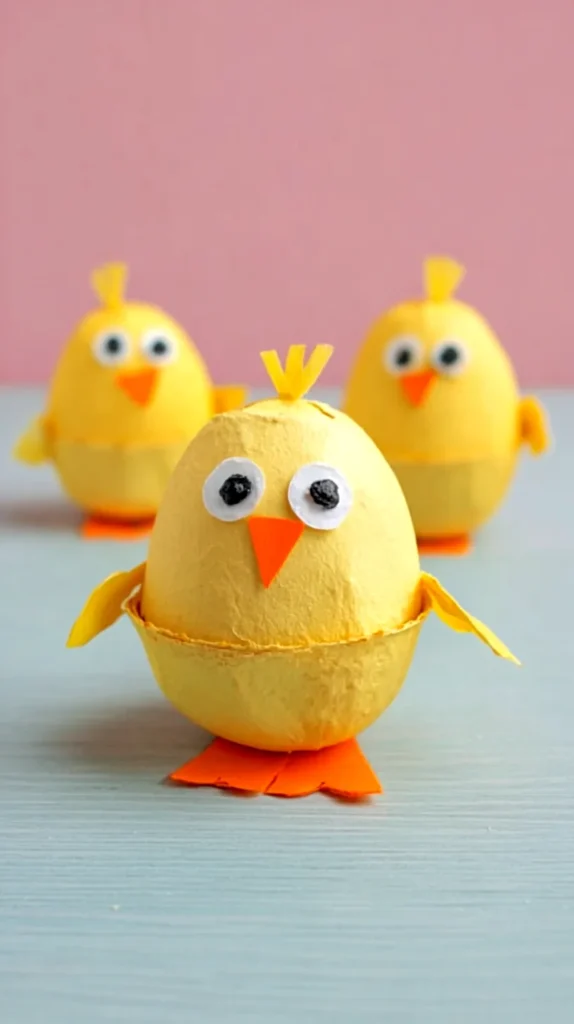
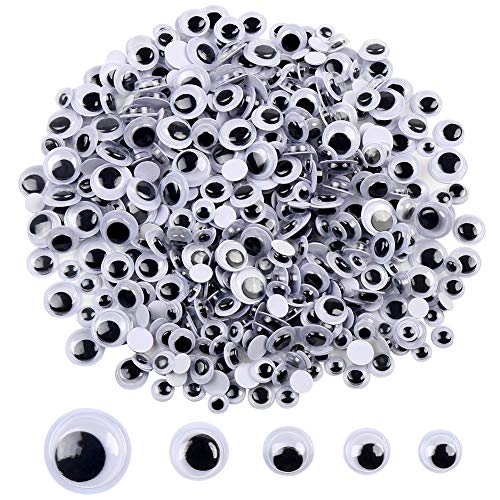
Egg Carton Chicks With Serious Personality
Egg cartons transform beautifully, which always feels a little miraculous. Each small cup becomes a chick body almost immediately. Easter crafts for kids tend to shine when materials start humble. Kids sense that freedom right away and relax into it.
I’ve found that starting with the carton matters. Cut the carton into individual cups before anyone sits down. That small step saves patience later. Once the cups are separated, flip them upside down so they sit like tiny domes. Suddenly, they already look chick-shaped.
Paint comes next, and yellow sets the tone quickly. Acrylic or washable paint both work here. One solid coat usually does it, even if brush marks show. Let the paint dry just long enough to stop smudging. Perfection isn’t required at this stage.
Once dry, the personality part begins. Glue on googly eyes and step back. Some kids choose giant eyes. Others go tiny and intense. Add small paper triangles for beaks and simple wings on the sides. Expressions emerge fast, and that’s where the fun lives.
I tend to notice that kids linger longer when they control their expressions. Sweet chicks appear. Judgmental chicks appear. Confident chicks appear. No two ever look alike, even with the same supplies. That individuality feels important.
As the chicks come together, naming usually follows. Names turn crafts into characters instantly. Conversations start. Stories build. The table gets louder, but happier.
Easter crafts for kids work best when humor sneaks in naturally. Egg carton chicks invite laughter without trying. They’re quick to make, easy to personalize, and impossible to take seriously. That lighthearted energy sticks long after the paint dries.

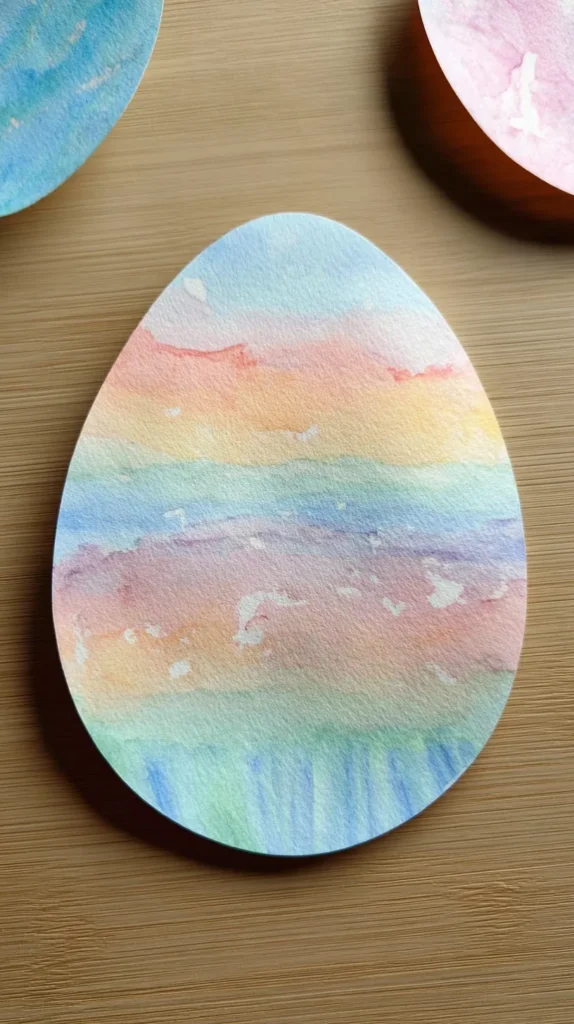
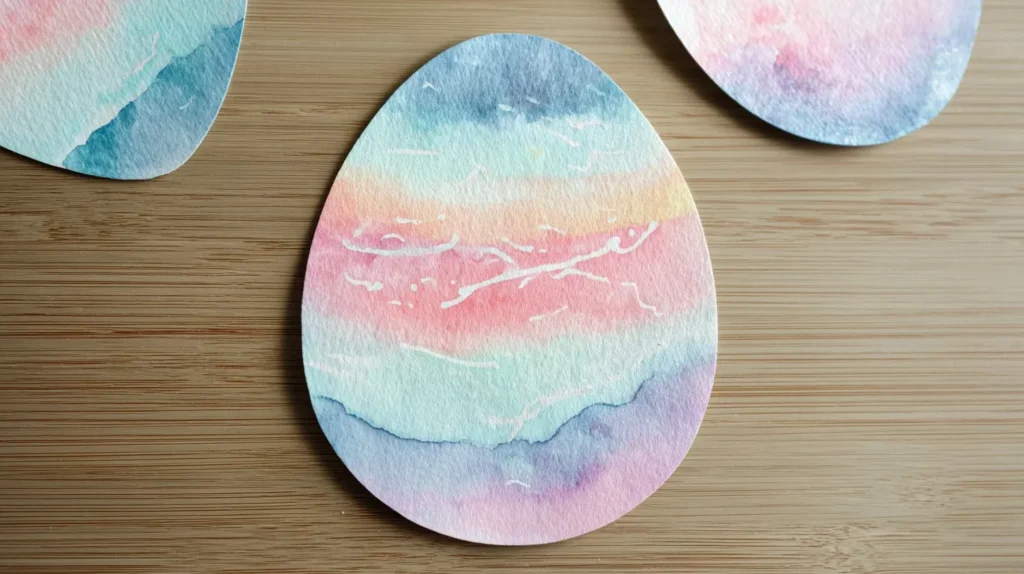
Watercolor Easter Eggs That Feel Calming
This craft slows everything down in the best possible way. Watercolors invite softer choices and quieter focus. Easter crafts for kids don’t always need big energy to succeed. Sometimes calm is the hook.
I’ve found that watercolor projects shift the mood at the table almost immediately. Voices drop a notch. Movements slow. Kids lean in closer without being asked. That alone makes this one worth keeping in rotation.
Start by setting out thick paper or watercolor paper for each child. Lightly draw egg shapes with pencil if needed. The outline gives direction without boxing anyone in. Watercolor paints work best when paired with real brushes, not sponge ones. A small cup of water per child helps avoid chaos.
Next, show kids how to wet the brush before touching paint. Encourage light strokes and loose movement. Colors blend naturally when water leads. Whites and pastels shine here, although bolder colors still work. I tend to notice that kids surprise themselves with restraint during this step.
While the paint is still wet, sprinkle a pinch of salt onto the egg shape. Not too much. Just enough. Then pause. This is the dramatic moment. As the paint dries, the salt creates tiny bursts of texture. Kids always lean closer here and whisper things like, “Wait… what’s happening?”
Once the paint dries fully, gently brush off the salt. The texture remains, which feels like a quiet reward. No rushing this part.
Why this one works so well:
- The mess stays minimal.
- The pace stays relaxed.
- The results look intentional.
Easter crafts for kids benefit from balance. Calm projects soften louder moments. Watercolor eggs do that beautifully, without trying too hard.
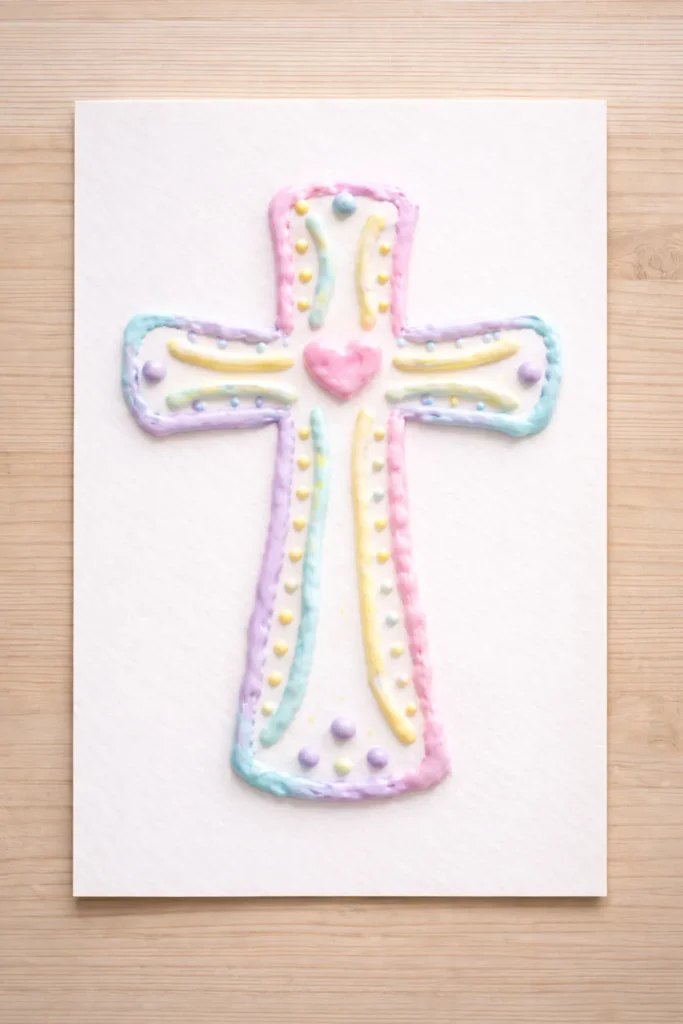
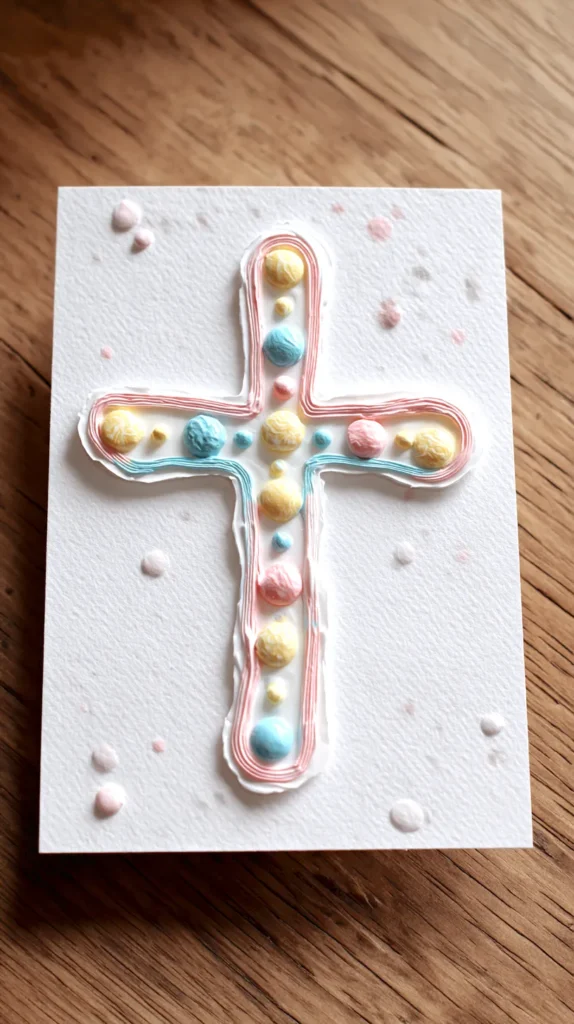
Puffy Paint Crosses That Stay Thoughtful
This craft carries meaning while staying completely kid-friendly. Puffy paint adds texture and interest without turning things serious or stiff. Easter crafts for kids can hold space for reflection without dampening the mood. That balance matters more than it sounds.
I’ve found that puffy paint immediately changes how kids approach a project. The texture feels special, almost ceremonial, but still playful. There’s something about raised paint that slows hands down naturally. Kids lean in and take their time without being asked.
Start by setting out white cardstock or sturdy paper with simple cross shapes already drawn or printed. Thicker paper matters here because puffy paint needs support. Mix equal parts white glue and shaving cream in a bowl. Stir gently until it looks fluffy but smooth. Then add a small drop of food coloring or washable paint. Less color works better than more.
Once the paint is ready, spoon it into zip-top bags or piping bottles. Snip a small corner if needed. Kids can squeeze gently and trace the cross shape first. After that, patterns happen naturally. Lines, dots, and swirls all work beautifully. I tend to notice that kids focus more when the motion stays slow.
Encourage them to think about texture instead of accuracy. Raised paint forgives wobbles. That’s part of the charm. If paint spreads unevenly, let it. It dries light and airy, which always surprises kids.
As the crosses dry, conversation often drifts. Kids explain color choices or patterns without prompting. “This one’s calm,” someone might say. That moment counts.
Easter crafts for kids don’t need a sermon attached. Puffy paint crosses create space for expression without making it heavy. The thoughtfulness sneaks in and lingers. Puffy paint keeps everything approachable, expressive, and blessedly un-intimidating.
Last Ideas and Thoughts
I’ve found that Easter crafts for kids create a very specific kind of togetherness. It’s not quiet, and it’s not orderly, but it’s real. Craft tables turn into places where kids talk while their hands stay busy. That combination matters more than polished results.
I tend to notice that creativity softens moods in surprising ways. Kids slow down without being told. Conversations wander. Laughter pops up in odd moments. Even disagreements fade faster when paint and glue are involved. (Crafting is sneaky like that.)
Living in Orlando means Easter excitement arrives early and sticks around. Sunshine shows up uninvited and raises everyone’s energy level. Crafting gives that excitement a place to land before it spills everywhere. I’ve found that having a few go-to projects changes the whole rhythm of the day.
What I love most is how these moments linger. Finished crafts don’t just sit there. They spark pride. Kids point them out. They explain choices. “I made this part bold on purpose,” someone says, and you can hear the confidence. That’s the part that sticks.
Easter crafts for kids aren’t about creating keepsakes that last forever. They’re about creating moments that matter right now. Those moments often travel further than expected, especially when shared on Pinterest. Inspiration spreads, ideas multiply, and suddenly someone else’s table gets a little brighter.
In the end, I’ve found that crafting during Easter isn’t about managing kids. It’s about making space for expression, joy, and connection. That’s the memory worth keeping, long after the paint dries.