Easter bunny crafts are one of those sweet little wins that work for almost everyone. They’re cute, they’re seasonal, and they can be as easy or as detailed as needed. That’s a big deal when ages and skill levels are all over the place. Some kids want glue, paper, and five fast minutes. Other kids want something they can really build, paint, and show off. I love a craft idea that can meet both in the middle.
As a mom in Orlando, I’ve found that spring crafts always bring a little extra energy into the house. Maybe it’s the pastel colors. Maybe it’s the bunnies. Or maybe it’s the fact that Easter just feels playful. Either way, this is the kind of post that helps when someone needs a simple preschool project, a fun classroom idea, or a bunny craft that older kids and even adults will actually want to make. Nobody wants to scroll through a bunch of filler just to find one solid idea.
That’s why this post keeps the focus tight on Easter bunny crafts and gives real ideas that are actually useful. Some are great for little kids who need easy steps. Some work better for elementary ages who want more hands-on fun. A few are cute enough to use as gifts or decorations, which always feels like a bonus. The best part is that bunny crafts can be playful without being complicated, and that’s exactly where this list is headed.
This site contains affiliate links, please view the disclosure for more information.
Why Easter Bunny Crafts Work So Well For Busy Families
Lacey, my eight-year-old, is in her prime craft-making stage. It’s her thing, and our kitchenette is the proof—Why Easter Bunny Crafts Work So Well For Busy Families
My daughter Lacey is ten, and she is deep in her craft-making era. Right now, that feels like part hobby, part lifestyle, and part home decor problem. Our old glass table in the kitchenette proves it every single day. It has paint dots, glue smudges, and little marks from one project after another. Once in a while, I think about replacing it with something cleaner. Then I look at that glass and know I can’t do it yet. Those stains are tied to afternoons of happy messes, paper scraps, and her excitement over every finished project.
That’s one reason Easter bunny crafts work so well in our house. They feel cheerful, simple, and easy to love. Little kids can make bunny faces, handprints, and paper ears without getting frustrated. Older kids can take the same theme and do something more detailed. I always like craft ideas that leave room for both. Not every child wants the same level of effort, and not every family has the same amount of time. Easter bunny crafts make it easy to meet kids where they are.
They also turn a regular afternoon into something that feels extra sweet. The colors are soft, the bunny theme is playful, and the supplies are usually easy to grab. Paper, paint, glue, foam, ribbon, and cotton balls can go a long way. That matters when real life already feels full. I don’t want seasonal fun to come with a giant setup or a stressful cleanup. I want ideas that feel doable, cute, and worth the mess. That’s exactly why Easter bunny crafts keep showing up in our home this time of year.
Easy Easter Bunny Crafts For Preschoolers
When kids are little, crafts need to feel easy right from the start. They need simple steps, safe supplies, and a quick payoff. That’s why I think Easter bunny crafts work so well for preschoolers. The bunny theme is cute, the shapes are basic, and the finished craft still feels special. Little kids do not need anything fancy to feel proud of what they made.
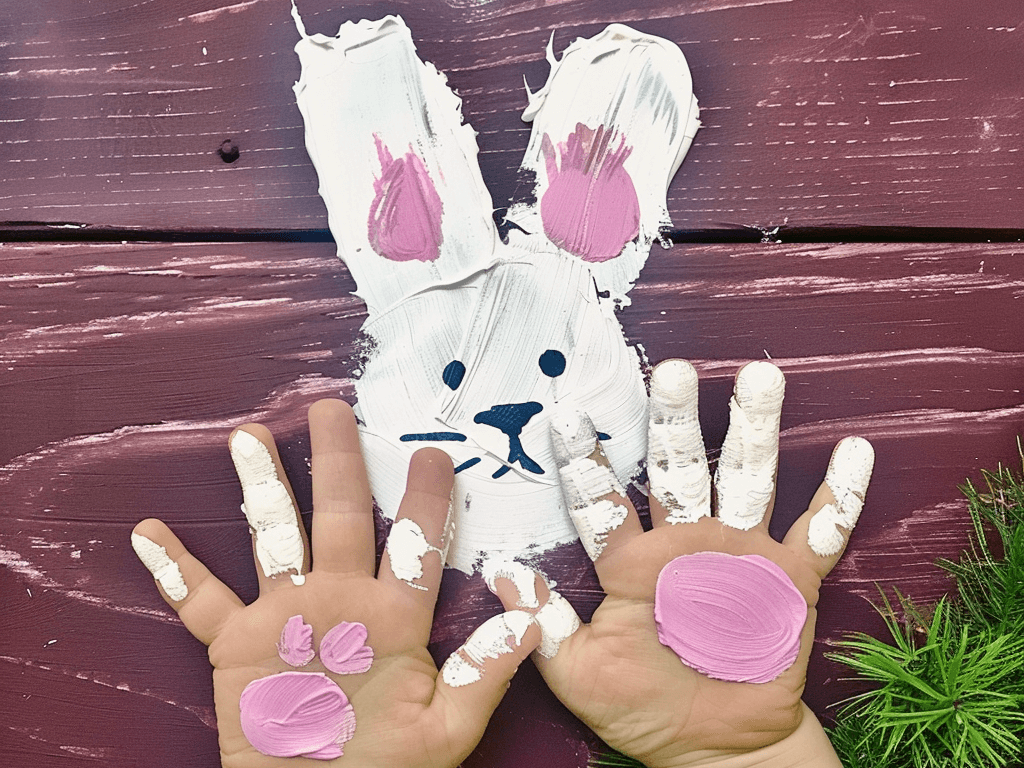
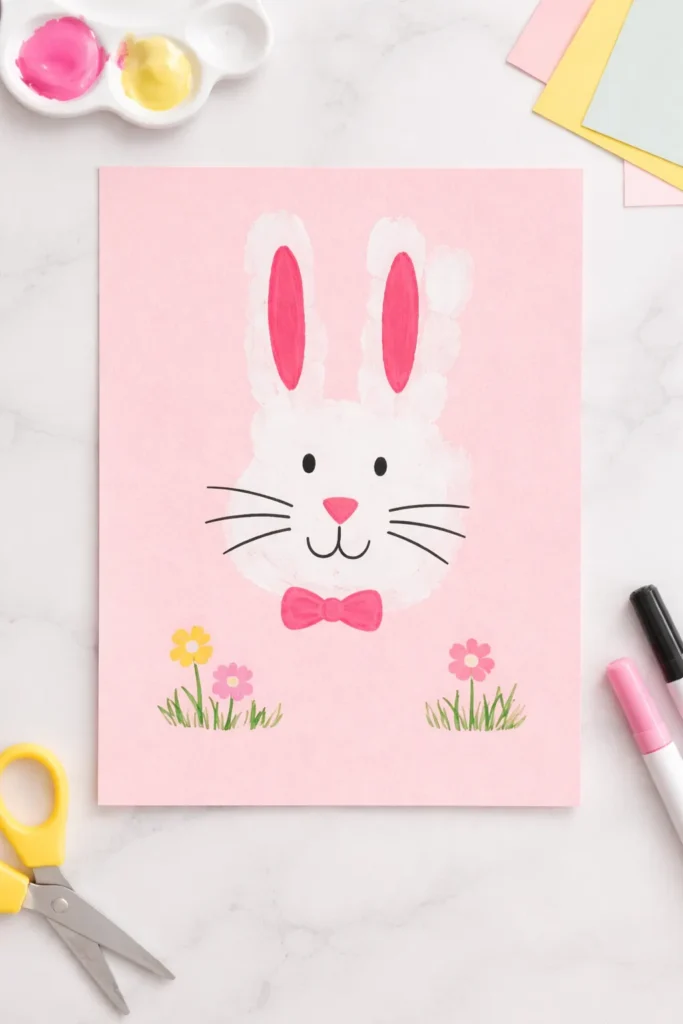
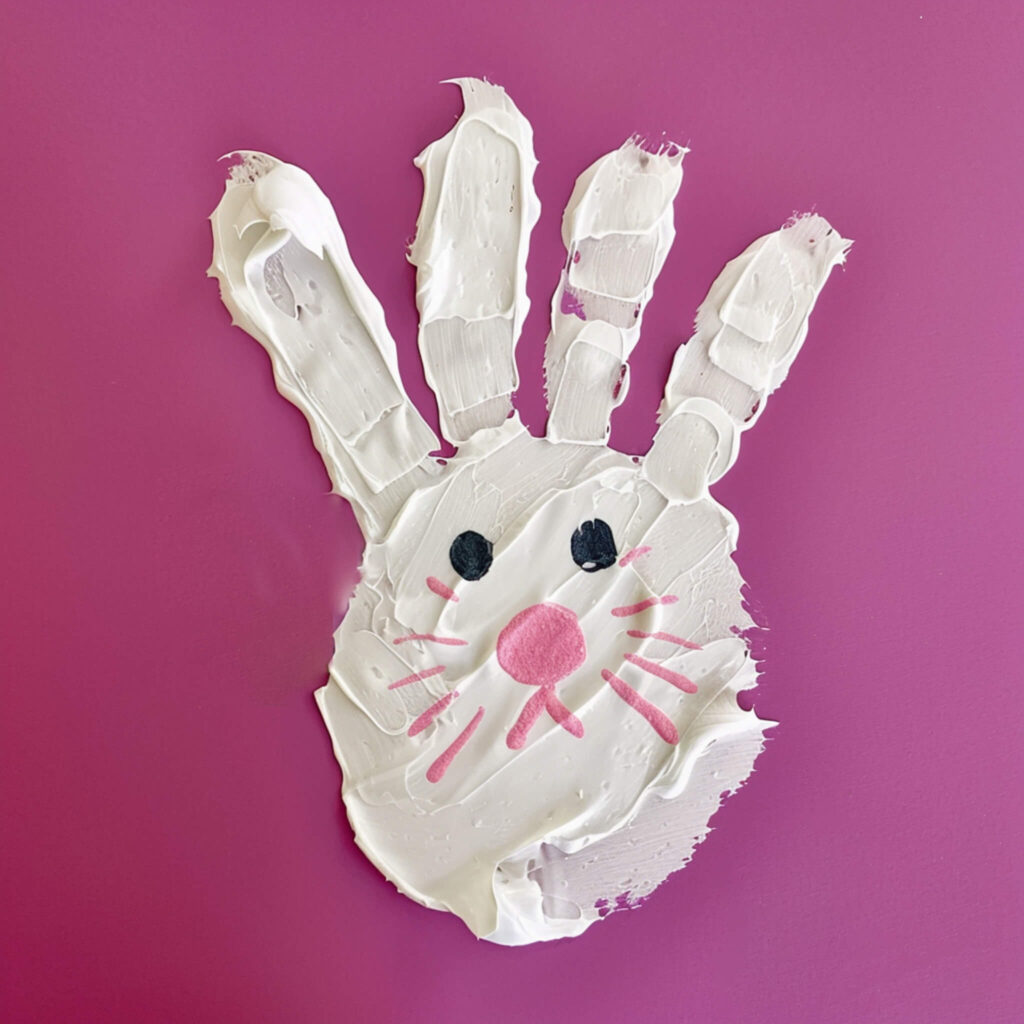
One of the best preschool ideas is a handprint bunny. It uses basic supplies, and it gives parents something worth saving. That matters, because preschool crafts are usually half activity and half memory. I’ve found that the sweetest projects are often the simplest ones.
A preschool handprint bunny usually needs:
- White or light pink paper
- Washable, non-toxic paint
- A small paintbrush or sponge
- Black marker
- Pink marker or pink paint
- Baby wipes or paper towels
The steps are easy enough to keep the mood happy. Paint the child’s hand, but skip the thumb. Press the four fingers down in two pairs to make the bunny ears. Then use the palm for the bunny face. After the paint dries, add the little details that bring it to life.
That can include:
- Black eyes
- A pink nose
- Whiskers
- A bow tie
- Small flowers near the bunny
The nice thing about Easter bunny crafts for this age is that perfection does not matter. In fact, the little quirks are what make them cute. Crooked whiskers, uneven paint, and smudgy noses are part of the charm. Preschoolers mostly want to paint, press, and see something fun appear on the page. That’s the magic of this age. The craft stays simple, the kids stay interested, and parents end up with a keepsake they’ll want to hold onto.

Paper Plate Easter Bunny Crafts For Elementary Kids
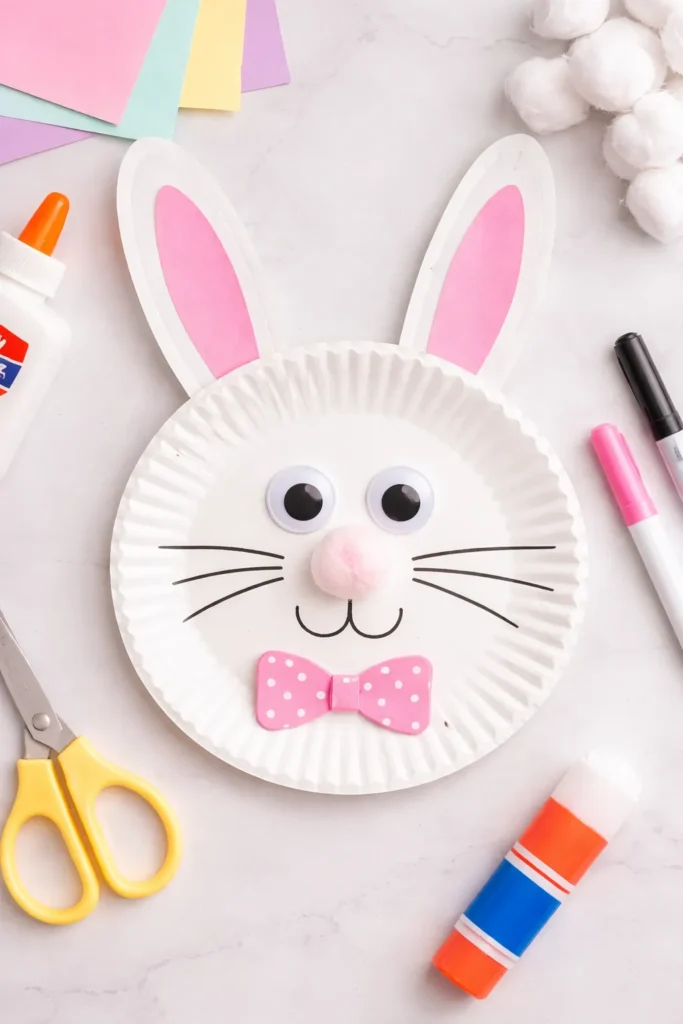
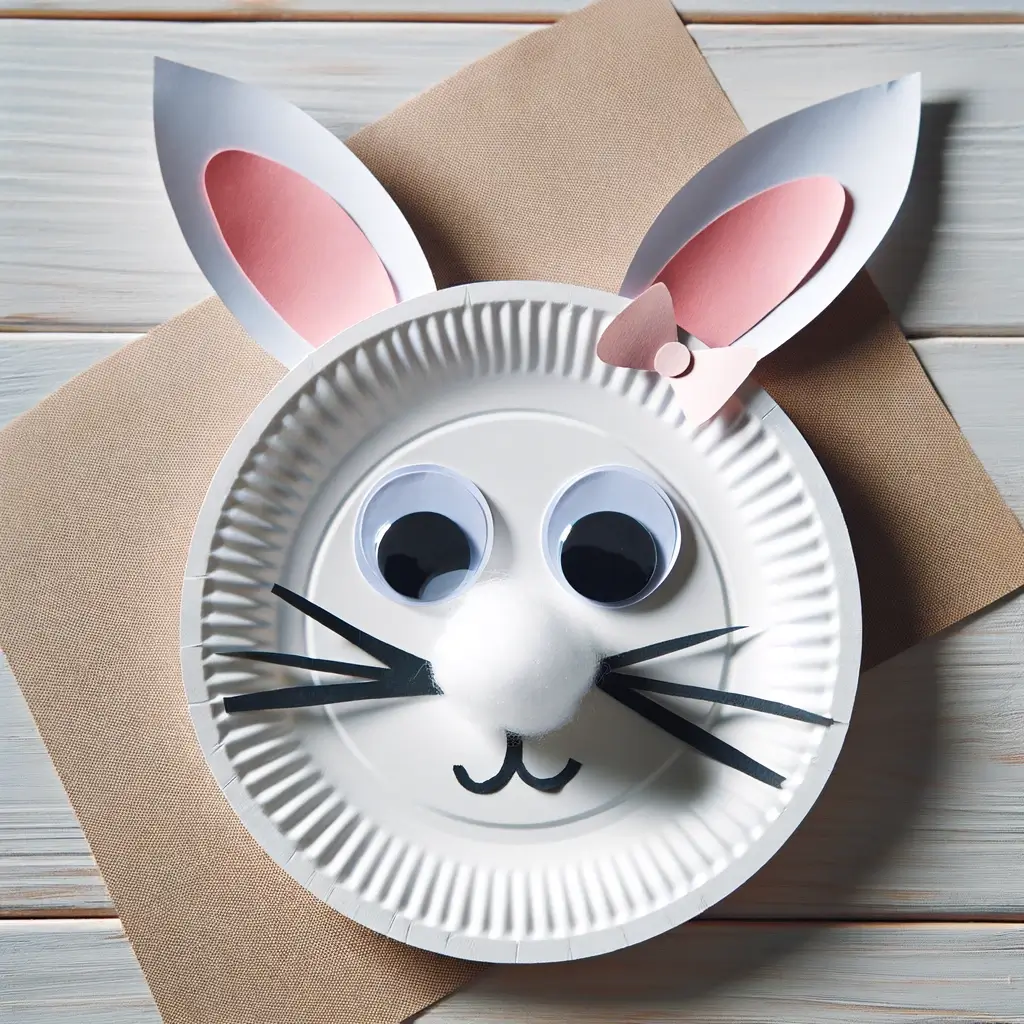
When kids hit the elementary years, they usually want more than a fast glue-and-go project. They still want fun, but they also like crafts with more steps and more choices. That’s why paper plate bunnies work so well. They’re simple enough to finish without frustration, yet detailed enough to feel a little more grown up. I’ve found that Easter bunny crafts like this hit a really nice middle ground for this age.
A paper plate makes the perfect bunny face because it’s sturdy, round, and easy to decorate. Kids can build the whole look piece by piece, which keeps them busy in a good way. Cutting the ears, gluing the nose, and drawing the whiskers all help with fine motor skills too. That part matters, but it never feels like work to them. It just feels like fun.
For this version, the supplies stay easy and affordable:
- Paper plate
- White construction paper
- Pink construction paper
- Googly eyes
- Cotton ball
- Glue
- Child-safe scissors
- Black marker or crayon
The steps are simple, but there’s still room to get creative. First, cut two tall bunny ears from white paper. Next, cut smaller pink ear pieces and glue them in the center. Attach the ears to the back of the paper plate so they stick up from the top. Then glue on the googly eyes and place one cotton ball in the middle for the nose. After that, draw the mouth and whiskers with a black marker.
Older elementary kids usually want to add their own spin, and that’s where this gets extra cute. They can glue on a paper bow, add rosy cheeks, or make a little party hat. Some may even want to add flowers, glitter, or eyelashes. Easter bunny crafts do not need to be complicated to feel special, and this one proves it fast.
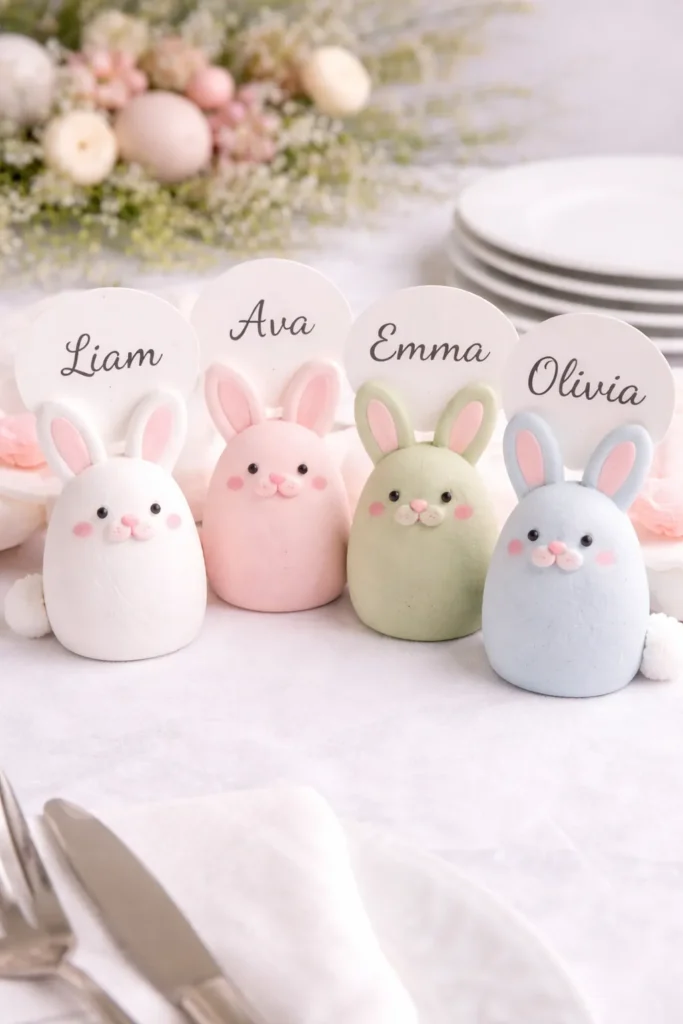
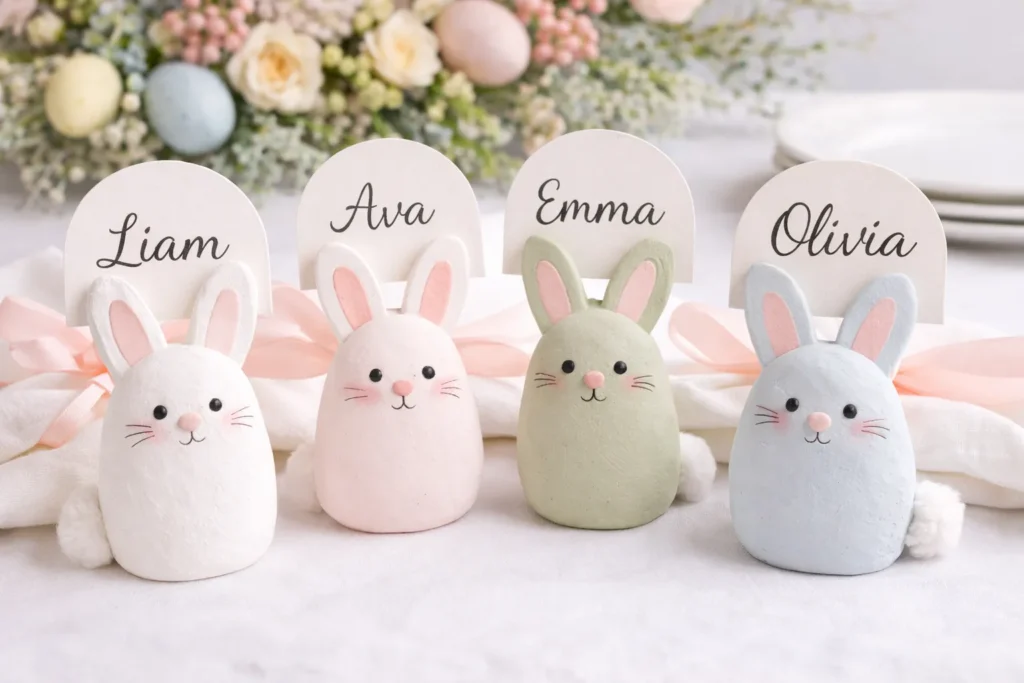
Easter Bunny Crafts That Double As Place Cards
One Easter bunny craft idea I really like is a bunny place card holder for the table. It looks cute, but it also earns its keep, which matters when holiday decor starts taking over every open surface. It works for brunch, dessert, or a full Easter dinner. Among Easter bunny crafts, this one feels smarter because it works as decor, table styling, and a personal touch all at once.
Air-dry clay makes this project easy without making it feel childish. Start with a small oval for the bunny body, then pinch up two ears at the top. Press a narrow slit between those ears before the clay dries, because that opening will hold the name card later. Smooth the front with a damp fingertip, then let the bunny dry all the way.
Once it hardens, paint the bunny white, blush pink, soft sage, or pale blue. Add two tiny dot eyes and a simple nose, then stop there, because too many details can make it look busy fast. The charm comes from the shape, not a pile of extras. On the back, glue a mini pom-pom tail so it still feels playful from every angle.
Cut small arch-shaped name cards from cardstock and slide one into each bunny. Kids can paint happy little faces if they’re helping, while adults can keep the look softer and more polished with muted colors. Easter bunny crafts do not always need to sit on a shelf to matter. Sometimes the best project is the one that makes the table prettier, helps guests find their seat, and still feels worth saving for next year.


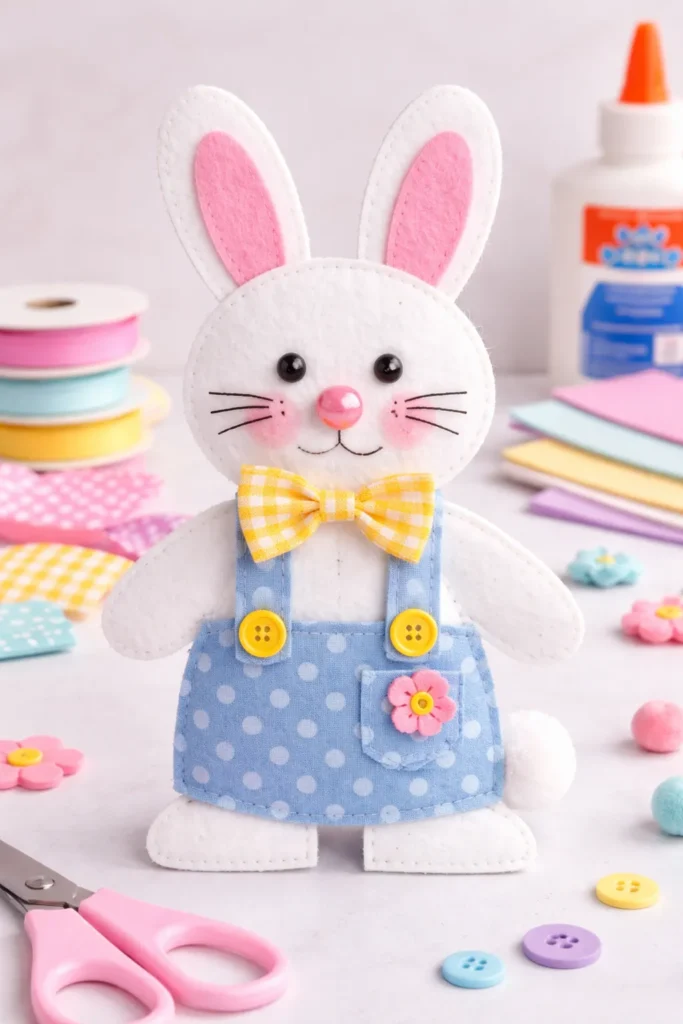
3D Easter Bunny Crafts For Older Kids
Older kids usually want Easter bunny crafts that feel more creative and a little less basic. They still like cute results, but they also want a project with more freedom. That’s where a 3D bunny made from craft foam or felt works so well. It gives them more to cut, more to design, and more chances to make it their own. I like this kind of craft because it feels fun, but it also looks nice enough to display after it’s done.
The base can stay simple. Start with white or pastel craft foam, or use felt for a softer look. Draw one bunny shape or trace a template. Then cut it out carefully. Older kids can usually handle that part just fine, especially with a clear outline.
Here’s what helps this project come together:
- Craft foam or felt sheets
- Pencil
- Scissors
- Craft glue
- Ribbon
- Fabric scraps
- Buttons
- Pom-poms
- Optional bunny template
Once the bunny shape is cut, the fun part starts. Kids can turn a plain bunny into something with real personality. That’s what makes Easter bunny crafts like this so good for older ages. There’s enough structure to keep it clear, but enough freedom to keep it interesting.
Cute ways to decorate the bunny:
- Add a ribbon bow around the neck
- Use buttons for the body
- Glue on a tiny pom-pom tail
- Cut pink inner ears from foam
- Add fabric scraps for overalls or a dress
- Draw eyelashes, whiskers, or a smile
If they want the bunny to stand up, glue a small folded strip of foam to the back. That works like a stand and makes the craft easy to display on a shelf, table, or desk. I’ve found that older kids enjoy Easter bunny crafts more when the final project feels worth keeping, and this one really does.

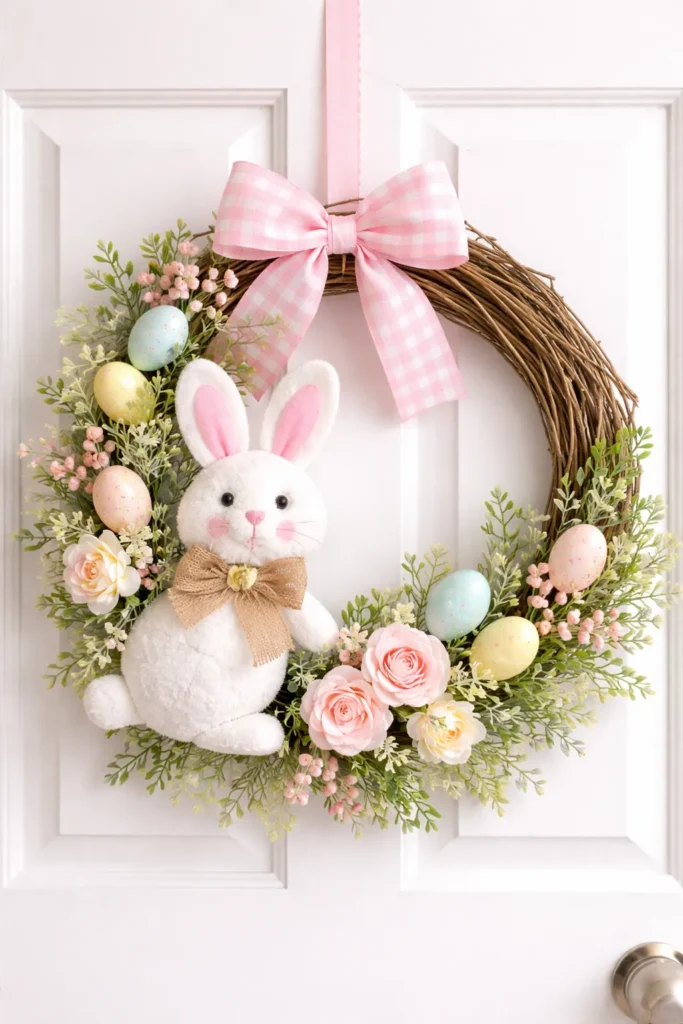
Easter Bunny Wreath Crafts For Adults
Adults deserve Easter bunny crafts too. I love the cute kid projects, but sometimes I want something that looks pretty on the door. A bunny wreath does that fast. It feels seasonal without looking too childish, and it gives adults a project that feels calm and creative. This is one of those Easter bunny crafts that can look simple or more dressed up, depending on the colors and details.
Start with a grapevine wreath for the base. It already has texture, so the finished piece looks fuller right away. Then build around it with soft spring colors and a few details that stand out.
Supplies that work well:
- Grapevine wreath
- Faux flowers
- Faux greenery
- Decorative Easter eggs
- Floral wire or hot glue gun
- Ribbon for hanging
- Wooden or fabric bunny decoration
Before gluing anything down, lay the pieces on the wreath first. I always think that step helps. It lets me see if one side looks too heavy or too bare. Most adult wreaths look best when the design sits on one side or across the lower half. That keeps the wreath from looking crowded.
A simple order makes the whole thing easier:
- Place the bunny decoration first
- Tuck greenery around that area
- Add flowers for color and softness
- Fill open spots with a few eggs
- Tie ribbon at the top for hanging
Soft pink, cream, white, and pale green give a classic spring look. Light blue also works if you want cooler colors. Try not to use too many large eggs, or the wreath can start to feel busy. A few well-placed pieces usually look better than too many extras.
Once everything is attached, fluff the greenery and check the shape again. If the bunny sits a little off-center, that can look really nice on a front door. I like Easter bunny crafts like this because the finished project feels worth keeping. It looks festive, but it also feels polished enough to bring out every spring.

Easter Bunny Crafts for Classroom Fun
If you’re a teacher or helping out at a class party, you’ll want Easter bunny crafts that are quick, easy, and not too messy. I’ve got some fun ideas that keep kids happy and engaged without making a mess in the classroom!
One of my favorite options? Bunny headbands. All you need are:
- White cardstock or construction paper
- Pink paper for the inner ears
- Glue sticks
- Tape or staples
- Crayons or markers
Kids can cut out two long bunny ears, color the inside pink, and attach them to a paper band that wraps around their head. They love hopping around in them, and they’re easy enough to finish in under 15 minutes.
Another great classroom option is the cotton ball bunny face. Just hand out paper plates and let them go wild gluing on:
- Cotton balls (you’ll want a big bag)
- Googly eyes
- Pink pom-poms for noses
- Pipe cleaners for whiskers
It’s a classic, and the kids are always proud of how fluffy their bunny turns out.
Don’t forget coloring pages. Sometimes simple is best, especially with younger students. Print a few bunny outlines and lay out some crayons. Boom—quiet time.
No matter what project you pick, make cleanup easy with:
- Table covers or old newspapers
- Wipes or wet paper towels nearby
- A few kids assigned as “clean-up crew”
Easter bunny crafts in the classroom don’t need to be complicated. Keep it simple, keep it fun, and you’ll have a room full of happy little bunnies showing off their creations. And yes, parents love seeing those bunny ears come home too.

Easter Bunny Crafts That Grow With Kids
One fresh way to plan Easter bunny crafts is to stop thinking in separate projects and start with one reusable bunny shape. I like the single-base idea because it cuts down on prep, keeps the theme tight, and still lets each age group make something that feels right for them. Preschoolers can stamp or paint inside the shape. Elementary kids can glue on ears, bows, and cotton tails. Older kids can trace that same outline onto felt or foam and turn it into something three-dimensional. Adults can use the exact bunny shape on a wreath, centerpiece, or napkin ring. That kind of layering makes the whole post more useful, because one idea stretches farther than people expect.
Most craft lists toss out random projects and call it variety. I think a better approach is giving readers a system they can reuse every spring. Print one bunny outline in three sizes, then keep it in a folder with the Easter supplies. Small works for tags and cards. Medium fits paper plates, treat bags, and classroom crafts. Large works for door decor, wall signs, and table pieces. Suddenly Easter bunny crafts stop feeling like one-and-done activities and start feeling like a mini seasonal kit that saves time next year too.
Parents with more than one child will really get the value here. Everybody can work on the same bunny theme without the projects looking babyish or too hard. Better yet, the house still feels coordinated when the crafts are done, which is not always the case with holiday projects. That makes photos, displays, and cleanup feel calmer and more pulled together. Cute matters, but useful matters too.

Recycled Easter Bunny Crafts That Save Money
Craft supplies can get pricey fast, but you don’t need to spend much to create cute Easter bunny crafts. I’m all about using what’s already around the house. These ideas are budget-friendly, earth-friendly, and still totally adorable.
Start with toilet paper rolls. These little cardboard tubes are perfect for bunny bodies. Just grab:
- White paint
- Pink paper scraps
- Googly eyes or hand-drawn eyes
- Cotton balls or white pom-poms
Paint the tube white, add pink ears, glue on eyes and a nose, and finish it with a cotton ball tail. It’s simple, it’s fast, and kids love that it stands up on its own.
Empty egg cartons also work great. Cut out individual cups and flip them upside down to make mini bunny faces. Let kids paint them white or pastel colors, then add:
- Paper ears
- Pipe cleaner whiskers
- A tiny paper or pom-pom nose
They’re small and sweet, and perfect for displaying on a shelf or windowsill.
Even jar lids can work for more advanced Easter bunny crafts. Paint the lid, glue on ears made from felt or fabric scraps, and turn it into a cute magnet or ornament. These are perfect for older kids or even adults who want something a little different.
Other recycled items to save and use:
- Cereal boxes (cut into shapes)
- Fabric scraps (for ears or bows)
- Old buttons (eyes or nose)
- Newspaper (great for paper mâché bunnies)
Using recycled materials keeps costs down and adds that little challenge of turning “trash” into treasure. Plus, it teaches kids how to be creative with what they’ve got. That’s a win in my book.

Easter Bunny Crafts That Make Great Gifts
Sometimes the crafts are just for fun, but other times, you want something cute enough to give away. These Easter bunny crafts work perfectly as gifts for neighbors, grandparents, or even your kids’ classmates.
Start with treat bags. You can make bunny-themed gift bags with:
- White paper lunch sacks
- Pink paper for ears
- A black marker for drawing the face
- Cotton balls or pom-poms for the tail
Let the kids fill them with jelly beans or chocolate eggs. Fold the top of the bag down, staple on the ears, and tie it with ribbon. It’s easy, adorable, and everyone loves getting one.
Another idea I love is bunny-shaped soap or bath bombs. These are more for older kids or adults, but they’re a sweet handmade gift. Use silicone bunny molds and follow a simple bath bomb recipe. Wrap them in clear bags with a cute label.
You can also make mini bunny planters with:
- Empty yogurt cups
- White paint
- Googly eyes and pink paper for ears
- Soil and grass seed
They’re like little chia pets, and kids love watching the “bunny hair” grow.
Other gift-worthy Easter bunny crafts:
- Bunny bookmarks (felt, foam, or cardstock)
- Painted bunny rocks with sweet messages
- Handmade bunny cards with pop-out ears
When the crafts double as gifts, it gives kids a purpose beyond just making something. They feel proud, and the person receiving it feels extra special. And really, who wouldn’t want a handmade bunny from someone they love?
Final Thoughts
I like crafts that do more than fill time, and that is exactly why Easter bunny crafts keep showing up every spring. They give little kids something easy and fun, while older kids and adults still get projects that feel worth making. That range matters, because not every family has the same ages, attention spans, or patience level on the same day. A good bunny craft can meet people where they are without making the whole thing feel watered down.
That is what makes this theme so useful. One child can make a painted handprint bunny, while someone else works on a paper plate face, a foam bunny, or a wreath for the front door. Everything still fits together, and the house still feels pulled together for the season. I also love that Easter bunny crafts can be playful without looking cheap or thrown together.
For me, the best part is that these projects leave you with something to keep, display, or even use on the table. That makes the mess feel a lot more worth it. If a craft can be cute, doable, and Pinterest-friendly, I’m paying attention. Easter bunny crafts check all of those boxes, and that’s a big reason they stay in the rotation year after year.