I’m obsessed with dessert cups! I mean, come on, they are seriously cute and fancy at the same time! Dessert cups are one of those things that just make life easier—and sweeter. They’re adorable, convenient, and perfect for all kinds of gatherings. Dessert cups are always a good idea, whether it’s a casual family barbecue or a fancy wedding. They’re portioned out, so there’s no need to mess with slicing or serving, and they look so much prettier than a pile of cake on a plate.
What I love most about dessert cups is how flexible they are. You can layer just about anything to fit your mood or theme. Fresh fruit and cream? Perfect for summer. Chocolate mousse and cookie crumbles? Hello, indulgence. They’re like little blank canvases that let you get creative without too much effort.
Another bonus? They’re a dream to make ahead. Assemble them the night before, pop them in the fridge, and you’re ready to go when the party starts. Plus, they’re fun to eat. There’s something so satisfying about grabbing your own little cup of dessert that’s layered and ready to enjoy.
Living in Orlando with five kids has taught me that dessert cups work best when they feel special but don’t add chaos, because heat, humidity, and hungry people wait for no one.
I’ll give you some simple recipes and ideas below that will show you how many different ways you can use dessert cups. You’ll find step-by-step instructions for everything from classics like cheesecake to playful kid-friendly creations. No Pinterest fancy tools required—just simple ingredients, easy steps, and desserts your guests will love.
This site includes affiliate links; you can check the disclosure for more details.
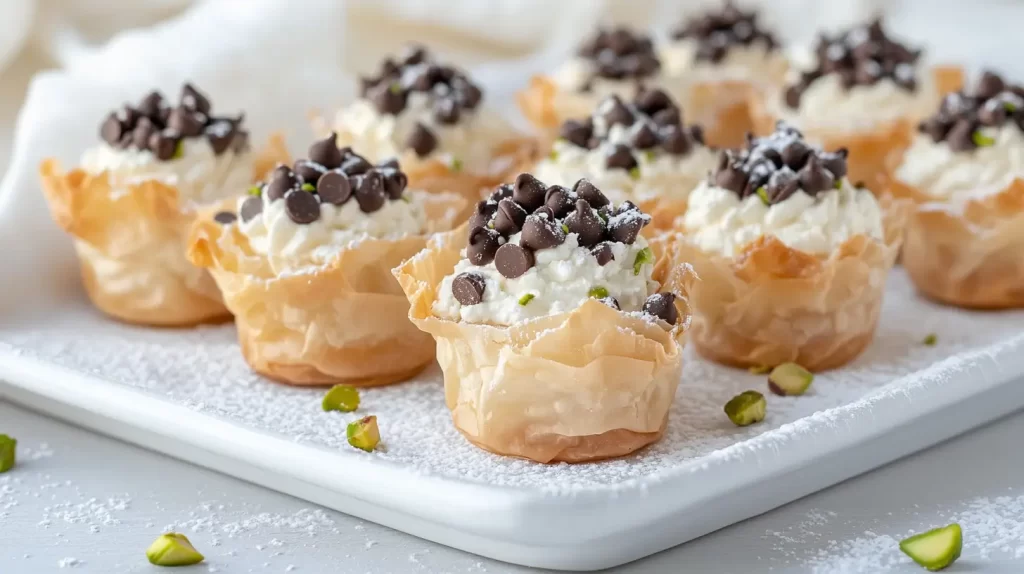
Mini Cannoli Cups
Mini cannoli cups are a fun, small version of the classic Italian dessert. They’re perfect for parties or gatherings, offering the same creamy filling and crunch of a traditional cannoli, but in an easy-to-serve cup.
Ingredients:
- 1 package mini phyllo cups (usually found in the freezer section, about 15 cups)
- 1 cup ricotta cheese (drained overnight for best results)
- 1/2 cup mascarpone cheese
- 1/3 cup powdered sugar (plus extra for dusting)
- 1/2 teaspoon vanilla extract
- 1/2 teaspoon cinnamon
- 1/4 cup mini chocolate chips
- Chopped pistachios (optional, for garnish)
Instructions:
- Prepare the filling: In a medium bowl, mix together the ricotta, mascarpone, powdered sugar, vanilla extract, and cinnamon until smooth. Fold in the mini chocolate chips for a little crunch.
- Fill the cups: Use a piping bag or spoon to fill each mini phyllo cup with the cannoli filling. Just fill them to the top for that tidy look!
- Add garnishes: Sprinkle chopped pistachios or extra mini chocolate chips over the filled cups for added flavor and presentation.
- Dust with powdered sugar: Just before serving, lightly dust the tops with powdered sugar for the classic cannoli look.
- Serve immediately: These are best served fresh to keep the phyllo cups crisp. If you’re prepping in advance, keep the filling separate and put it together right before you serve it up!
Mini cannoli cups are an elegant and easy dessert that combines creamy, sweet filling with a crispy, flaky base. They’re a crowd-pleaser and will disappear fast from any dessert table!

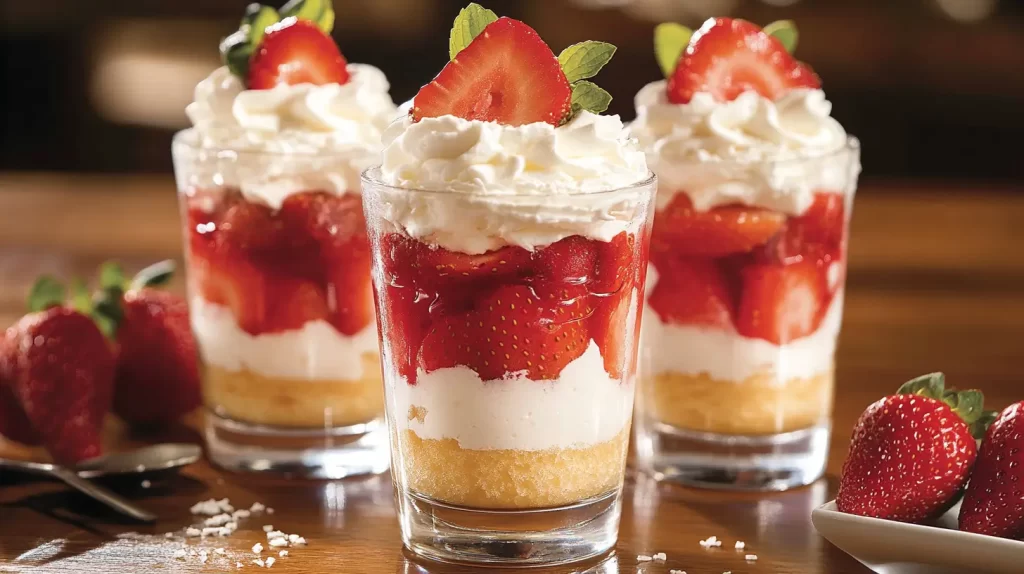
Strawberry Shortcake in a Cup
Strawberry shortcake in a cup? Now that’s a tasty twist on a classic! Yum! Served in large shot glass-style cups, it’s a perfect choice for individual servings at parties or a delightful after-dinner treat.
Ingredients:
- 1 pound fresh strawberries, hulled and diced
- 2 tablespoons granulated sugar
- 1 cup heavy whipping cream
- 2 tablespoons powdered sugar
- 1 teaspoon vanilla extract
- 1 cup shortcake or pound cake, cut into small cubes
- Optional: fresh mint leaves for garnish
Instructions:
- Prepare the strawberries: In a medium bowl, toss the diced strawberries with granulated sugar. Let them sit for about 15-20 minutes to release their juices.
- Make the whipped cream: In a chilled bowl, beat the heavy whipping cream, powdered sugar, and vanilla extract until soft peaks form. Set aside.
-
Layer the ingredients:
- Add a layer of cake cubes to the bottom of each 4-ounce dessert cup (about 2 tablespoons).
- Spoon a layer of the macerated strawberries (about 1 tablespoon) over the cake cubes.
- Add a layer of whipped cream (1-2 tablespoons) on top of the strawberries.
- Repeat the layers until the cup is nearly full, ending with whipped cream on top.
- Garnish and serve: Top each cup with a small spoonful of strawberries and a sprig of mint for a pop of color. Serve immediately or refrigerate for up to 2 hours before serving.
This strawberry shortcake in a cup is a delightful mix of fresh berries, fluffy cream, and soft cake. Yum! The clear cups show off the beautiful layers, which makes them look as good as they taste.
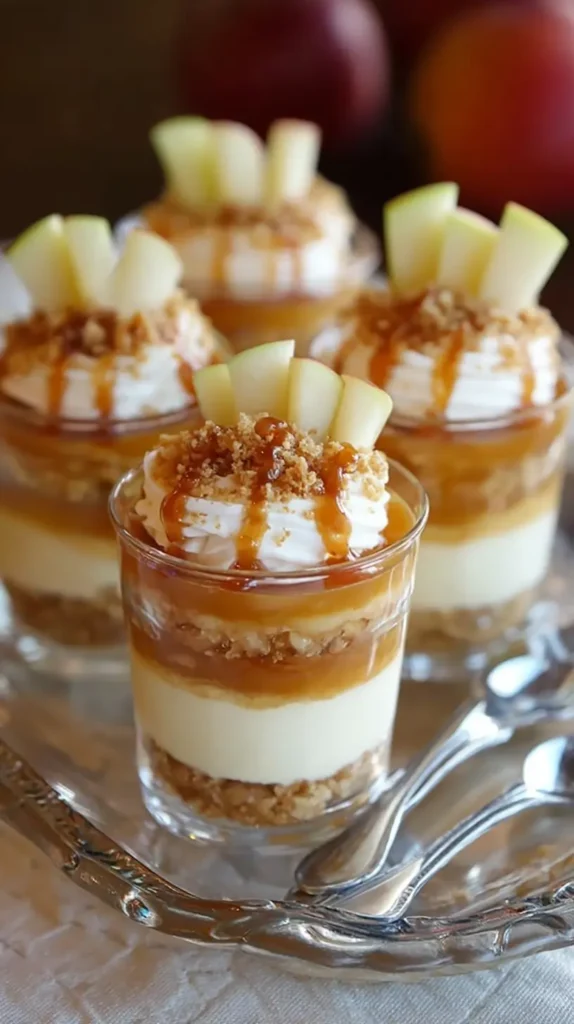
Caramel Apple Dessert Cups That Feel Like Fall Showing Off
I have a soft spot for desserts that look like they tried harder than they actually did, and caramel apple dessert cups fit that category perfectly. They’re cozy, layered, and just dramatic enough to make people pause before grabbing a spoon. Think fall fair vibes, but cleaned up and wearing a cute outfit.
The base is where the calm starts. A buttery cookie crumb gives you something sturdy without being heavy. It’s there to ground the whole cup, not steal the show. Once that layer is in, everything else feels easier. The cup already knows what it’s doing.
The creamy layer is what makes these dessert cups feel indulgent instead of sugary. Smooth, pale, and soft, it gives the caramel somewhere to land. I like this layer generous but not aggressive. You want balance, not a dairy avalanche.
Then comes the caramel apple situation, which is the reason everyone’s leaning in. Warm caramel folded with finely chopped apples gives you flavor without chaos. The apples should be small enough to behave. Big chunks turn dessert cups into a workout, and no one signed up for that.
A quick repeat of crumbs adds texture and keeps things interesting. It’s like a reset button between layers. Same flavors, different bite. That repetition is what makes the cup feel complete instead of random.
The top gets a soft swirl of whipped cream, a drizzle of caramel, and a few thin apple slices for flair. Nothing excessive. Just enough to say yes, I thought about this. These caramel apple dessert cups chill well, serve easily, and feel festive without trying to audition for a baking show.
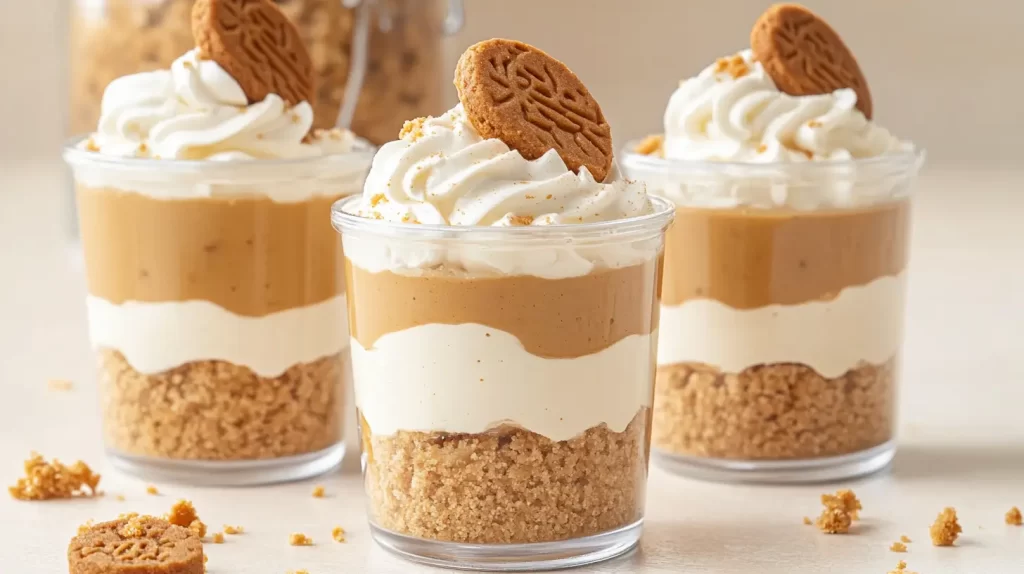
No-Bake Lotus Biscoff Cheesecake Cups
These no-bake Lotus Biscoff cheesecake cups are rich, creamy, and bursting with the caramelized flavor of Biscoff cookies. Served in large shot glass-style cups, they make for a perfect individual dessert that looks as good as it tastes.
Ingredients:
- 1 cup Lotus Biscoff cookies, crushed (plus extra for garnish)
- 3 tablespoons melted butter
- 1 (8-ounce) package cream cheese, softened
- 1/2 cup powdered sugar
- 1/2 teaspoon vanilla extract
- 1/2 cup Lotus Biscoff spread
- 1 cup heavy whipping cream, whipped to stiff peaks
- Optional: whipped cream and whole Biscoff cookies for garnish
Instructions:
- Prepare the crust: In a bowl, mix the crushed Biscoff cookies with melted butter until well combined. Add about 1 tablespoon of the mixture to the bottom of each 4-ounce dessert cup and press down gently to form a crust.
- Make the cheesecake filling: In a large bowl, beat the cream cheese, powdered sugar, vanilla extract, and Biscoff spread until smooth and creamy. Fold in the whipped heavy cream until fully incorporated.
- Assemble the cups: Spoon or pipe the cheesecake filling into each cup, filling about three-quarters full. Add a thin layer of crushed cookies on top for texture.
- Chill and garnish: Refrigerate the cups for at least 2 hours to set. Before serving, top with a dollop of whipped cream and a small piece of a Biscoff cookie for decoration.
- Serve and enjoy: These cups are best served cold and are a guaranteed crowd-pleaser.
The combination of creamy cheesecake and crunchy Biscoff cookies makes these no-bake cheesecake cups an irresistible treat. The shot glass-style presentation ensures they’re easy to serve and look absolutely stunning!
The Two-Temperature Trick That Makes Dessert Cups Feel Fancy
One thing I almost never see talked about with dessert cups is temperature, and it’s honestly a missed opportunity. Most mini desserts get served straight from the fridge, end of story. Cold. Predictable. Fine, but forgettable. Dessert cups don’t have to live there. They can do more. A lot more.
Here’s the idea. Build dessert cups with intention around warm and cold layers, then serve them at a moment when those temperatures actually matter. Think of it like contrast dressing for food. When one layer is cool and creamy and another is gently warm, your brain pays attention. Suddenly the dessert feels thoughtful instead of assembled.
This works best when the warm element is subtle and stable. A soft brownie base, a spoon of warm berry compote, or a lightly heated caramel layer works beautifully. The rest stays chilled. You’re not serving hot pudding in plastic. You’re creating contrast. The cup holds it all together without drama.
Timing is the secret weapon here. Keep the cups chilled and warm only the base layer right before serving. Pour or spoon it in, then finish with the cold layers already set. The warmth rises just enough to soften what’s above it. The texture changes slightly. The flavor opens up. People notice, even if they can’t explain why.
This approach also fixes a common dessert cups problem. Straight-from-the-fridge desserts can taste muted. A little warmth wakes everything up without changing the recipe. No extra ingredients. No fancy tools. Just smarter assembly.
It’s still easy. It still looks pretty. It just feels intentional. That’s the kind of detail people remember, and it turns simple dessert cups into something that feels restaurant-level without the restaurant effort.
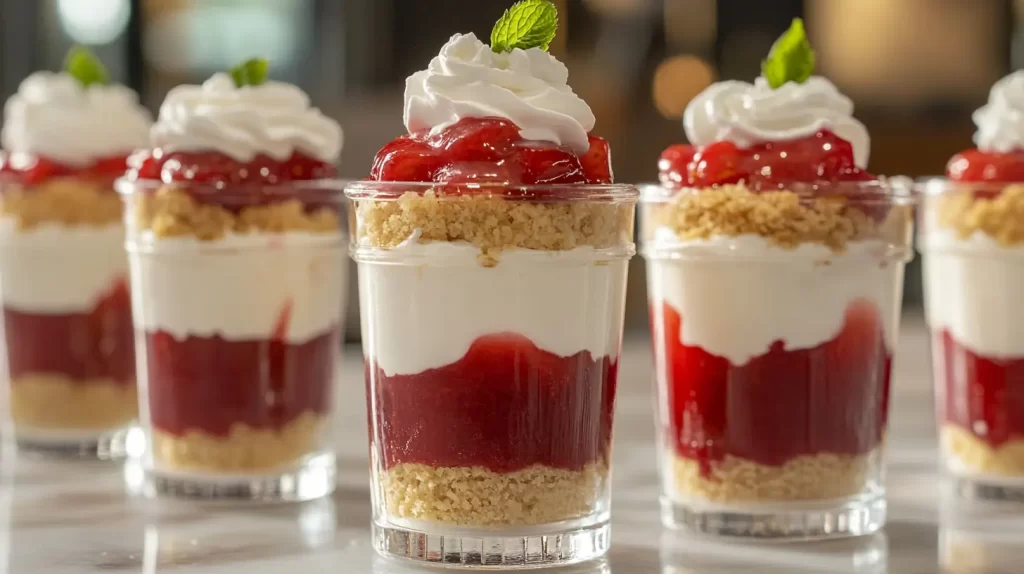
Classic Cheesecake Dessert Cups
These cheesecake dessert cups are for people who want something creamy, nostalgic, and quietly impressive without turning the kitchen upside down. They’re no-bake, they behave in clear cups, and they make everyone assume you planned ahead. You can let them believe that.
Ingredients
For the base, you’ll need 1 cup of graham cracker crumbs and 3 tablespoons of melted butter. For the filling, grab one 8-ounce package of cream cheese, fully softened, 1/2 cup powdered sugar, 1 teaspoon vanilla extract, and 1 cup heavy whipping cream. To finish, have about 1/2 cup fruit topping ready. Strawberry, blueberry, or cherry all work, and none of them will judge your choice.
Instructions
I start by mixing the graham cracker crumbs with the melted butter until it looks like beach sand that’s ready to cooperate. About 1 tablespoon goes into the bottom of each 4-ounce dessert cup. Press it down gently. You’re creating a base, not laying bricks. This recipe makes about 8 cups.
Next comes the filling. I beat the cream cheese, powdered sugar, and vanilla until smooth and creamy, no lumps allowed. In a separate bowl, I whip the heavy cream until it holds stiff peaks. Then I fold it into the cream cheese mixture slowly, because this is where the filling goes from dense to dreamy.
To assemble, I spoon or pipe the filling over the crust, filling each cup about two-thirds full. I finish with a spoonful of fruit topping, letting it drip naturally because perfection is overrated and this looks better anyway.
The cups chill in the fridge for at least 2 hours. Right before serving, I might add whipped cream or fresh fruit if I’m feeling generous. These cheesecake dessert cups are flexible, forgiving, and always welcome, which is exactly the kind of dessert I want around.
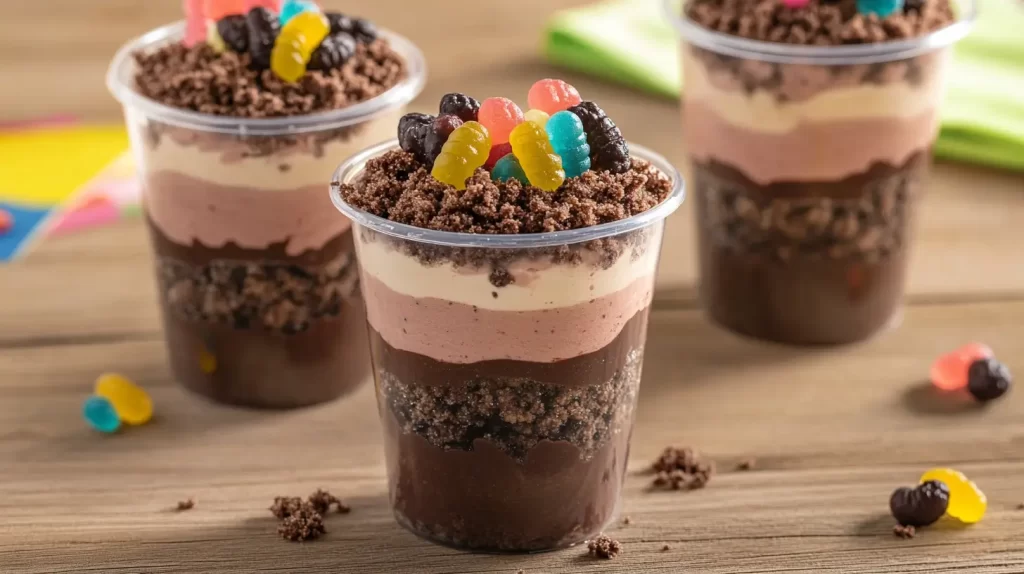
Dirt Pudding Dessert Cups (Kid-Friendly)
Kids and adults alike will adore these fun and whimsical dirt pudding cups, complete with edible “dirt” and gummy worms.
Ingredients:
- 1 (3.9-ounce) package instant chocolate pudding mix
- 2 cups cold milk
- 1 cup whipped topping
- 1 cup crushed chocolate sandwich cookies (like Oreos)
- Gummy worms for decoration
Instructions:
- Prepare the pudding: In a large bowl, whisk together the pudding mix and milk until thickened. Fold in the whipped topping to create a creamy texture.
- Assemble the layers: Spoon about 1 tablespoon of crushed cookies into the bottom of each 4-ounce dessert cup. Add 2 tablespoons of chocolate pudding, then repeat until the cup is nearly full. This recipe yields about 6 to 8 cups.
- Top with dirt and worms: Finish with a generous sprinkle of crushed cookies on top to resemble dirt. Add a few gummy worms peeking out for a fun touch.
- Chill and serve: Refrigerate for at least 1 hour before serving. These can be made a day ahead for easy party prep.
These dirt cups are always a hit at kids’ parties, but don’t be surprised if the adults grab a few too!
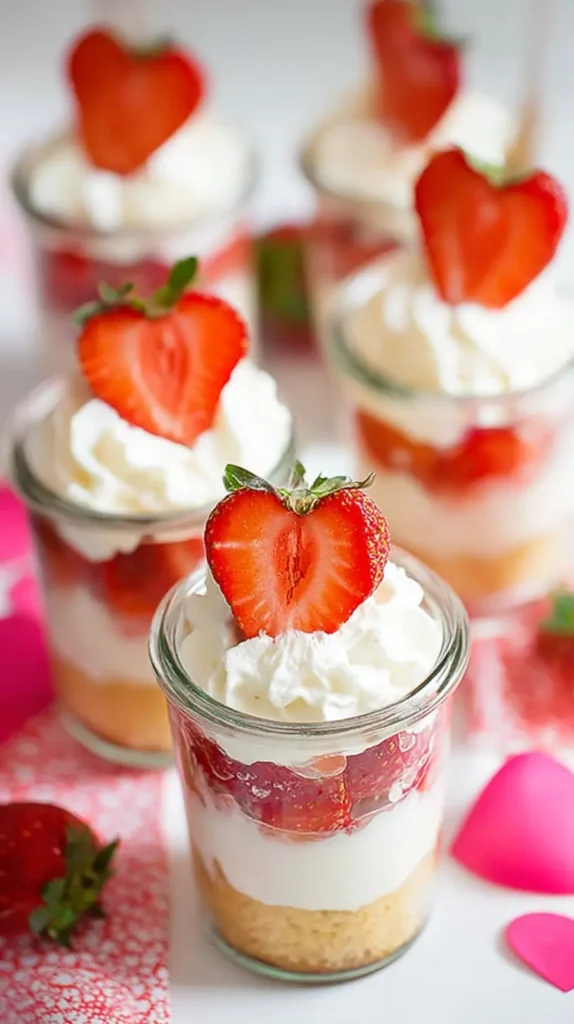
Strawberry Dessert Cups Made for Valentine’s and Galentine’s Energy
I always think Valentine’s and Galentine’s desserts should feel fun first and formal never, and these strawberry dessert cups understand that assignment perfectly. They’re pink, layered, and a little flirty, which makes them feel celebratory without turning into a whole production. I like desserts that show up cute and confident, not stressed.
I start with a simple cookie crumb base because it gives the cup structure without stealing attention. That bottom layer matters more than people realize. When it’s right, everything stacked on top feels intentional instead of random. I keep it soft, buttery, and pressed just enough to behave.
The creamy middle layer is where these dessert cups get their smooth, swoony personality. I go for something light and spoonable that balances the fruit instead of overpowering it. This layer keeps the sweetness in check and makes each bite feel calm and indulgent at the same time.
Fresh strawberries do the heavy lifting visually and flavor-wise. I chop them small so they layer cleanly and don’t slide around. The red against the white layers is doing all the flirting for you, which is exactly what you want for Valentine’s or Galentine’s desserts.
I finish the top with a soft swirl of whipped cream and a heart-shaped strawberry slice because details matter. It’s playful, a little cheeky, and instantly signals occasion. These strawberry dessert cups chill well, serve easily, and feel right at home whether I’m hosting friends or setting out something sweet just because.
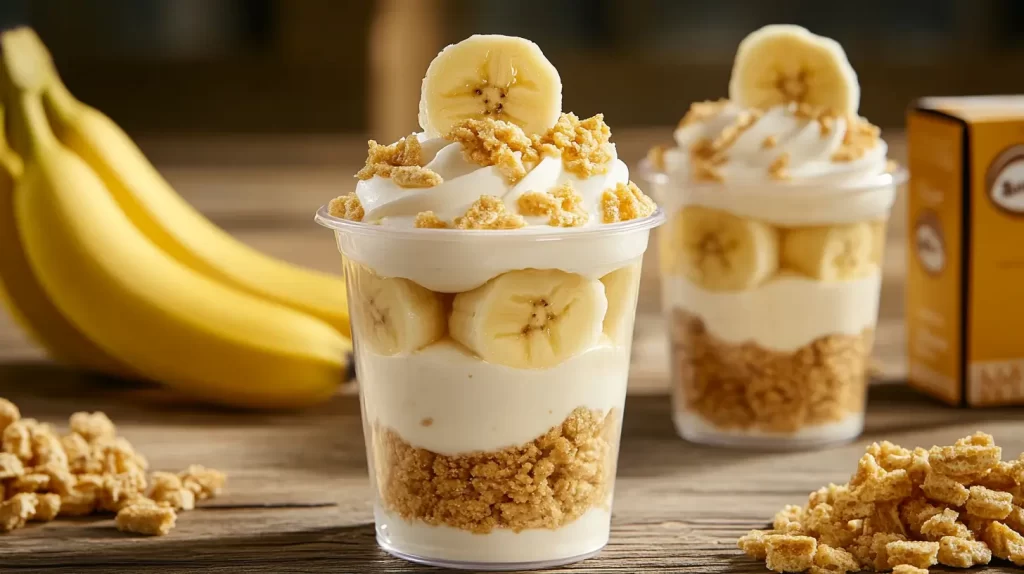
Nilla Wafer Banana Pudding Cups
These Nilla Wafer banana pudding cups feel like a familiar dessert that decided to dress up just a little. They’re creamy, cozy, and nostalgic, but still polished enough to serve in clear cups without apology. I like them because they’re comforting without feeling heavy or old-fashioned.
Ingredients
You will need two cups of cold milk and one 3.4-ounce package of instant vanilla pudding mix. For the whipped element, use 1 cup heavy whipping cream, 2 tablespoons powdered sugar, and 1 teaspoon vanilla extract. You’ll also need 2 to 3 ripe bananas, sliced, plus 1 cup crushed Nilla Wafers, with extra for topping. Whipped cream and banana slices are optional, but they do make the cups feel finished.
Instructions
I start by whisking the pudding mix with the cold milk until thickened, then refrigerate it for about 10 minutes so it can fully set.
While that chills, I beat the heavy whipping cream with the powdered sugar and vanilla until stiff peaks form. I set aside half for topping and gently fold the rest into the chilled pudding, which keeps the texture light and smooth.
To assemble, I spoon about 1 tablespoon of crushed Nilla Wafers into the bottom of each 4-ounce dessert cup. I add a layer of pudding, followed by a few banana slices. I repeat the layers until the cups are nearly full, ending with pudding on top.
I finish each cup with crushed wafers and a dollop of whipped cream. The cups chill in the fridge for at least 2 hours before serving, giving the flavors time to settle and soften together.

Fresh Fruit and Yogurt Parfaits
When I want something lighter that still feels put together, these fruit and yogurt parfaits are my go-to. They’re fresh, colorful, and quietly satisfying without pretending to be dessert’s serious cousin. They look great in clear cups and come together fast, which is always a win.
Ingredients
You will need two cups of plain or vanilla yogurt, the kind that is smooth and easy to eat with a spoon. For sweetness, use 1/4 cup honey or maple syrup, adjusting as needed. You’ll also need two cups of fresh fruit and one cup of granola for crunch. Berries, diced mango, or sliced kiwi all work beautifully here.
Instructions
I start by stirring the honey or maple syrup into the yogurt until it tastes just right. This step matters more than people think. You want the yogurt lightly sweetened, not dessert-level sugary.
To assemble, I add about 1 tablespoon of granola to the bottom of each 4-ounce dessert cup. Next comes roughly 2 tablespoons of sweetened yogurt, followed by about 1 tablespoon of fresh fruit. I repeat the layers until the cup is full, keeping the final layer light and balanced. This recipe makes around 6 parfait cups, depending on how generous the layers get.
I serve these right away so the granola stays crisp and the fruit stays fresh. If I’m setting them out for a brunch table, I’ll sometimes add an extra sprinkle of granola or a few fruit pieces on top so they look finished without feeling fussy.
These parfaits work as breakfast, a snack, or a lighter dessert. They’re easy to adjust with whatever fruit is in season, which makes them feel flexible instead of fixed.
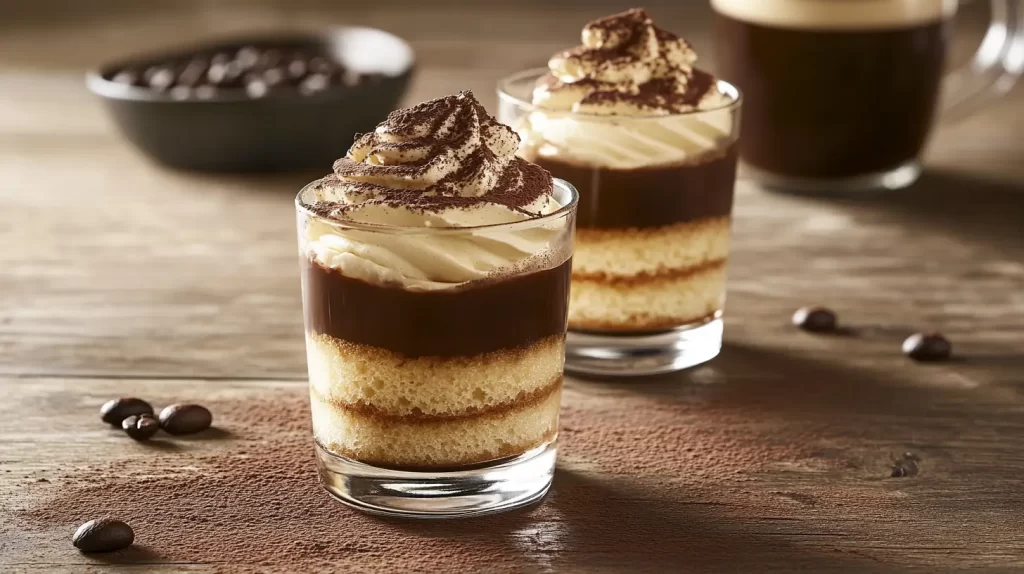
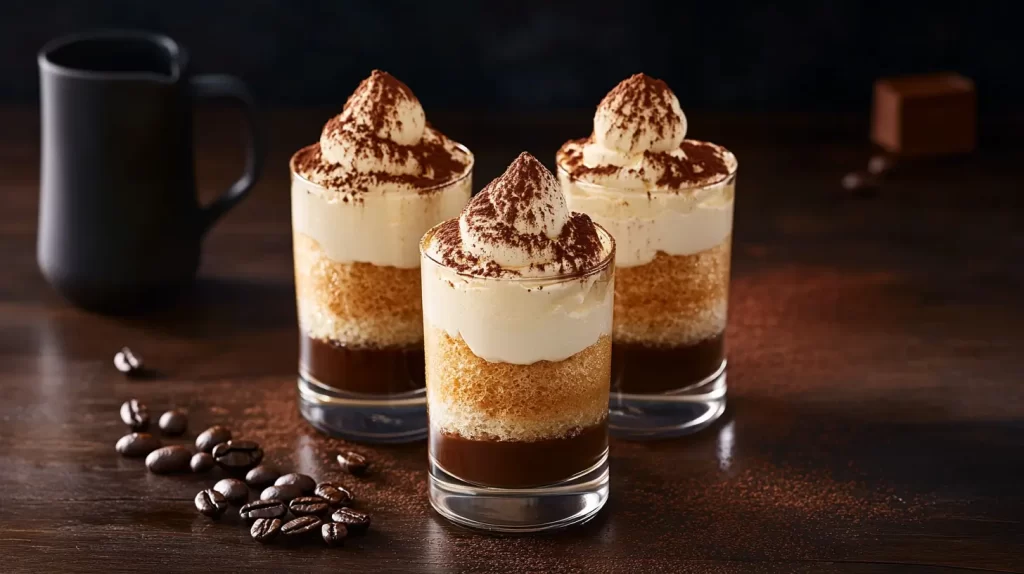
Tiramisu Cups
These tiramisu cups are what I make when dessert needs to feel a little dressed up without becoming a project. They’re rich, creamy, and unapologetically classic, but serving them in small cups keeps everything neat and intentional. Same flavor, less pressure.
Ingredients
If you’re using coffee liqueur, you’ll need 1 cup of strong brewed coffee that has cooled down completely and 2 tablespoons of coffee liqueur. To make the filling, get 1/2 cup of powdered sugar, 1 teaspoon of vanilla extract, and 8 ounces of mascarpone cheese. You’ll also need 1 cup heavy whipping cream, whipped to stiff peaks, plus 12 to 15 ladyfinger cookies. For finishing, use about 2 tablespoons unsweetened cocoa powder, with dark chocolate shavings if you want extra flair.
Instructions
I start by mixing the cooled coffee and coffee liqueur in a shallow dish, then set it aside so it’s ready when I need it.
For the filling, I mix the mascarpone, powdered sugar, and vanilla until smooth and creamy. Once that’s ready, I gently fold in the whipped cream. Slow and steady here matters. This is what gives tiramisu its soft, cloud-like texture.
To assemble, I break the ladyfingers into pieces that fit the bottom of 4-ounce dessert cups. I dip each piece quickly into the coffee mixture, just long enough to soak without turning soggy, then layer them into the cups. I spoon about 2 tablespoons of mascarpone filling over the cookies, then repeat with another coffee-soaked layer and finish with mascarpone on top.
The cups chill in the fridge for at least 4 hours, or overnight if time allows. Right before serving, I dust the tops with cocoa powder and add chocolate shavings if I’m feeling generous. These tiramisu cups feel elegant, indulgent, and quietly impressive every single time.
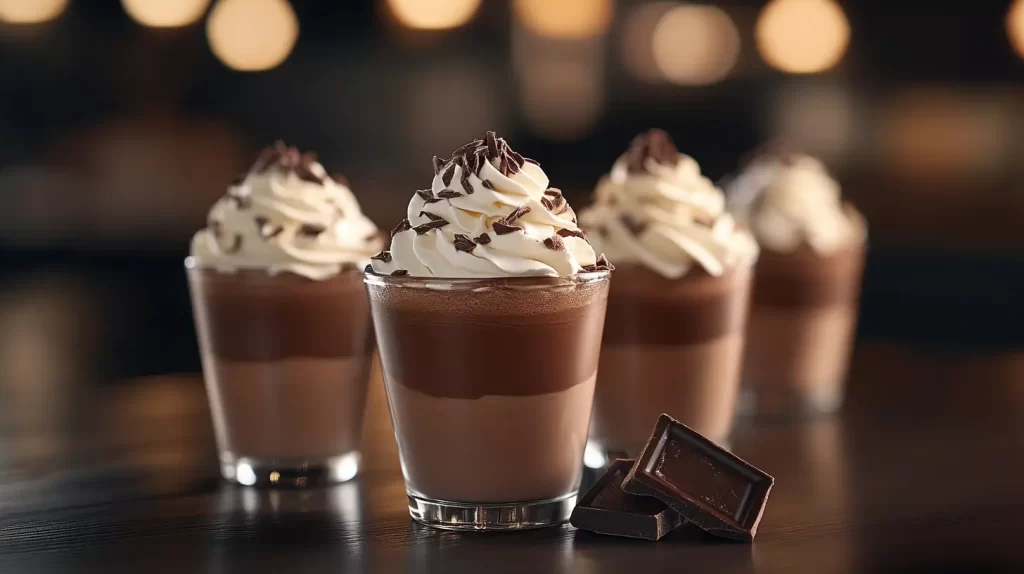
Decadent Chocolate Mousse Cups
For something truly indulgent, these chocolate mousse cups deliver a rich and creamy experience that feels like a fancy restaurant dessert.
Ingredients:
- 1 cup semisweet chocolate chips
- 2 tablespoons butter
- 1 cup heavy whipping cream, divided
- 1/4 cup powdered sugar
- Whipped cream and chocolate shavings for garnish
Instructions:
- Melt the chocolate: In a microwave-safe bowl, melt the chocolate chips and butter in 30-second intervals, stirring after each, until smooth. Let cool slightly.
- Whip the cream: In a chilled bowl, whip 3/4 cup of the heavy cream with powdered sugar until stiff peaks form.
- Combine the ingredients: Fold the whipped cream into the melted chocolate until fully combined and smooth.
- Assemble the cups: Spoon or pipe the mousse into 4-ounce dessert cups, filling them about three-quarters full. This recipe makes about 6 to 8 servings.
- Chill before serving: Refrigerate for at least 2 hours before serving. Top with whipped cream and chocolate shavings.
These elegant cups are perfect for date nights, dinner parties, or any time you want to impress your guests.
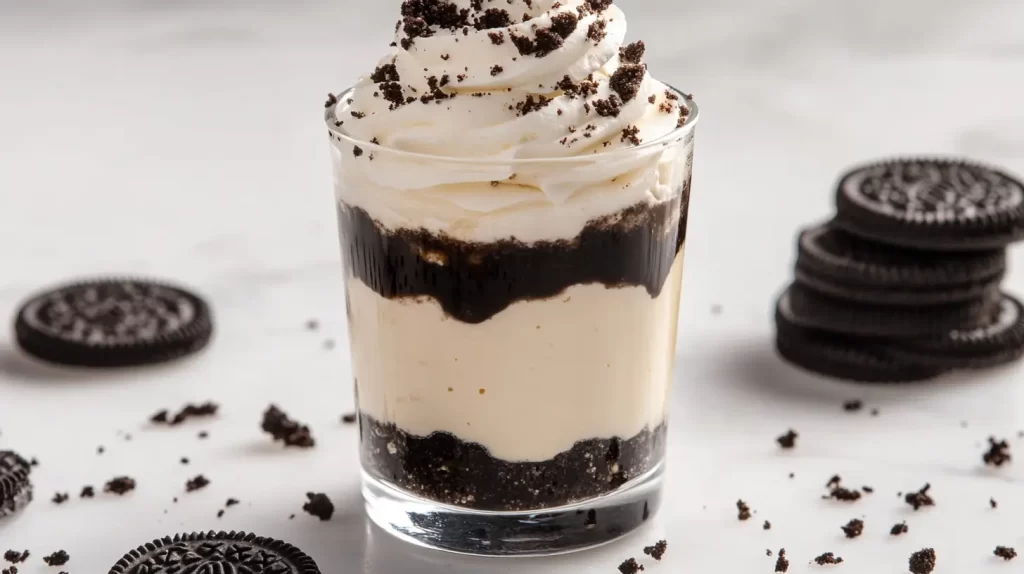
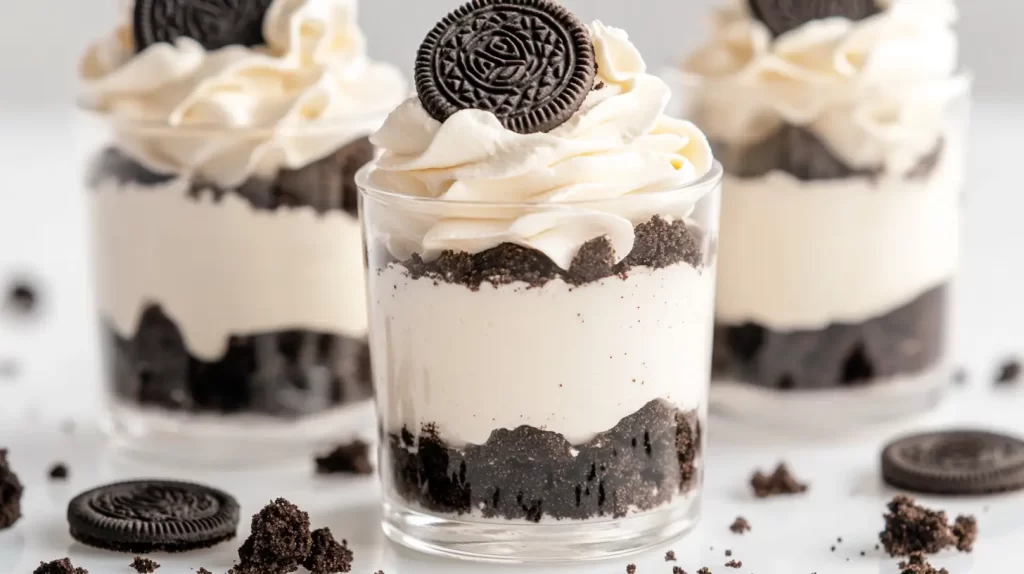
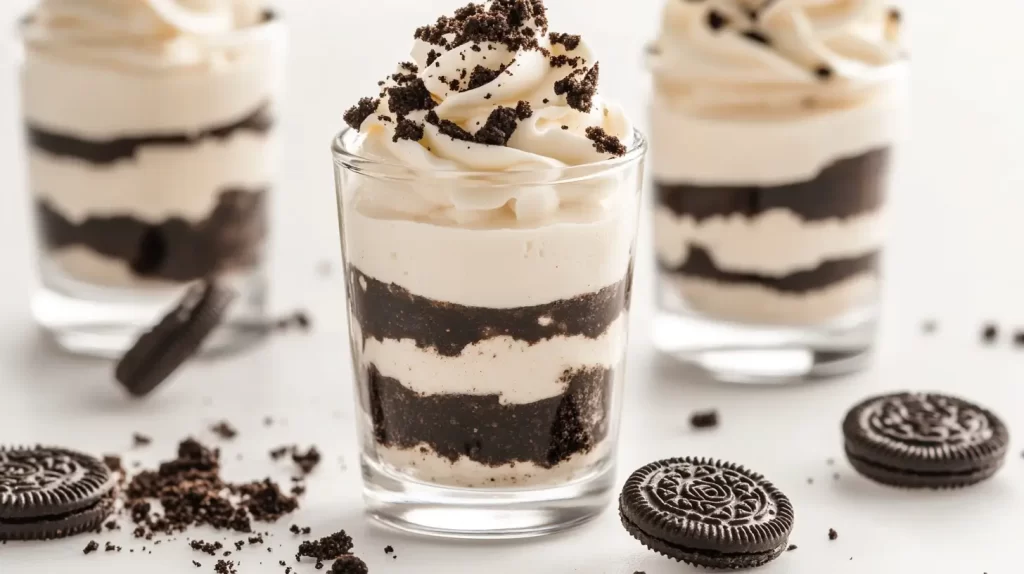
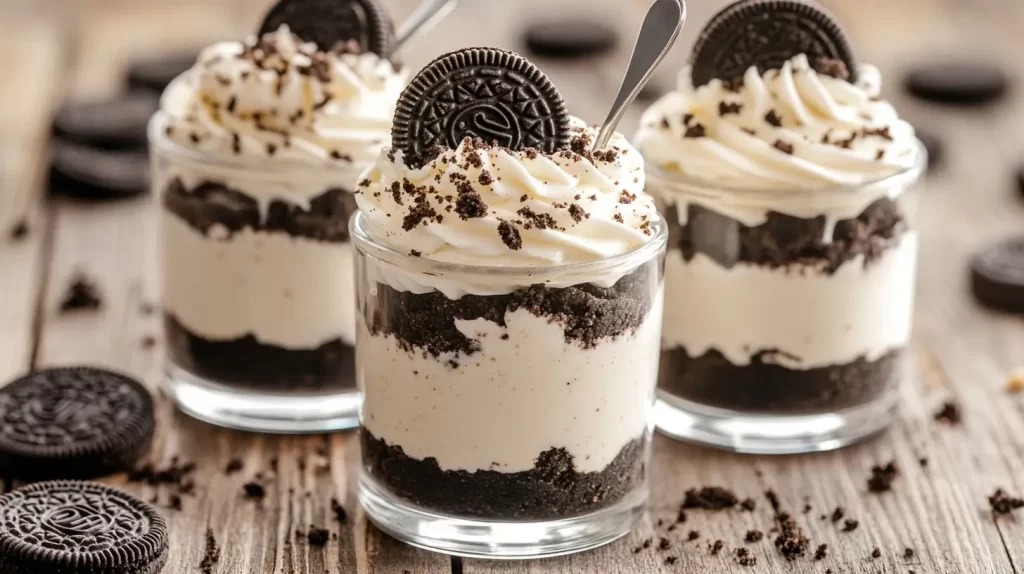
Oreo Dessert Cups
Oreo dessert cups are a creamy, chocolatey dream for any Oreo lover. These no-bake treats are easy to prepare and perfect for serving in individual 4-ounce cups, making them a hit at parties, potlucks, or family gatherings.
Ingredients:
- 20 Oreo cookies, crushed (plus extra for garnish)
- 3 tablespoons melted butter
- 1 (8-ounce) package cream cheese, softened
- 1/2 cup powdered sugar
- 1 teaspoon vanilla extract
- 1 cup heavy whipping cream, whipped to stiff peaks
- 1/4 cup mini chocolate chips (optional, for garnish)
Instructions:
- Prepare the crust: In a bowl, mix the crushed Oreos with the melted butter until the mixture resembles wet sand. Spoon about 1 tablespoon of the mixture into the bottom of each 4-ounce dessert cup and press it down gently to form a crust.
- Make the filling: Beat the cream cheese, powdered sugar, and vanilla extract in a large bowl until smooth. Fold in the whipped cream until fully combined and fluffy.
-
Assemble the cups:
- Add a layer of the cream cheese mixture (about 2 tablespoons) over the Oreo crust in each cup.
- Sprinkle a layer of crushed Oreos (about 1 teaspoon) over the filling.
- Add another layer of the cream cheese mixture, filling the cup to just below the rim.
- Garnish and chill: Top each cup with a sprinkle of crushed Oreos and mini chocolate chips for decoration. Refrigerate for at least 2 hours to allow the dessert to set.
- Serve and enjoy: Serve these chilled Oreo dessert cups and watch them disappear in no time!
These Oreo dessert cups are creamy, rich, and packed with the iconic cookies-and-cream flavor everyone loves. Plus, their layered presentation makes them as visually stunning as they are delicious!

Tips for Perfect Dessert Cups
- Use clear containers: Glass or clear plastic cups showcase the beautiful layers and make your dessert look even more appealing.
- Prep in advance: Most dessert cups can be made ahead of time and stored in the fridge, saving you stress on party day.
- Get creative with layers: Mix and match flavors, textures, and colors to keep things interesting.
- Portion control: Dessert cups are great for serving the right amount of sweetness without overindulging.
Final Thoughts
Dessert cups are more than just a sweet treat—they’re a creative way to serve up something special for any occasion. Whether you’re whipping up a quick no-bake cheesecake, a playful dirt pudding, or an elegant tiramisu, these mini desserts pack a big impact. They’re easy to assemble, fun to customize, and perfect for making ahead of time, so you can focus on enjoying your event instead of worrying about dessert.
What makes dessert cups truly shine is their versatility. From kids’ birthday parties to fancy dinner gatherings, they’re a dessert that fits every mood and moment. Plus, the individual servings make them as practical as they are beautiful. Your guests will love the look, and you’ll love how simple they are to prepare.
After raising five kids in Orlando, I’ve learned that dessert cups earn their place when they look impressive, survive the heat, and still feel fun instead of fussy, which is probably why they always perform so well on Pinterest for parties and gatherings.
So whether you’re a seasoned baker or just someone who loves a good dessert, these recipes are your go-to guide for creating show-stopping treats. Grab your favorite cups, gather your ingredients, and start layering—you’ve got this! Your next dessert table is about to be the talk of the party.